24 July 2010

Falafel with Lemon Tahini Sauce

Falafel. You just can't say anything bad about it. I friggin' LOVE it! I've been on vacation for the last few weeks, and had some falafel while I was gone. Since I got home a couple of days ago, it's all I could think about. So, I decided to ask for a little help from some fellow food bloggers (floggers?) and sort of combined a mish-mash of their recipes to make my own special mix. I've never fried anything before, so I was a little nervous, but it turned out really, really well. This is definitely going to be a permanent recipe in my repertoire!!

I didn't use canned/tinned chickpeas. I used dried chickpeas that I soaked for 18 hours in a large bowl of water. So, I can't guarantee how they would turn out if you used the canned variety. I bought my dried chickpeas from an organic vendor at my local farmer's market, but you can also find them in the ethnic foods aisle near the Middle Eastern and Mediterranean foods. Since I soak dried beans, this isn't really a dish you can just decide to whip up and eat right away...it takes a little planning. But, it is worth it and I swear you will not regret the time it takes to soak the beans. Another little tidbit: I didn't measure my spices, but I am pretty good at estimating amounts for recipes. But, as always, taste as you go so you get the tastes you like.

I used grapeseed oil for my frying, but you could use veg oil or peanut if you really want. I chose grapeseed because it has a very mild taste and less fat than some other oils. It is somewhat expensive if your store is like mine and has very little selection (they only had 1 brand of this oil), but you may have more luck at a WholeFoods. I used a deep saucepan so that I wouldn't have oil spatter all over my stove. I only put about 1 1/2 inches of oil into my pan. You may want to go deeper if you choose to make falafel balls instead of patties. Either way, you want the oil to just cover the falafels. I suggest using a candy/frying thermometer because you want your oil to be 350 degrees F in between batches. It's important that your oil doesn't get too cool or too hot between batches.

Here's My Recipe (Makes about 20 falafel patties that are 1 1/2 inches in diameter):

Ingredients:
  • 1/2 lb dried chickpeas (also called garbanzo beans)
  • 1/2 cup diced red onion
  • 3 garlic cloves (2 for falafel & 1 for sauce)
  • Oil for frying (again, I used grapeseed oil)
  • 2 TB dried parsley flakes
  • 1 TB sea salt
  • 3 TB fresh lemon juice (1 for falafel & 2 for sauce)
  • 1/4 tsp cracked pepper
  • 1/2 tsp coriander
  • 1/2 tsp cumin
  • 1/4 tsp turmeric powder
  • 1/8 tsp smoked paprika
  • 1 1/2 tsp chili powder
  • 1/4 tsp cayenne pepper
  • 1 tsp garlic powder
  • 1 tsp baking soda
  • 1/4 cup tahini
  • 1/4 cup water

Method:

  1. Soak your chickpeas for at least 12 hours, but I suggest a bit longer because mine were still sort of hard at 12 hours. I liked mine at 18 hours best. Put your chickepeas in a large bowl and cover with water until the water is 2 inches higher than the beans. Cover and let set on counter or in fridge for your selected time. Then, drain well and put chickpeas into a food processor.
  2. Add onion, 2 cloves garlic, parsley, salt, pepper, 1 TB lemon juice, coriander, cumin, turmeric, paprika, chili powder, cayenne and garlic powder into the food processor. Pulse repeatedly until the mix isn't pureed, but is getting kind of close. You'll need to scrape down sides of the food processor several times. Add baking powder and pulse a bit more. Taste frequently and adjust the spices until it tastes good to you.   
  3. Put the oil into your pan and heat on medium-high heat until the oil reaches 350 degrees F. Meanwhile, use your hands to shape your mixture into either patties or balls. I suggest making them while the oil heats because these cook really fast and you won't have tons of time between batches. I also turned my oven up to 225 degrees F. and put a paper towel-lined cookie sheet on a rack. Putting the cooked falafels on the sheet will keep them nice and warm in-between batches.
  4. I could put 4 falafel patties in my pan at one time. Leave room so they aren't touching so they don't get raw spots or get stuck together. It took about 2 minutes on the first side and 2 on the second side. Also, because I am wary of hot oil, I used a slotted spoon to put the patties into (and take them out of) the oil. No splashing or worrying about getting burned for me. Remove from the oil when the falafels are a dark brown and place them on the cookie sheet in the oven.
  5. Let your oil heat back up to 350 degrees F before you add more patties into your oil.
  6. When all of your patties are cooked and are in the oven, it's time to make your sauce. In a bowl, whisk together tahini, water, 2 TB lemon juice, 1 minced garlic clove and salt/pepper. Should be thick, yet thin enough to drizzle (in my humble opinion).
  7. Serve your falafels on a pita with sauce and veg or just eat them with the sauce and a fork. Either way, you will love them!

30 June 2010

Veganism and the Archives

As you may or may not know, I have recently converted to a vegan diet (no dairy, no meat, no animal products whatsoever).  I will be leaving my omnivore archives open as some people still visit them, but for the foreseeable future, I will only be posting new vegan recipes.  I'm not here to convert anyone or make anyone feel bad about their choices, I'm only here to share great recipes that I love. 

I really love this way of eating.  It makes my body happy, energized, and healthier than its been in quite some time.  I'm hoping this doesn't dissuade you from returning to this page, and if it does, I'm sad to see you go.  This is just another step in the adventure of my life and I'm glad I can share it with everyone.  

28 June 2010

Pesto Pasta with Toasted Walnuts

June 27, 2010


I love basil. A lot. My two small basil plants have been flourishing this summer, and I was feeling inspired. So, I chopped almost all of the leaves off and decided to make some pesto. I had never before made pesto, but it turned out really tasty...even the somewhat picky husband couldn't quit dipping bits of baguette into it. I sliced my baguette into little rounds, brushed a dab of extra virgin olive oil on each slice, then sprinkled some garlic salt on top. Then I baked them at 375 degrees F for about 10 minutes or so to crisp them up into little garlic toasts. They go perfectly with the pesto pasta!
I didn't have a ton of basil, probably only about 2 cups of whole leaves, so this recipe doesn't make a big portion. I also gave up dairy recently, so I didn't use any parm cheese, which is traditional for this dish. As one last little note, I don't like pine nuts, so I substituted walnuts instead.

Here's the Recipe: (serves 2 as a main dish)

Ingredients:

  • 2 cups fresh basil leaves
  • 1/3 cup walnuts for pesto (more if you're going to garnish your plate with them)
  • Juice of 1/2 lemon (mine was extra juicy, so you may need a whole lemon's juices)
  • 1-2 TB extra virgin olive oil (add more if you want. I was trying to keep it lighter in calories)
  • 3 cloves garlic, skins removed but kept whole
  • salt to your tastes
  • 4 oz. pasta of your choice (I used penne)

Method:

  1. In a small pot, boil some salted water, then add your pasta.
  2. Meanwhile, place your walnuts into a skillet. Place skillet on medium heat, stirring often for about 6-9 minutes. Remove from heat when you start to smell the nuts toasting (careful not to burn them).
  3. Place the basil, walnuts, garlic cloves, olive oil and lemon juice in a food processor and whir until there are very little pieces remaining. I like some texture to my pesto. You may need to stop and scrape the sides down and whir some more to ensure there are no large chunks of garlic remaining. No one wants to bite into a big hunk of raw garlic.
  4. Add the salt and whir once more.
  5. Drain your pasta and return to pot. I added about 3/4 of the pesto to the pot and stirred well, coating all of the noodles.  I actually turned the burner on low for a few minutes to gently heat the pesto.
  6. The other 1/4 of the pesto is excellent for dipping your little garlic toasts into...or just add it to your pasta.

26 June 2010

Crunchy Kale Chips


I've done it.  I jumped on the kale chip bandwagon.  I like kale, yes, even raw.  So, I decided I had to try out the baked kale chips everyone seems to rave about.  And, let me tell you, I was not disappointed.  They are crispy and delicious.  I ate half a bunch of kale chips with my lunch today.  They made a simple, healthy replacement for my beloved potato chip.  I literally couldn't stop munching them until I saw that nearly 2/3 of a bunch of kale was gone.  Even the skeptical husband ate some.  He liked the taste, but said the texture was "like eating paper," and it weirded him out.  Regardless, you can add any combo of spices and I think they'll probably still turn out deliciously.  For the first half bunch, I used garlic salt.  For the second half, I used garlic salt and some chili powder.  Both were wicked tasty.   Who ever would have thought that greens could be so delicious?

Here's My Version:
Ingredients:
  • 1 bunch kale (I used curly kale)
  • Olive oil (I actually used my olive oil cooking spray as it was less messy and quicker)
  • Spices of your choice, but you will want salt at least

Method:
  1. Preheat oven to 325 degrees f.  Get 2 baking sheets out and cover with parchment or cook directly on the sheet pan.
  2. Remove stems from kale and discard.  The easiest way, is to hold the stem in one hand and slide your fingers (of the other hand) up the stem, removing the curly leaf as you go.  Tear into 3-4 inch pieces.
  3. Wash your kale really well.  Mine had lots of grit/sand stuck on it.  Then, be sure to dry the pieces well with paper towel.
  4. Lay the pieces out on your baking sheets, try not to overlap much or they will not crisp up.** 
  5. Spray a light layer of your olive oil spray over the pieces to lightly coat them.  Then sprinkle your spices on top.
  6. Bake each tray about 10-12 minutes, testing their crunchiness occasionally.  You'll want them crispy, and lightly browned. 
**If you are using regular olive oil, place your kale pieces into a large bowl.  Drizzle 1-2 teaspoons of olive oil over the leaves.  Then, using your fingers, massage the oil onto the pieces until each is lightly coated with the oil.  Then place the pieces on the baking sheet and spice them up.

21 June 2010

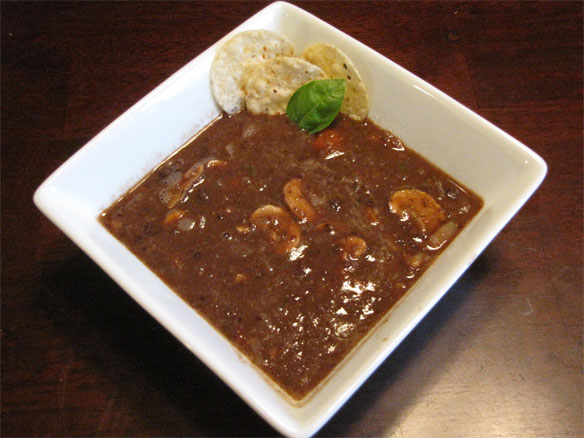
Smoky Black Bean Soup (Vegan)


Okay, so I'm hooked on a relatively new food blog called VeganPiggy, which has some really great recipes. And, the proprietors are super friendly! Anyway, I found a version of this recipe on their website, and I just HAD to make it. It turned out really, really well. And, I highly suggest using a smoked paprika instead of just regular paprika. This gives the soup a lovely smoky flavor that really complements the black beans nicely. I also LOVE using some tortilla chips instead of crackers with black bean soups for a bit of a southwestern flair. This recipe makes a ton of soup, which is good for me since I love leftover soups, and I also love to share my food with friends. I think the only thing I would change next time I make this soup is to add some fresh corn. Well, on to the recipe!!

Here's My Version: (serves 4-6 as a main course)

Ingredients:

  • 4 cans organic black beans, including their juices
  • 1/2 can organic diced tomatoes and its juice
  • 1 red onion, diced
  • 2 carrots, peeled and sliced thinly
  • 1 TB olive oil
  • 4 ounces fresh cremini or white button mushrooms, sliced thinly
  • 4 cloves garlic, minced
  • 6 medium-sized basil leave, chopped (you could use any fresh herbs you like or omit them altogether)
  • 1 cup organic vegetable stock
  • 1 tsp cumin
  • 1 tsp chili powder
  • 1 tsp smoked paprika
  • Sea salt and fresh cracked pepper to your liking

Method:

  1. Heat your oil in your stock pot over medium-high heat. Add the carrots, garlic, and onion, and saute for about 6 minutes (until the carrots have softened somewhat and the onion is translucent.
  2. While the veg is sauteeing, use a food processor to puree 2 cans of the beans and 1/2 of the tomatoes.
  3. When the veg is done ready, add in the vegetable stock, mushrooms, pureed beans, the rest of the whole beans, the herbs of your choice and the spices, including salt/pepper. You can make the soup spicier by adding more chili poweder, cumin and some cayenne if you want. Stir well.
  4. Bring soup to a boil (about 6-7 minutes), then turn heat to low and simmer for another 15-20 minutes or more. If you like it soupier/runnier, add more vegetable stock and cover with a lid. I like mine somewhat thick, so I leave the lid off to cook down some of the liquid. Be sure to stir the soup every few minutes so no beans burn to the bottom of your pot.
  5. Serve with some garlic bread or tortilla chips and enjoy!!