Showing posts with label Sandwiches. Show all posts

30 April 2012


Ever eat chickpea sandwiches? They're a staple in my world. I love taking them for lunch at the library because they don't make your bread soggy (I absolutely cannot deal with soggy bread) and the flavor seems to get better as it sits. As for the bread, I never much took any interest in foccacia, but the fella came home with a giant, flat loaf from the store today. I wondered what the hell I was going to with it. Alas, I made a sandwich. And it was great. The foccacia was soft inside and chewy outside. Better yet, it was vegan!

This little recipe started with a recipe I found on Happy Herbivore's blog a couple years ago, and has constantly evolved ever since. This makes 1 sandwich, but I'll leave it up to you to double/triple/whatever.

What I used:
  • 1/2 can drained chickpeas (About 2/3- 3/4 cup)
  • 3 TB diced onion
  • 2 TB sunflower seeds for a little crunch
  • 1 TB Vegenaise vegan mayo
  • 1 1/2 TB dill relish
  • 1 tsp dijon mustard
  • 2 TB nooch
  • pinch of salt and pepper
  • 1/8 tsp dried dill
What I did:
  1. Put everything in your food processor and pulse a few times, until the mix holds together. If it's too dry, add a little more mayo or dijon mustard and pulse a few more times. Spoon the mix out onto some bread, top with some baby spinach (or lettuce) and a slice of tomato. Dig it.

05 February 2012

Tempeh Joes


I will warn you up front, I don't love sloppy joes. Never have and likely never will. But, my fella made a request for sloppy joes made with tempeh. Since he almost never makes such requests, I was happy to oblige. I cheaped out and used a can of sauce because I was in a rush, but I did make some little changes. And, I made some homemade buns, which were super yummy. Here's the link to the recipe I use (skipping the "wash" and instead brushing on some melted vegan butter after baking to keep the tops soft). As much as I don't generally enjoy joes, I do plan to try some lentil joes because I'm determined to find some kind of joes that I might possibly enjoy. The fella LOVED these tempeh joes a LOT...and he considers himself to be a Joe Aficionado of sorts. 

I used 1 1/2 blocks of tempeh. I cute it into cubes and steamed it about 8 minutes to take a little of the bitterness out of the tempeh. Then, I ran it through my food processor to cut it into little pieces. I minced 2 cloves garlic, diced 1/2 cup onion and 1/3 cup green bell pepper. I added those veggies into a skillet with a little oil and sauteed until the onions were transparent. After that, I added the tempeh to the skillet along with the can of sauce. Then I mixed in some garlic powder, onion powder, a pinch of cumin, some chili powder and a bit of sugar to mellow the tang of the sauce. Mix it all up and simmer for at least 5 minutes to get the flavors all mixed together. Serve with some mustard and tuck in. This should make about 6 large sandwiches.

13 December 2011

Vegan Grilled Cheese...Only Better


I was on twitter a few days ago, and my pal @Whitrae mentioned a sandwich that she made. It sounded bizarre, but being a curious chickpea, I had to make it. It was a Daiya, Tofurky and Tofutti grilled cheese. Odd, yes. Delicious, hell yes. I'm always on the lookout for new ways to make a grilled cheese as it is one of my oldest comfort food indulgences, and this really switched it up...in a good way.

Here's my version of Whitrae's comfort food favorite:
Slather the outsides of your bread with some Earth Balance. On the opposite side of one slice, spread some of the Tofutti cream cheese. Top with some Daiya cheddar and minced onion, then add a few slices of Tofurky (I used the thinly-sliced hickory smoked turky). Top with more cheese then the other slice of buttered bread. Then just make it like a regular grilled cheese in a skillet. Cook about 3 minutes on each side, until the bread is toasted and the cheese is melted.

And don't forget to thank Whitrae for her awesome idea. :)

09 December 2011

Chicken Ranch Wrap of Destiny!


Last week I got some absolutely fabulous large spinach wraps/tortillas, and I decided that since Gardein products are on sale at my grocery store, I'd go ahead and do a little experiment for dinner tonight. I've used the Gardein crispy tenders for all sorts of yummy meals (they're extra tasty with some mashed potatoes), so I felt confident making them into a tasty wrap tonight. Served with some sauteed zucchini, red onion and mushrooms, the wraps were quick, easy and filling dinner.

I just cooked the tenders in the oven, according to the directions on the package (430 degrees, cook about 22 minutes, flipping once during cooking). On the spinach wrap, I piled on lettuce, red onion, diced tomato and some ranch dressing. I usually make my own by just throwing some mayo, vinegar and spices together until it tastes good. Another rocking sauce combo for the chicken wraps is a blend of ranch and bbq sauce. Whatever way you choose, I'm sure you'll dig it. OH, and I make a tasty homemade Caesar dressing, which I also think would be spectacular next time I make the wrap.

I have nothing left to say, except that you should totally try making Gardein into some wraps. I don't think you'll regret it.

29 November 2011

Heavenly Tempeh Wrap


This is my 200th post here on this blog. Crazy. I always thought I would do something special for my 200th, but I completely forgot. Silly chickpea. So, anyway, I had a massive craving for tempeh that just wouldn't quit. I had some super tasty spinach tortillas and some ideas rolling around in my brain. Alas, this spicy and tangy tempeh wrap was born.

The wrap is crazy easy to make. It really takes almost no effort. You should totally make some. The sauce will seem pretty tangy on its own, but once you cook it with the tempeh and add your toppings, it'll go together surprisingly well. I know, the sauce sounds odd. Just try it. Now, I'm getting back to reading a book on my day off, so go make some food, dudes! Go forth and cook.

Makes 2 large wraps.

What you need:
  • 1 block tempeh, sliced into 1/2-inch slices
  • 1/3 cup ketchup
  • 1/4 cup soy sauce
  • 3 TB garlic chili pepper sauce (I used A Taste of Thai brand) You could sub sriracha maybe.
  • 1 tsp coconut oil
  • 2 large spinach wraps
  • toppings of your choice- I used Vegenaise, shredded carrot, red onion, romaine and a handful of baby spinach
What you do:
  1. Whisk together the ketchup, soy sauce and chili sauce in a bowl. Plop your tempeh in after the sauce is all mixed up. Then go ahead and let it all marinate for a few. I maybe left mine about 20 minutes. Ideally, I'd marinate it longer, but this worked just fine. 
  2. Heat a skillet over medium heat. Add the coconut oil. Once hot, add the sauced-up tempeh. Cook about 4 minutes on each side, until browned. You can spoon more of the leftover sauce on the tempeh while it is still cooking. I did. 
  3. Now fill your wrap however you want and tuck in.

21 November 2011

Daiya Grilled Cheese...Um, yum.


Yup. Looks great, eh? It was.

Why the hell have I never made a Daiya cheddar grilled cheese before? I feel like I have to eat 100 of them to make up for the last year of not eating it.

I'm kind of a weirdo when it comes to my grilled cheese sandwiches. I like to add a tiny bit of finely diced onion into them. And, here's the part that people have always teased me about: I love them dipped in ketchup. There, I said it. I'm out of the ketchup closet. The only other time I ever eat ketchup is with fries. Otherwise, I pretty much loathe it. But there is something magical about dipping grilled cheese into it. Do it. If you don't like it, then bugger off. It tastes like my childhood and I don't want it tainted with your poor taste.

07 April 2011

Split Pea Burgers & My Eco Craft

About a month ago, I bought some dried split peas and had no idea what to do with them, but I wanted to try them out. Well, I threw them in the cupboard and forgot about them until earlier today when I stumbled upon Alton Brown's recipe for split pea burgers, so I knew I had to make an attempt at them. As always, I have a serious inability to follow recipes. I always have to give them my own spin and make changes based on my tastes as I am a picky chickpea with particular tastes. And, I have to say, I rocked this recipe out. It was a serious hit at my house. As you can see in the photo, I made some baked tater tots. What you can't see is the amazing queso dip I made to dip the tater tots into. WHOA. Seriously yum.

Makes 4 average-sized burgers

Ingredients:
  • 1/3 cup diced onion
  • 1/4 cup orange bell pepper, diced
  • 1 TB olive oil
  • 3 cloves garlic, minced
  • 2-3 ounces sliced mushrooms
  • kosher salt to your tastes
  • 1 1/2 cups vegetable broth
  • 1/2 cup dried split peas
  • 1/4 cup raw brown rice
  • 3/4 tsp coriander
  • 3/4 tsp cumin
  • black pepper
  • 1/2 tsp onion powder
  • 1/2 tsp garlic powder
  • 1/2 cup bread crumbs plus 2-3 TB for coating the burger before cooking
  • 2 TB vital wheat gluten
Method:
  1. Heat the oil in a large saucepan over medium heat. When hot, add the onion, bell pepper and some salt. Let them cook about 4 minutes. Then add in the mushrooms and garlic and cook another 4 minutes. 
  2. Then add the peas, rice, broth, and spices and stir well. Turn heat to medium-high until the mix starts to boil. Then turn to medium-low and simmer about 40-50 minutes, or until the rice and peas are softened. Be sure to stir ever 5-10 minutes to make sure nothing sticks to the pan. There should be no liquid left when it is done.
  3. Remove from the heat and carefully pour the mixture into a food processor. Whir a few times, until the mix is chopped, but NOT pureed. I think I whirred it about 7-8 times total. 
  4. Pour the mix into a large bowl. Use a large wooden spoon to stir the 1/2 cup breadcrumbs and the gluten into the bowl. It should start solidifying almost instantly. Just mix until you can't see any dry breadcrumbs. Then put the bowl in the fridge for about 10 minutes.
  5. Pour the rest of the bread crumbs onto a small plate. Then remove the peas from the fridge and cut into 4 equal-sized pieces. Shape the pieces into round patties. Then, carefully set the first patty on the bread crumbs. Flip to coat the other side, too. Once they are all coated, you'll want to heat a large nonstick skillet over medium heat. Spray the skillet with a little cooking spray.
  6. Cook the patties for about 4 minutes on each side, or until the breadcrumbs are browned and the patties are cooked through.
I liked mine with some Vegenaise, raw onion and mustard, but you should dress the split pea burgers however you like. Though, my way is far superior. Hahaha.

And now, for my Eco-Craft:
A couple years ago, I made someone a scarf with this outrageously pink yarn, and had half a skein left over. I threw it in the closet and totally forgot about it until last night when I went looking for something else. I thought, "Hey, I should make something with this." So, I decided that instead of tossing out the obnoxious-colored yarn, I will make a dog/cat blanket. And, I am thinking that I'll donate it to the local animal shelter. They are always in desperate need of blankets and towels to line the cages and give the animals a little comfort. I don't know if the yarn I have will run out before I'm done, so it may end up being several different colors. But, who cares if it helps the animals!?!
What I am getting at though, is that instead of tossing out your old yarn, or other leftover crafting supplies, put it all together and make something else with it! Reduce your waste. So, here is what the blanket is looking like so far:


Have a kickass day!

    17 February 2011

    BBQ Tempeh & Homemade Baked Beans


    A couple weeks back, I decided to stock up on some plain tempeh from Trader Joe's, which I recently discovered I am in love with (the tempeh). I used up the smoked tempeh last week, which left me with 2 packages of the plain stuff. I've literally been trying to think of how I want to use it up for the last week. I am not old and senile, but I am indecisive. So, last night I started talking with some twitter pals about soaking some navy beans. I didn't know what to make with them, and several pals said to make baked beans. Ick.

    "But," they exclaimed, "they are a million times better when you make them from scratch! The canned baked beans are a sad representation of what real baked beans are all about."

    "Fine! I'll give it a shot, but I better not be wasting my fucking beans. Do you understand how hard it is to find good dried beans around here?" I complained. I'm clearly a 70-year old in a 30-year old's body. Get off my damn lawn!

    Well, I started wondering about what goes well with baked beans. And I remembered cookouts always seem to have baked beans with some sort of BBQ. And coleslaw. That is the fascinating story of how I ended up making not only BBQ sauce from scratch, but some baked beans and coleslaw. You will be quizzed. And it won't be multiple-choice, you whippersnappers.

    Today's recipe for BBQ sauce makes A LOT of sauce. I have no idea what to do with the rest of mine. The tempeh (depending on how you cut it) can make 3-4 sandwiches on normal-sized burger buns. The BBQ sauce recipe is adapted from this one. The baked beans made enough for 3-4 as a side dish. Who would eat baked beans as a main dish? Sheesh. The bean recipe is adapted somewhat from Veganomicon, but I did change several things, such as using soaked, cooked navy beans instead of canned, and changing up the spices somewhat. If you do decide to make both recipes at the same time, I suggest starting the BBQ sauce once you get the beans in the oven. This will get them both done at the same-ish time. See? I'm helpful. Sometimes.

    You can figure out your own coleslaw for now because mine wasn't perfect, but it made the cut for this dinner. I REALLY liked adding the creamy coleslaw onto the tempeh sandy, like a condiment. Clever, no? Yes, it is! This is my blog. I can say what I want!


    Ingredients for BBQ sauce:
    • 1- 8oz package of plain tempeh, cut into finger-sized pieces or whatever size you prefer
    • 1- 15oz can of tomato sauce (or use 2 of the small cans)
    • 1 small-medium yellow onion, diced small
    • 1 TB olive oil
    • 1/2 heaped tsp red pepper flakes
    • 1 tsp cumin
    • 1/2 tsp cayenne pepper
    • 4-5 cloves garlic, minced
    • 1/2 cup ketchup
    • 1/2 cup plus 2 TB brown sugar
    • just under 1/2 cup molasses (not blackstrap)
    • 2 TB spicy brown mustard
    • 3 TB regular yellow mustard
    • 1/2 tsp or so of black pepper
    • 1/2 tsp coriander
    • 1/2 tsp garlic powder just because
    • 1 1/2 TB Braggs liquid aminos (or soy sauce)
    • 1/2 tsp liquid smoke
    • A pinch of kosher or sea salt to your tastes
    Method for the BBQ sauce and Tempeh cooking:
    1. Heat a large sauce pan or deep skillet over a medium heat. Add the oil, cumin and red pepper flakes. Let the oil heat through...maybe 3-5 minutes. Add in the onions and let cook about 6-8 minutes. You want them transparent and soft. I even let mine caramelize a tiny bit. 
    2. While the onions were cooking, I got a bowl and whisked together the rest of the ingredients (except the minced garlic). Always be prepared or something. 
    3. Okay, onions are cooked. Add the garlic and cook 2 minutes. It'll be nice and fragrant. 
    4. Add the bowl of ingredients I made you prepare. Haha. You're welcome. Stir well and scrape any bits from the bottom of the pan. I just used a whisk because it was easiest and I didn't want to get another utensil. 
    5. Let cook over medium heat, stirring occasionally for about 30 minutes, so it thickens a bit. I do suggest that once it starts bubbling, you turn the heat down to just under medium heat. Otherwise the bubbling could make a mess. I got sauce in my hair, if that is any indication. And, while I'm quite short, that sauce got some serious air. So, you've made sauce. Congrats.
    6. Preheat your oven to 375 degrees F (I should have maybe told you that already). Lightly oil a baking dish of some sort. I used an enameled stoneware baking dish. Pour about half of the BBQ sauce into the dish. Then drop your tempeh fingers in. I used my fingers to flip the tempeh around in the sauce to cover all sides in said sauce. But, if you are a germophobe or whatever, you may use tongs. I also used a spoon to scoop lots of sauce onto the tops of the tempeh. Cover dish with foil. Bake about 30 minutes. Or until the fingers are somewhat tender and have absorbed a bit of the BBQ sauce.
    7. When I put the tempeh slices on my bun, I slathered on a bit more of the leftover sauce that had cooked in the dish. Holy yum. Then, topped it with some coleslaw and a bit of yellow mustard. It was ridiculously messy, but SO worth it. 
    Now, on to the beans. I assume you have already soaked them overnight. Mine tend to soak close to 18 hours before I cook them. Then, put them in the pot with fresh water and about a TB of salt. Stir it all up. Put the lid on, askew, to let the steam out. Cook the navy beans for about an hour over medium heat. But, test for doneness. yours may take longer or less. I dunno! SO, your beans are cooked. Lets get started with the rest of the recipe.


    Ingredients for the baked beans:
    • 1 1/2 cups cooked and drained navy beans (or 1 can, drained and rinsed)
    • 1 small white onion, minced
    • 3 cloves garlic, minced
    • 1 - 8oz can of tomato sauce
    • 1/4 cup molasses (not blackstrap)
    • 1 1/2 tsp mustard powder
    • 1/2 tsp coriander
    • 1/4 tsp salt
    • 1/8 tsp allspice
    • 1/8 tsp red pepper flakes
    • dash cayenne
    • 1/2 tsp garlic powder
    • 1 bay leaf (don't forget to remove it before serving the beans!)
    • 1 tsp Braggs (because I'm a junky for the stuff)
    • some black pepper to your tastes
    Method for the baked beans:
    1. Find yourself an oven-proof pot with lid. I used a small enameled cast-iron dutch oven. Heat the pot over a medium burner and add the oil and red pepper flakes. Then add the onion and cook until the onions are translucent. 5-7 minutes. Now add the garlic. Cook another couple of minutes until some of the onions are just starting to turn golden. 
    2. While the onions are cooking, add all the other ingredients (except the beans) to a small bowl and whisk to combine. 
    3. Once the onions are browned a smidge, add the sauce you just mixed up. Stir well and dislodge any bits from the bottom of the pan. Cook about 5 minutes this way. Then turn the burner off.
    4. Add the beans and mix well. Pop the lid on the pot and cook on the center rack of oven 60 minutes total. BUT, halfway through, pull them out and give them a good stir. Take a moment to taste them and adjust your spices. Then put the cover back on and cook another 30 minutes. Fish out the bay leaf and toss it in the trash. Done!

    12 February 2011

    Spicy Black Bean Burgers (aka-I'm a master beaner)


    I was a black bean virgin. I had never cooked black beans. Don't judge me! So, anyway, last night I decided to soak a heaping cup of them and just see what I could come up with today. I puttered around with a few ideas, but I wanted to challenge myself to make a non-sucky black bean burger. If you've tried many bbb's, you'll likely agree that they are typically either dry and crumbly or mush. So, the challenge was on. And guess what?!? Well, you probably actually guessed it since I'm blogging it. But here it is anyway: I fucking rocked it.

    I'm not sure what other toppings you might want to use, but I really enjoyed some salsa and guacamole with a little red onion. I suppose you could try other toppings, but, really, why would you? Take my word for it and use the guac/salsa combo. As a side, I made some nachos. Just spread some refried beans on tortilla chips (be sure to get the ones that say vegetarian otherwise you're going to be eating lard...for real). Then, sprinkle a bit of Daiya cheddar, onions, whole black beans and any other toppings you want. Bake at 375 degrees F for about 8 minutes. Then, add on any guac, salsa, or sour creme you might want.

    Makes 4 regular-size patties.

    Ingredients:
    • 1 1/2 cups cooked black beans
    • 2/3 - 1  cup bread crumbs
    • 3-4 TB vital wheat gluten
    • 3 cloves garlic
    • 4 button mushrooms, chopped
    • 1/4 cup (slightly heaping) onion, diced
    • 3 TB orange bell pepper, diced
    • 2 TB Braggs liquid aminos (or soy sauce)
    • 3-4 TB liquid taco sauce, medium
    • 3/4 tsp cumin
    • 1/4 tsp red pepper flakes
    • 1/4 tsp onion powder
    • 1/2 tsp garlic powder
    • 1/4 tsp cayenne pepper
    • 1/2 tsp liquid smoke (optional) or some smoked paprika would work
    • pepper, though I would not add salt as the Braggs and taco sauce are both salty already
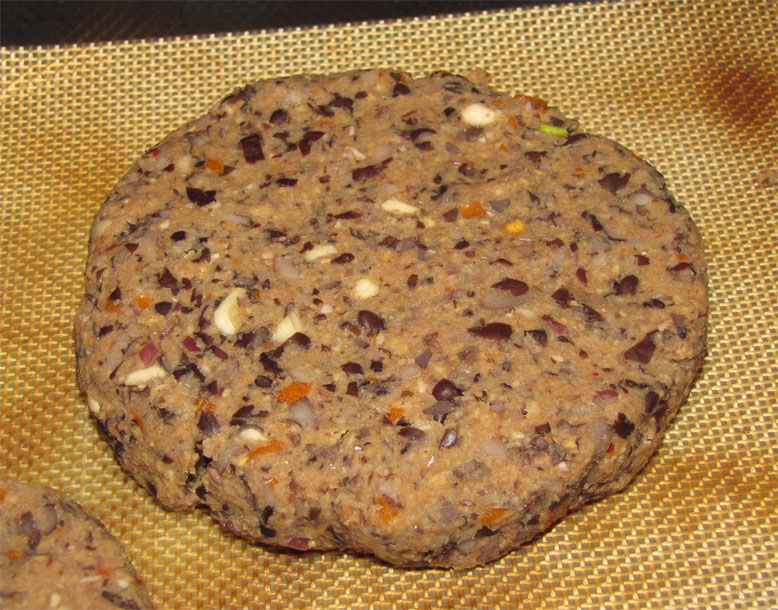
     Patty before it was cooked
    Method:
    1. Preheat your oven to 375 degrees F. Line a baking sheet with whatever you typically use...silicone mat, foil, parchment. Then spray it with a smidge of cooking oil.
    2. Put your beans, onion, mushroom, red pepper, garlic, Braggs, taco sauce, liquid smoke and dry seasonings into a food processor. Pulse about 10-15 times, or until your beans are no longer whole. It will be kind of juicy, but don't worry, we'll get to that.
    3. Scoop out of the processor and into a large-ish bowl. 
    4. Add the gluten and the breadcrumbs and combine with your hands. You'll want to add 3 TB of the gluten and 1/2 cup of the breadcrumbs right off the bat. Then add more until the the bean mix all sticks together firmly and can easily be shaped into patties that don't fall apart when handled. I probably used about 3 1/2 TB gluten and 3/4 cup of the breadcrumbs total. But, depending on how juicy your mix is, you may need more or less. 
    5. Now, shape into patties that are no more than 3/4 inch thick and set on your prepped baking sheet. I sprayed a tiny bit of oil on the tops of the patties to help them crisp a bit.
    6. Cook on the middle rack for about 15 minutes. Then, carefully flip your burgers (I spritzed a bit more oil on the top) and return to oven another 12-15 minutes. You want the burgers browned somewhat. They will be crispy around the edges and firm in the middle.
    So, there you go. Make it. Or not. I can't make all your decisions for you! Sheesh. But, I can say that you'd be a fool if you didn't like my burgerz.

    16 January 2011

    Tempeh Bacon Sandy - aka TLT

    Who doesn't love a good, smoky BLT, I ask? Well, vegans. But, many do enjoy bacon substitutes... sometimes. Alright, alright, I have a confession. I used to be scared as hell of faux meats, and still kind of am. Really. Leave me alone. I had a serious aversion to meat back in the day, so my meat aversion carried over into the faux meat category; sue me. My view on fake bacon changed somewhat when I went to The Pulse Cafe in Somerville, Mass and tried their TLT. Whoa. Holy yummy. That shit was life-altering to this scaredy cat.

    When I got back home, I asked around and got a suggestion for making a smoky-flavored tempeh since I can only buy plain tempeh locally. It sounded like a pain to marinate for hours, but, really, I was just being a crybaby. It was fucking easy. You cut the tempeh, mix the marinade, put it in the fridge and then put it in the oven. Easy. Don't be lazy. *whip cracking*

    If you're looking for crunchy bacon, well, I can't really help you. Maybe if you cut the tempeh super duper thin, it will work, but I don't really care as I like it kinda chewy. This recipe works to make about 12-15 slices of tempeh bacon. Maybe you can make more. Who knows!

    I absolutely recommend finding some nice sourdough for your sandy. I like to lightly spray each side of each slice with a bit of an olive oil cooking spray and then grilling (frying?) it in my nonstick skillet over medium heat to crisp it up. It should look like this:


    The recipe makes enough for at least 2 rather large TLTs in large sourdough slices. I'm only giving you my take on the tempeh bacon, as I am hoping you are not so stupid as to not know how to assemble as sandwich on your own. I hope this is not a mistake on my part. HA.

    Ingredients for Tempeh Bacon:
    •  1 - 8oz package of plain tempeh
    • 1/4 cup braggs liquid aminos
    • 2 1/2 TB apple cider vinegar
    • 1 1/2 tsp brown sugar
    • 1 1/2 tsp maple syrup
    • 1/2 heaping tsp cumin
    • 1/2 tsp chili powder
    • 1/4 tsp pepper
    • 2 1/2 tsp liquid smoke
    • sprinkle of salt 
    Method:
    1. Lay the tempeh slices in some baking dishes, close, but not touching.
    2. Get a small pot and put the liquid aminos, vinegar, brown sugar, syrup, cumin, chili powder and pepper on to a boil over a medium-high heat. Be sure to stir it well first, of course. Once boiling, mix in the liquid smoke and remove from heat. 
    3. Pour over the tempeh slices and marinate a moment. I flipped mine after about 15 minutes. Then cover with plastic wrap and put in your fridge. I think mine ended up marinating about 6 hours, though you can take yours out earlier, maybe. If not, don't blame me. I went all out on the marinating.
    4. Preheat your oven to 425 degrees F. Line a large baking sheet with parchment paper.
    5. Careful! Be gentle when transferring the bacon slices (again, no touching!) from the marinade dishes to the parchment-lined sheet. Then sprinkle the salt over top. Just a smidge else you will get hypertension. 
    6. Now put the sheet in the oven for about 10 minutes. Then, you're gonna need to get your tongs and flip the pieces over. I gave mine a quick spray with some cooking spray. I don't know why...sheesh. Lay off. Now put them back in the oven and cook about 8 more minutes, or until the pieces are all browned and stuff. 
    7. Now assemble your sandy. Though I doubt it could possibly be as good as mine! I kid. Not really.

    07 January 2011

    Coconut Bacon BLT!


    WHOA! My most favorite meaty dish ever was the BLT (Bacon, Lettuce, Tomato), which I have not had in a billion eons.  So, recently, I tried tempeh bacon in Boston (which was quite lovely), but, I decided today to try a recipe I've seen bandied about a lot recently on the internet: Coconut Bacon.  Who would've ever thought that coconut could be a suitable bacon substitute?  I sure as hell hadn't thought it.  But, my friend on Twitter, @VeganGoodThings wrote this killer recipe for coconut bacon.  So, being the BLT lover that I am, I tried it out.  And I love it.  I like the crispiness and the slight maple flavor. 

    I made 3 small changes to the original recipe:
    • slightly less maple syrup
    • instead of tamari, I used Braggs Liquid Aminos because that's what I had handy
    • I sprinkled mine with a bit of salt before baking
    It was shockingly good and made my house smell super yummy for hours afterward.  So, it is official, I'm a coconut bacon convert.  Though my favorite is still the tempeh bacon, the coconut bacon is simple and tastes lovely.  I think it would be good sprinkled in other dishes, like pastas or salads, or maybe even in some couscous dish.  Whatever you do with it, enjoy it. 

    22 October 2010

    Tu-Not Sammies


    YUMMM!! I never, ever thought a chickpea sandwich could taste like an old meaty comfort food from my distajnt past (tuna fish)...only better.  I was shocked to find a simple, delicious vegan recipe to take its place.  This is my very favorite sandwich of all time, and I make it at least once a week.

    I got the basis for this recipe here (HappyHerbivore-- one of my new favorite vegan blogs), but changed a few things to fit my own personal tastes. I definitely recommend using the nutritional yeast if you have some. If you're new to nutritional yeast, it is not the same stuff you use to bake bread with. This yeast has a cheesy-ish flavor and (to be frank) looks like fish food flakes. I buy the Braggs brand at my health food store, which has added B-vitamins. Do some research about B-12 if you're unsure of the nutritional needs of vegans and vegetarians. On to the recipe!!

    Here's My Version: Makes 2 Sandwiches

    Ingredients:

    • 2/3 cup soaked/cooked chickpeas, or use half of a can after you rinse and drain them
    • 2-3 TB diced onion
    • 1 tsp spicy brown mustard
    • 1-2 TB dill relish
    • 1 heaping TB nutritional yeast
    • 1 TB Vegenaise Mayo --You could use other brands, but Vegenaise is my favorite
    • 1-2 TB unsalted sunflower seeds
    • 1/2 tsp Braggs 
    • pepper to taste

    Method:

    1. Put everything in a food processor and pulse a few times to chop and combine the ingredients. I left mine kind of chunky, which was delicious! You can also use a fork and mash the chickpea by hand should the mood strike you. It never strikes me, so good luck with that.
    2. Taste and adjust. Feel free to add any other ingredients or seasonings. You're the one eating it, after all. I serve mine on toasted bread because it's awesome. Sometimes, though, I eat it straight out of a bowl with some crackers instead of on bread. Too much tastiness.