Showing posts with label sides. Show all posts

08 April 2013

Buffalo Chik'n Salad


I've never been a huge fan of salads, but I'm always up for a challenge, so I decided that I need to work on that. Enter: buffalo chik'n salad. In the words of a ridiculously-annoying-piece-of-shit-actor, "WINNING!" I have made this salad 3 times in the last week, so I think that says something.

I'm a recent fan of buffalo sauce, as I always thought I wouldn't like it. I tasted it once about a month ago, and I try to use it every chance I get. I use the bottled stuff, which appears to be much lower in calories than if I'd made it myself. The brand I got has 5 calories per tablespoon, so that's not bad at all. You can do the (chicken) chik'n a couple different ways, but I chose to brush the sauce onto the patty in between flippings. You can also cook the chik'n, and coat it in sauce at the end. I've done it both ways, but I like the first method better. It seems to allow the flavor of the sauce to cook into the chik'n better.

As for salad dressing, that's up to you. I prefer to blend a little vegan ranch with a tiny bit of avocado and drizzle it over the salad. It was awesome. But, you can do whatever your little heart desires.

Serves 2 as a main

What I used:
  • 2 Gardein Crispy Chik'n Filets
  • 3-4 TB bottled buffalo sauce
  • 1 tsp grapeseed oil
  • 2 cups baby spinach
  • 3-4 cups chopped romaine lettuce
  • 1 medium tomato, chopped
  • 1/4-1/3 cup red onion, diced
What I did:
  1. Heat a grill pan (or non-stick skillet) over medium-high heat. Add the oil. Once hot, add the chik'n filets. Cook about 3 minutes, then flip. Cook another 3 minutes, then carefully brush some buffalo sauce on the tops. 
  2. Turn heat down a bit to medium. Use tongs to very carefully flip your chik'n filets over. They will sizzle and pop. It's supposed to. Now, brush the top with sauce. After about 2 minutes, flip the filets again. I end up flipping the filets a couple times, brushing sauce on each time.
  3. Carefully transfer the chik'n to a cutting board and slice into strips.
  4. Get 2 plates and toss together the lettuce and spinach equally on each plate. Top it with the onions and tomatoes and then add the chik'n strips on top. Dress however you want.

06 April 2013

Roasted Buffalo Cauliflower


Fuck Yes! I finally went there. I've had deep-fried, breaded buffalo cauliflower, and absolutely loved it. But, being a chickpea who's afraid to deep fry (long story), I decided to take a "healthier" (see: safer) method to pig out on my favorite sauce and one of my very favorite veggies. For the record, this whole plate pictured above, including the avocado, is only 187 calories. It's 3 cups of cauliflower, about 3 TB of bottled buffalo sauce, and 1/3 of a small avocado.

If you look online, you'll find an assload of recipes for buffalo cauliflower, each more fancy and complicated than the next. I'm here to assure you that this is the easiest. It took zero effort. It's fucking healthy. You'll thank me.

The batch I made was intended for a whole meal for 1 person. So, I'm not giving you an exact recipe. Just do the following and you'll do just fine.

  1. Preheat your oven to 425 degrees. Prepare a baking sheet (I used a silicone mat, but you could definitely use parchment).
  2. Put cauliflower in a bowl.
  3. Pour buffalo sauce on cauliflower and flip it around to coat the cauli.
  4. Pour the cauli onto the baking sheet.
  5. Place baking sheet in oven and cook for 25 minutes, stirring once about halfway through cooking. 
  6. Pig the fuck out.

04 October 2012

Rice Salad - VeganMoFo #4


Rice Salad. Never had it before. So, I invented it. It was pretty good, too. I am known for my pasta salad among my social circle, and I wanted to try something new. I pretty much just made my pasta salad with rice instead of pasta. Don't ask me why because I really don't know.

It all started with some leftover white rice and some raw veggies in the fridge. Add in some spices and some vinaigrette and kapow! You have rice salad. Don't eat it cold out of the fridge or else the rice will be hard. I used cold rice, then let it warm to room temperature. PS- mine turned pink from the purple carrots I microplaned.

What I used:
  • 2 cups leftover white rice
  • 1/3 cup minced red onion
  • 1/3 cup minced bell pepper
  • 1 medium purple carrot (or orange), microplaned or grated
  • vinaigrette of your choosing, I usually wing it and make my own on the fly
  • salt and pepper
  • pinch of coriander powder
  • garlic powder or very finely minced garlic clove
What you do:
  1. Mix everything together in a bowl and adjust your seasonings as needed. 
  2. Cover with lid or plastic wrap and let sit out at room temp for 1 hour. If you are making it ahead, cover and put in the fridge. Then let set out 1 hour before serving. You want room-temperature rice.

02 October 2012

Chickpea Salad on Crackers - VeganMoFo #2


Chickpea salad is the shit. You should probably make some. It's insane on crackers. It's killer on toast. Hell, it's great on a spoon. No matter how you eat it, I assure you that you'll dig it. One can of chickpeas makes enough for 2 sandwiches or an entire sleeve of crackers. It will keep for at least 24 hours in the fridge, but I can't imagine that it will even last that long. Be warned: chickpea salad is insanely addictive.

I have made this so many different ways, but the following is my basic version. Add whatever you want: celery, seaweed, whatever. Go forth and create food!

What you need:
  • 1 can of chickpeas, drained and rinsed
  • 2-3 Tb vegan mayo (I prefer Vegenaise)
  • 1 TB mustard
  • 1 dill pickle spear, chopped (also good with a spicy dill spear)
  • 1 tsp pickle juice
  • 2-3 TB minced red onion
  • 1/2 tsp soy sauce or aminos
  • salt and pepper
  • pinch of fresh dill (optional)
  • 2 TB sunflower seeds (optional)
What you do:
  1. Pile everything into your food processor and whir it until it reaches a consistency you dig. Adjust your seasoning and chow down.

03 September 2012

Curry-Spiced Roasted Cauliflower


This was my dinner tonight. A massive bowl of roasted curry-spiced cauliflower. It was spectacular. Like, for real. Ever have those days where you don't much feel like cooking? Yeah, me too. That was today. This holiday weekend was busy, busy, busy! I went to a couple Detroit Tigers games and watched them sweep the Chicago White Sox. I suppose you could call me a late bloomer in enjoying baseball, despite growing up with my entire extended family being rabid baseball fans. Speaking of baseball, did you Michigan veggie peeps know that Comerica Park serves vegan and vegetarian goodies at their Brushfire Grill snack bar? Hummus and veggies, veggie dogs, veggie burgers, black bean burgers and vegetarian sausages all make appearances at Brushfire. Kind of cool, if you ask me. So, beside going to a couple games, I've spent a lot of time reading (I'm a librarian after all) and cooking, and reading cookbooks. It was kind of the perfect weekend, if you ask me.

Back to the cauliflower. I got a head of cauliflower a couple days ago at my local farmer's market for $1 and knew I needed to get it used today, so I heated up my oven and started chopping it into large-ish florets. Suddenly, the fucking lightbulb went on in my head; I needed to add some curry powder. I love cauliflower (especially roasted) and I love curry spices, so this couldn't possibly go wrong. Right?

In case you were wondering, I was right. I ate the whole head of it. Don't hate me because I'm hungry.

What you need:
  • 1 medium head cauliflower, cut into large florets
  • 1-2 tsp curry powder of your choosing
  • Oil (I used some melted coconut oil)
  • salt and pepper
What you do with it:
  1. Preheat your oven to 425 degrees F. 
  2. Put cauliflower into a large bowl, drizzle with  coconut oil and sprinkle with curry powder. Use a serving spoon and stir to coat the cauliflower with oil and curry powder. It should look like this:
  3. Spread cauli on a baking sheet in a single layer. Sprinkle some salt and pepper on the veg and pop it in the oven for 15 minutes. 
  4. At the 15 minute mark, remove from the oven and use tongs to flip the florets over. Cook another 12 minutes, or until you're happy with the texture and caramelization.

21 July 2012

Herbed Cashew Ricotta


Every once in a while I get a craving for ricotta cheese, but being cruelty-free, I don't indulge in dairy. I can't find any vegan ricotta in a 50-mile radius, so I decided to try and make my own version using cashews. If you haven't already tried it, raw cashews can make an astounding number of sauces and cheeses. I made a mayo-like creation with them as well as an alfredo sauce with them, both of which were spectacular. For this ricotta, I decided to add some herbs and use it for pasta with onion, garlic, and sauteed zucchini. SO GOOD! Dudes, you should totally give cashew ricotta a chance.

This makes a little over a cup of ricotta, depending how much water and fresh lemon juice you add.

What I used:
  • 1 cup raw cashews, soaked in water for at least 2 hours
  • fresh lemon juice - I used juice of 1 whole lemon, adding a little at a time and tasting often
  • fresh herbs to your liking (I used basil, dill and flat-leaf parsley
  • 1 small fresh clove of garlic (optional) 
  • 1tsp olive oil
  • salt
  • a little water to loosen up the cashew ricotta in the blender
What I did:
  1. Drain and rinse off your soaked cashews. Add them to your blender or food processor. 
  2. Add a couple TB of fresh herbs and the garlic(if using). Squeeze some lemon juice in and a splash of water. Whir until the cashews are mostly creamed with a little texture remaining. 
  3. Taste and adjust salt, lemon and herbs as needed. It should look something like this:

I let mine sit in the fridge, covered, for about an hour and the flavor got even better. Now, you can add it to an awesome dish, like this:

24 June 2012

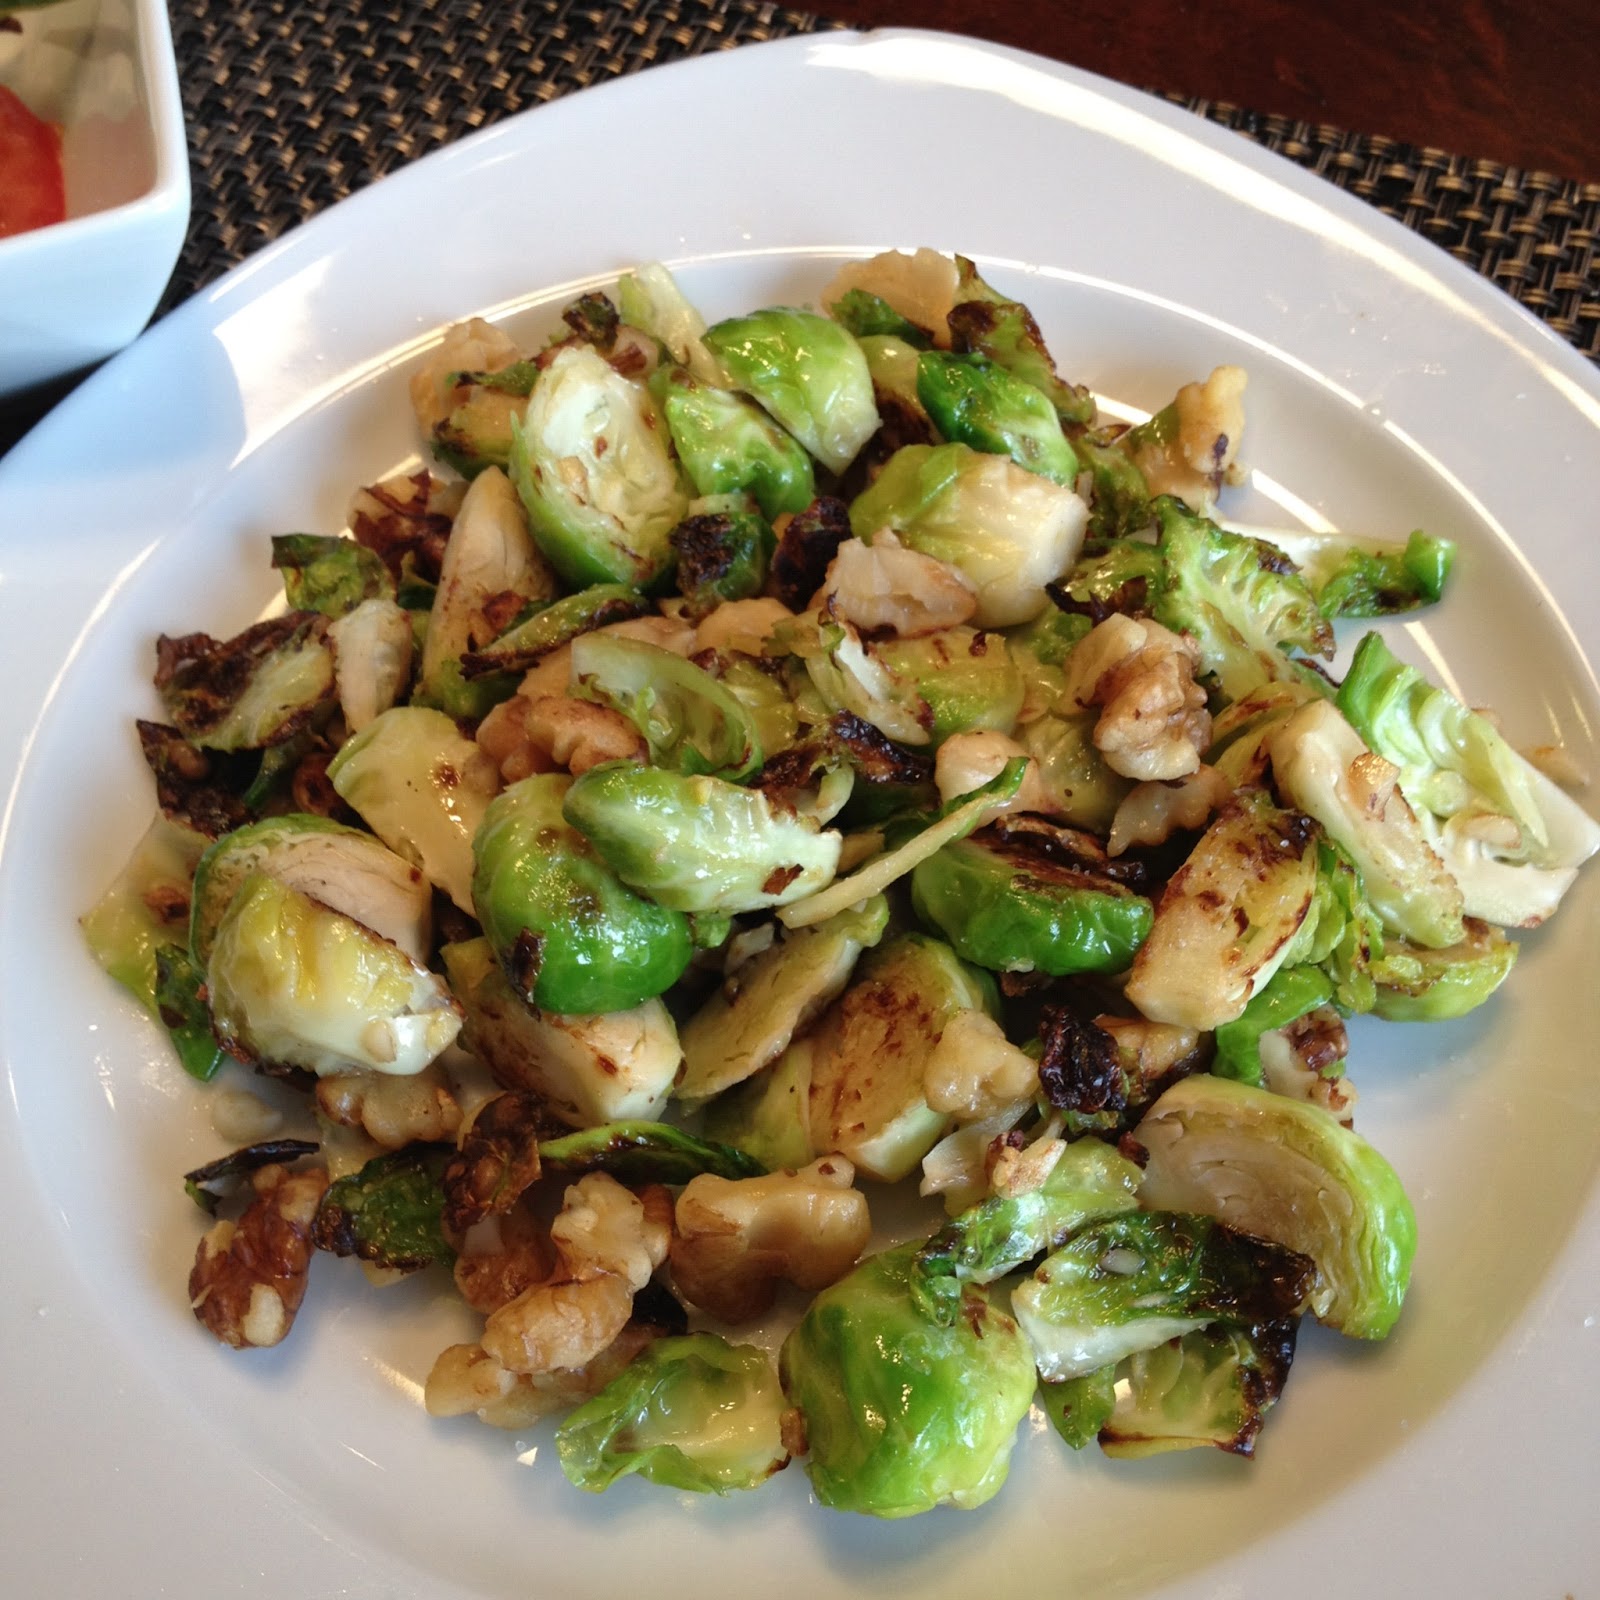
Pan-Seared Brussels Sprouts with Garlic and Walnuts


Ladies and gents! It's that time of year again. I can finally find brussels sprouts in my market again. I rejoice every single time summer hits and I can find fresh sprouts. I absolutely LOATHE the frozen sprouts you can buy at the grocery store. In general, I don't use frozen veggies except peas and sometimes corn. All the others taste like they've been frozen, and I just can't roll with it.

So, today, the fella went to visit his family for a bit, and I was left in solitude to read books and snuggle my pup. You see, she just had to have dental work done (as many aging chihuahuas must do), and she's feeling a bit mopey, thus she needed her mama to spoil and snuggle her all afternoon. When dinner time came around, I wasn't feeling like making a huge or elaborate meal as I sometimes feel the need to do on my days off. I popped open my fridge and instantly zeroed in on the sprouts. They were calling my name. I couldn't refuse the buggers. I'm an addict. I just needed one more hit of sprouts. Judge me if you must.

In the past, I've always roasted my sprouts in the oven, but I was feeling a smidge creative and decided to try pan-searing them in my cast iron skillet. Jackpot! You still get the crispy, caramelized bits, but you cook the brussel sprouts quicker. You can't beat that. This was my dinner. A plate of brussels with garlic and walnuts and a side of fresh tomato with olive oil and Thai basil. I have a happy tummy.

Here's what I did:
  1. While trimming my sprouts, I heated a cast iron skillet over medium heat. After heating it for about 5 minutes, I added about 1 tsp of olive oil. Once the oil is shimmering, carefully add the brussels (about 1/2 lb. with the end trimmed and top layers of leaves removed). Cook, stirring occasionally for about 5 minutes. I added a little kosher salt here.
  2. Once the carmelization starts on the sprouts, add in about 1/4 cup chopped walnuts. Stir and cook about 2 minutes. 
  3. Now add in 1 minced garlic clove. Cook until fragrant, about 2 minutes. The end.

14 June 2012

Vegan Potato Salad Goodness


I don't have an exact recipe for this potato salad, but I'll give you the ingredients and let you pick your own measurements. Just keep adding shit til it tastes good to you. I didn't know what I was doing at all...I just kept adding flavors til it was tasty. I highly suggest that you let it set and combine flavors in the fridge for an hour. The dill has time to develop and get extra tasty. Dig it.

What I used:
  • Vegenaise vegan mayo
  • red potatoes (diced and boiled until fork tender)
  • yellow mustard
  • fresh dill
  • finely diced red onion
  • a tiny bit of fresh lemon
  • salt and pepper
  • sugar (optional-- we like it with just a teeny tiny bit of sweetness to balance the tang of the lemon and mustard)
Mix all the ingredients together and taste as you go. Add more as needed. Too tangy? Add sugar. Too sweet? Add more mustard and mayo. Cover and pop in the fridge for an hour or so. Eat the shit outta this tato salad.

27 May 2012

Baked Broccoli Mac and Cheese

Forgive the shoddy photo, I was too hungry to spend time caring.
I had a busy day today doing errands and generally just being awesome and completely forgot about dinner until late. I am low on groceries due to complete and utter laziness. Well, not really laziness. I worked the last 7 days in a row, and have been too tired and busy to get more food. What it all boiled down to is that I had broccoli in the fridge that was quickly approaching the end of its life and needed to use it up. As much as I love steamed broccoli on its own, I wanted something a little more hearty and comfy. What's more hearty and comfy than mac and cheese? Nothing, dammit. So, there you have it. Make this shit. You won't regret it.

Makes 4 servings as a side or 2-3 as a main dish.

What I used:
  • 1/2 pound small-medium shell pasta
  • 1 head broccoli, cut into small florets and steamed to your liking
  • 1 cup almond milk
  • 2 TB vegan butter
  • 1 more TB vegan butter 
  • 1 1/4 TB flour
  • 1/4 cup finely diced red onion
  • 1 tsp ground mustard seed/powder
  •  1/2 tsp garlic powder
  • 1/2 tsp onion powder
  • salt and pepper
  • 1/2 cup breadcrumbs
  • 1/4 cup Daiya mozza
  • 1 1/3 cup Daiya cheddar
What I did:
  1.  Preheat your oven to 430 degrees F. Then, put a pot of salted water on to boil. Add the pasta and stir. While it is cooking, start the next step.
  2. In a large-ish pot (over medium heat) melt the 2 TB butter and add the milk. Then, whisk in the flour, red onion, mustard powder, garlic powder, onion powder, salt and pepper. When it starts to thicken and boil gently, add in the Daiya and whisk until nice and smooth. 
  3. Drain your pasta and add it to the cheese sauce. Fold in the broccoli. taste for seasonings.
  4. In a small bowl, melt the other 1 TB of butter and mix in the breadcrumbs with a little salt or garlic salt. 
  5. Scoop your mac and cheese into an oven-safe dish (I used 2 smaller rectangle Le Creuset stoneware baking dishes). Sprinkle the breadcrumbs over the tops. 
  6. Bake for 12 minutes on the top rack, then turn on the broiler for a minute or two to brown up the breadcrumbs.

23 January 2012

Spicy Polenta Cakes


Casually browsing my cupboard last night, I stumbled on a bag of polenta that I had forgotten about. I've never cooked, let alone eaten polenta before, but I do love corn. How can anyone not, really? Well, I remembered seeing a few recipes over the last couple years for something called polenta cakes, so I decided to make my own vegan version featuring some Daiya Pepperjack. It was a total experiment...I was skeptical that they would work. But, they did....at least, they did with some toppings. I made some homemade black bean and corn salsa and then cooked up some yummy spicy tvp. They were both mega awesome on the pan-fried polenta cakes. Even better? Putting both toppings on one cake, like this:


The polenta cakes take a little prep time, first cooking the polenta and cheese and then refrigerating for about an hour to firm up, then finally pan-frying the tasty cakes. I suppose you might be able to bake them, but I wanted them cooked up quick and crispy. I used a circle cookie cutter to cut them out, but you could use a glass or cut them in squares with a knife.  

This recipe makes about 12 three-inch circle cakes.

Making the cakes:
  • 1 cup dry quick-cooking polenta (if it doesn't say quick, you're in for a long time of whisking)
  • 1 1/2 cups veg broth
  • 1 1/2 cups water (or you could use more broth)
  • heaped 1/2 cup or a bit more Daiya Pepperjack
  • 2 TB nooch
  • salt and pepper to your liking
  • 1/2 tsp smoked paprika
  • 1/2 tsp chili powder
  • 1/2 tsp garlic powder
  • hot sauce (optional)
  1. Heat broth and water in a large pot over high heat until almost boiling. Add paprika, chili powder, a few dashes of hot sauce, and the garlic powder. Then, turn the heat to medium low and whisk in the polenta. 
  2. KEEP WHISKING until the polenta is very thick and creamy. You don't want any lumps. It will take about 5 minutes of nonstop whisking if you use the quick cook. I've read that the regular stuff can take up to 20 minutes of whisking. 
  3. Now, whisk in the cheese and nooch. Keep on stirring, kiddos, until the cheese is melted. Turn off the heat and remove from the burner. 
  4. Quickly line a 9x13 inch sheet pan (or a baking dish) with some plastic wrap and give it a spritz of cooking spray. Now, smear the polenta onto the baking plastic. Try to make it into an even layer, like so.
  5. Spritz the top with a little more spray, then cover the polenta with more plastic wrap and refrigerate for 40-60 minutes.The polenta will be quite firm. 
  6. Cut the polenta. Now, heat a non-stick skillet over medium high heat. Add some oil (enough to cover the bottom of the pan), and ease a few cakes into the pan. Cook about 3-4 minutes, then very gently flip the cakes. Cook another few minutes, until each side is golden and a bit crisp. Sorry, I was busy...no pictures. Remove the cooked cakes and put them on a plate while you cook up the rest. 
  7. Top those bugger with some yummies. We used the spicy tvp and homemade salsa, but you could use bean and veggie chili, more cheese, whatever. Make it yours!
Here's my super simple salsa recipe:
  • 1 can black beans, drained and rinsed
  • 1 can corn, drained and rinsed (I prefer fresh, but it is winter here and no corn can be found)
  • 1 tsp cumin
  • 1/2 cup diced red onion
  • 1/3 tsp chili powder
  • 1/3 cup diced bell pepper
  • salt
  • juice of half a lime
  • 1 cup diced tomato (today was a mix of cherry tomato and roma)
  1. Mix everything together and let rest for about 10 minutes.
Spicy TVP recipe:
  • 1 cup dry tvp
  • about 1 1/4 cups veg broth (I didn't measure, but this seems about right)
  • 1/3 cup diced onion
  • 1/2 tsp smoked paprika
  • 1/2 tsp garlic powder
  • 1/2 tsp cumin
  • 1 TB taco seasoning powder
  • salt and pepper
  • 1/2 cup hot salsa
  • hot sauce
  • scant 1/4 tsp liquid smoke (optional, but recommended)
  1. Mix tvp, dry spices, onion and broth in a small pot over medium heat. Stir occasionally, until the liquid is absorbed.
  2. Once the liquid is almost entirely absorbed, add the salsa, hot sauce and liquid smoke. Turn heat to low and let everything simmer together for at least 5 minutes, but probably a little longer to let the flavors merge. Done!

    30 December 2011

    Curried Quinoa!!


    Ever have those days when you just don't feel like making anything fancy? Yeah, I had that day today. I decided to start with some quinoa and see where it took me from there. As I puttered around my kitchen looking for other stuff to add to the quinoa, I found some frozen peas and some chopped walnuts. But what spices? Dudes, you know I can't resist curry powders, so I decided to take a chance and make curried quinoa. This was pretty tasty on its own, but even more so with some garlic naan (or a garlicky pita). They go perfectly together. Take my word for it! I command you. Enjoy....or not....whatever.

    This makes enough for 3 bowls as a main dish or 4-5 as a side.

    What I used:
    • 1 cup dry quinoa
    • 1 cup vegetable broth
    • 1 cup water
    • 1 cup diced red onion
    • 1 cup frozen peas
    • 1 large carrot, grated (I actually used a microplane to grate mine)
    • 1 cup chopped walnuts
    • 1-2 tsp curry powder of your choice
    • 1/2 tsp cumin
    • 1/2 tsp turmeric
    • 1/2 tsp chili powder
    • 1/2 tsp garlic powder
    • 1 tsp coriander
    • salt
    What I did:
    1. Combine broth, water and spices in a pot over medium-high heat with lid on. Once lightly boiling, stir in the quinoa, carrot and onions. Leave the lid on and lower the heat to medium. Cook for about 12-15 minutes.
    2. Remove the pot from the heat. Carefully stir in your peas and walnuts, and place the lid back on the pot. Let sit for about 15 minutes. Taste for spices and dig in.

    07 October 2011

    Tasty-Ass Hashbrowns - Vegan MoFo #7

    Mmm. Yup. Hashbrowns. Don't ask me why I never made them before. I honestly don't know. I always just went to a diner and got them whenever I had a craving. But, the diner version has never been as tasty as these turned out to be. Maybe it's because these were made with love? Or maybe it was the coconut oil. That's probably more likely the case. Whatever, they are super easy and super tasty. In part of the batch, I mixed in some Daiya cheddar shreds and it was lovely. You need these potatoes. Like, now. Enough chatter. On to the recipe!
    Serves 3-4 as a side or 2 as a main dish.

    What you need:
    • 1/2 bag frozen shredded potatoes (you could probably use fresh, but I don't know)
    • 1/2 cup diced red onion
    • 1/4 cup diced green bell pepper
    • 4 cremini/baby bella mushrooms, sliced and chopped
    • 2 TB coconut oil
    • 1/2 tsp garlic powder
    • 1/2 tsp onion powder
    • salt & pepper
    • vegan cheese (optional)
    What you do:
    1. Heat a large non-stick skillet over medium-high heat. Add the coconut oil and let it melt.
    2. Add the onion and bell pepper and let cook about 3 minutes. 
    3. Add the shredded potatoes and mix around to get the oil on the potatoes. Add in the spices and stir again. 
    4. I cooked mine about 8 minutes, added mushrooms and stirred it up. Cook another 6-8 minutes. The potatoes were just a little browned. If you want them crunchier, cook them longer. Add cheese in the last few minutes of cooking so it will melt, but not burn. 
    See how easy that was?

      04 September 2011

      Revamping a Classic... and changes

      One of my all-time more favorite summer meals is grilled zucchini and onions. Seriously. Last summer, I ate it for breakfast AND lunch for a solid month. I'm that hardcore. Well, this morning, I ate a peach for breakfast on my way to yoga, and by the time I was driving home, all I could think about was eating lunch. And not just any lunch, I wanted needed zucchini. Fortunately, I live near a farm stand and snagged some zucchini, yellow squash and fresh mushrooms. Paired with the corn I bought at the farmer's market yesterday, I had a stellar lunch ahead of me. Don't agree? Well, forget you! It's delicious.

      I didn't feel much like firing up the grill, so I just went ahead and used my cast iron grill pan on my stove. I don't regret it for a second. In my attempt to cut down on my oil consumption, I used a little bit of cooking spray instead of a few teaspoons of olive oil. It's the little changes I'm working at. I'll probably never cut out oil totally, but I am definitely decreasing my intake. I feel better when I eat less oil, despite my complete love for olive oil! I'm starting now because next month, my friend and I are going to be doing a cleanse/detox/yoga challenge for the month of October. It's going to be a real challenge, as we have to commit to 5 practices a week, with 3 of them being the more intense classes. It's time to take control of my health and get more active again. But enough about that. Back to the food.

      Revamping my favorite summer dish is rad. You'll like it.

      WHAT TO DO:

      Just heat a skillet (I used the grill-pan, hence the lines on the veg) over medium heat. Spritz it with a bit of cooking spray. Add in sliced zucchini, summer squash, 1/2 half red onion sliced and get simmering. After a few minutes, stir the veggies around so they cook on both sides. Add in corn (I used 1 1/2 ears of corn kernels freshly cut from the ear). Cook, stirring occasionally until the zukes are mostly cooked, then add the mushrooms (about 5 caps, chopped) and top with a small spritz of cooking spray. Add in some salt and pepper and stir again. The whole cooking process should take about 15 minutes. I debated adding in some black beans or chickpeas, but I forgot to.

      Anyway, that's all for now. Any ideas for additions to the classic triumverate of zuke/squash, onion and mushrooms???

      01 September 2011

      Grilled Corn Fun


      I am in love with this time of year for one main reason: fresh, local produce at the farmer's market. I don't know what it is, but the local farmers have the most amazing sweet corn, which I can't pass by when I'm at the market. To make it even better is the fact that it's inexpensive and the farmers are so friendly. In fact, this last purchase ended with a bonus ear for free. I guess it's my smile and charming sensibilities that win me free produce. Or maybe the fact that they see me all the time and I like to chat. Whatever the case, I got bonus corn and you didn't! Nah nah boo boo.


      What's a girl to do with bonus corn on her hands? Grill it. Slather it in earth balance and salt and chow down. Oh, and make some absolutely fabulous salsa. So, now that I decided to make corn, what should I make to go with it? Mexican-inspired food always goes well with grilled corn. As you are well aware by now, I absolutely love tacos, especially tempeh tacos. So tacos, grilled corn and a black bean and grilled corn salsa for dinner. Hell yes. Add in some homemade guac and you're in business.


      I grill my corn once it's shucked and wrapped in foil. You can roast it in the skins, but it seems to take a million years and I just don't have that kind of patience. Plus, it doesn't get the charred kernels like I prefer. Just be sure to turn it every so often. I cook mine over a medium flame on the grill about 25 minutes. After about 20 minutes, peek inside the foil and see if it's coming along how you want it. When it is done, I put on an oven mitt and cut the kernels from the cob with a sharp knife. I put it all in a bowl and add a dollop of Earth Balance and shake on some sea salt. Mmmmm!


      For the salsa, I used 2 ripe roma tomatoes, diced. Add in 3/4 cup cooked (or canned) black beans and 1/4 cup diced red onion. Cut the kernels from 1 ear of grilled corn and add them to the mix. I then added the juice of half a lime, a few shakes of cumin and a bit of salt and pepper. Mix well and let marinate together for 20 minutes before serving.

      And for your viewing pleasure, I present this evening's sunset from my front stoop:

      30 August 2011

      Moroccan - Inspired Couscous! Vegan and Fab


      Sometimes I like to try to clean out my cupboard when I make a recipe. You know how it is: you accidentally push half a box of couscous to the back of your shelf and forget all about it til you reach for the bag of pistachios in front. Then, surprise! And while you're digging around in the cupboard, you suddenly realize that you forgot about the jar of preserved lemons your friend sent you. The wheels get turning. Then, bam! You eye those golden raisins you thought you finished. And, voila, dinner is born. I find I often inadvertently push stuff to the back of the shelf when I get new groceries. Despite my efforts to not be lazy, I am always sometimes a slacker when it comes to my shelving of the new foods. Doesn't sound like you? Well, then I envy your cupboard skills. Go on, brag about it and get it over with.

      So, now you know that this dinner was a cupboard cleaner. You could really customize it lots of different ways. This is just how I made it. And, I must say, it was quite scrumptious. The ingredient list looks daunting, but half of it consists of spices. Moroccan food typically has lots of spice. Feel free to add more of less of these. I found this is the perfect mix for my tastes. And, if you know me well, you'll be surprised to find this recipe contains neither onion nor garlic. Shocking, I know!

      This makes enough for 3 as a main dish. Or 6 as a side. You can serve it cold or warm. I like it a little better warm, personally.
      Ingredients:
      • 1 cup Israeli (also called Pearl) couscous
      • 1 1/4 cup water
      • 1 TB dried parsley
      • 1/2 cup golden raisins
      • 1/2-2/3 cup roughly-chopped pistachios 
      • 1 heaped cup cooked (or canned) chickpeas
      • 2 TB preserved lemon, finely minced (you could substitute fresh lemon juice, I suppose)
      • 1 TB olive oil
      • 1 1/2 tsp apple cider vinegar
      • salt and pepper to your tastes
      • 1/4 tsp powdered ginger
      • 1/4 tsp cayenne pepper
      • 1/4 scant tsp nutmeg
      • 1/4 tsp turmeric
      • 1/8-1/4 tsp cinnamon (I used a 1/8)
      • 1/2 tsp cumin
      • 1/4 tsp cardamom
      • 1/4 tsp paprika
      Method:
      1. Bring the water and parsley to a boil with a lid on the pot so none evaporates. Then remove from the burner, stir in the couscous, and cover for 8-10 minutes. It'll be ready when the liquid is all absorbed. While you wait, start with the rest of the recipe.
      2. Whisk together your oil and vinegar and set aside. This is the dressing of sorts. 
      3. Combine the spices in a separate bowl.
      4. Your couscous should be ready by now, so go ahead and remove the lid. Add the chickpeas, raisins and pistachios and stir. Now add in the dressing and stir again. 
      5. Add the spices a little at a time, stirring and tasting as you go. 
      6. You can either serve it warm, like me. Or you can refrigerate it for an hour and serve cooled. Enjoy dudes and dudettes!

      29 June 2011

      Sweet and Spicy Tempeh

      While this isn't the most beautiful dish, it is fantastically delicious. I have a serious addiction to tempeh, and yesterday I had the biggest craving for it, but couldn't think of anything fun to do with it. So, I hit FoodGawker and found this recipe from Jeroxie. While I definitely altered it, I thought you may want to give the original a shot if you are craving a slightly less spicy version. If, however, you are all about the spicy, then you may want to give my version a shot. It's wickedly tasty and goes excellently with some brown rice. Also quite tasty is eating it solo or from a leaf of romaine. I actually liked it so much, I ate some raw. But, that's just me. I'm hardcore that way.

      Oh! And I got to use my mortar and pestle, which just doesn't happen often enough, really. It ground everything into a nice thick paste to put on the tempeh, which was lovely. I rub/marinated mine for a few hours before cooking, which helps flavor the tempeh a little better, but you could try cooking it right off the bat, just don't blame me if it doesn't work out. The rub/marinade tasted so good, I ate some of the tempeh raw. I'm so hardcore.

      Makes 3 large servings if you serve it with rice or some sides.
      Ingredients:
      • 1 package tempeh, cut into small cubes
      • 1 small can tomato sauce (8oz)
      • 2 cloves garlic
      • 1/3 cup finely chopped red onion
      • 1/2 tsp ground ginger
      • 1 tsp brown sugar
      • 1/3 tsp cinnamon (it's 1/4 plus 1/8th tsp)
      • 1/2 tsp paprika
      • 1/3 tsp smoked paprika
      • 1/3 tsp allspice
      • 1/2 tsp coriander
      • 1/4 tsp red pepper flakes
      • salt and pepper
      • 1 1/8 tsp curry powder
      • 1 tsp sriracha or other hot sauce.
      • 2 tsp (approx) Braggs aminos or soy sauce
      Method:
      1.  Cut the tempeh into small cubes and place in a largish bowl. 
      2. Now, if you have a mortar and pestle, you'll need to use it. If you don't, am guessing you could use a little food processor to destroy your garlic then use a spoon or fork to make a thick paste. Okay, put the onions, garlic, ginger, brown sugar, cinnamon, paprikas, allspice, coriander, red pepper flakes and some salt and pepper into your mortar and bash it into a really thick paste, like this:
      3. Now mix the Braggs and the paste together. Then add it to the tempeh and mix very well to coat the tempeh on all sides. Cover and put in the fridge for at least an hour. I think mine ended up marinating for about 5 hours. 
      4. Once it's done sitting in your fridge for however long you want, add the tempeh to a non-stick skillet over medium heat. Cook, stirring every minute or so for about 6 minutes. Now turn the heat down to medium-low and add the tomato sauce, sriracha and curry powder. Let cook about 8 minutes, until the tomato sauce thickens and somewhat evaporates. 
      5. Serve up over rice or on some lettuce. Or just by itself. It's that good.

      27 June 2011

      Chili Cheese Tots - OMFG

      Chili, cheese, tots. What the hell else could all go better together? Nothing, that's what.

      I don't know about you all, but in my pre-veg days, I used to love going to Sonic to get their chili cheese tots. For weeks now, I've been craving those little morsels of heaven. But, they have meat and dairy in them. Icky poo, dudes. So, I decided to take matters into my own little hands and create a simple masterpiece. Fine, it's not like I even made the chili myself, but I do take pride in making it better. I bought a can of Hormel Vegetarian Chili with Beans (it has tvp in it!), and went to town with all 3 Daiya cheeses. And I can't imagine it tasting any better because it was mind-blowing. Seriously. Fucking amazing. And easy. And vegan. Dig it.

      Makes 3 big servings.

      Ingredients:
      • 1/2 bag frozen tater tots
      • 1 can vegan/vegetarian chili
      • 1/4 cup finely chopped red onion
      • 1/2 tsp garlic powder
      • 1/2 tsp chili powder
      • 1/4 heaping tsp onion powder
      • salt and pepper to your tastes
      • 1/4 tsp red pepper flakes
      • 1/2 cup vegan cheese (I used all 3 flavors of Daiya, but mostly the cheddar and pepperjack)
      • cooking spray
      Method:
      1. Preheat oven to 450, or whatever temp your tots say. Mine was 450. Line a baking sheet with foil and lightly spritz the foil with cooking spray. This keeps the tots from sticking to the foil. Arrange tots in a single layer, not touching, if possible. Spritz the tops lightly and sprinkle with some salt.
      2. Cook about 18-20 minutes, turning them halfway so they cook evenly. 
      3. In the last 2 minutes of baking the tots, pour the can of chili into a microwave-safe bowl. Mix in the onions and spices. Heat (covered) until very hot, about 2:30. By now, your tots are ready.
      4. Carefully place the tots in a baking dish in a single layer if you can. Pour the chili on the tots and spread until it covers all the tots. Now, sprinkle your cheese on the top.
      5. Turn on your broiler and put the baking dish on the top shelf of the oven. I cooked mine about 3 minutes, until the cheese melted and started bubbling. Then, carefully remove the dish and serve. 

      See, it's insanely easy, but incredibly delicious. You need to make these...NOW. Get moving!

      18 June 2011

      The Snarkiest Stuffed Peppers


      Until a few days ago, I had never ever eaten a stuffed pepper. So, what, you ask, inspired me to make them? A sale on the colored bell peppers. They were a buck apiece instead of the ridiculous $2.00-3.00 each that they typically are here. I snagged 4 in the desperate hope that I'd find something to do with them. If all else failed, I'd be doing a lot of dipping in hummus. Alas, I got creative and made a very kickass stuffed pepper. I amaze myself sometimes. No, really, I do.

      You eat quinoa, right? You better, because it is ridiculously healthy AND tastes really good, especially when paired with toasted almonds as it has a nutty flavor on its own. It has complete protein, fiber and nutrients. Dig it. It has other perks, too, like that fact that you can cook it up faster than brown rice, it's healthier than rice, and you can use it to replace rice in just about any dish. Oh, and did I mention it's really tasty? Don't believe me about quinoa's awesomeness? Read all about it here: Quinoa: An In-Depth Guide, WHFoods: Quinoa, and Livestrong. Or do your own search. You'll find that quinoa has a cult following for good reason: it's awesome. Moving on...

      For this dish, I chose not to use green peppers because, although I do like green pepper, I can only handle them in small quantities. Gotta problem? I thought not. I used one red, one orange, and one yellow pepper, all quite large. They were heaping with delicious goodness. And, they helped me get rid of about a cup of cooked beans I had in my fridge. I've been trying extra hard to not waste any foods at all because I paid for it. And I hate wasting money. You should too, because in the US, the largest portion of materials heading to landfills is, get this, FOOD WASTE. Read all about it here: US EPA. Plus, you paid for that food, fucking use it. End rant. It's recipe time.

      My recipe makes enough for 3 rather large peppers or 4 smaller ones, all packed to the brim.

      Ingredients:
      • 3 large bell peppers, or 4 smaller ones, tops sliced off, and ribs/seeds removed. Lightly slice the very bottoms so they will stand upright without falling, but be careful, otherwise you'll cut too far up and lose your bottom entirely. You want it to still be able to hold the filling!
      • 1/2 cup (slightly heaped) dry quinoa
      • 1 1/2 cups warm water
      • 1 cup raw almonds, chopped to your liking
      • heaping 1/2 cup red onion, chopped
      • 1 cup cooked beans (mine was 2/3 black-eyed peas, 1/3 chickpeas)
      • 4 oz, about half a package of fresh mushrooms
      • 4 cloves garlic, minced
      • 1 tsp olive oil
      • 1 large carrot, grated
      • 1 big handful baby spinach, shredded
      • a few shakes of coriander
      • 1/2 tsp onion powder
      • salt and pepper
      Method:
      1. Preheat oven to 375 degrees F. Get a baking dish and lightly spray the bottom with cooking oil. Set aside.
      2. Bring the water to boil in a small pot with a sprinkle of salt. Once boiling, mix in the quinoa, turn the heat to medium-low and cover with a lid. Cook until the water is pretty much all absorbed. This will take about 15-20 minutes depending on how old your quinoa is. It'll probably take longer if its older. You will see the little tails from the seed and the texture will be a little chewy, like brown rice. Meanwhile, get started on the rest of the steps.
      3. Throw your beans and mushrooms into a the food processor and whir until you don't see any whole beans or large mushroom chunks. Put into a large mixing bowl and set aside.
      4. In a small skillet, heat the oil over medium heat. Once hot, add the onion, almonds, garlic and carrot. Cook until the onion is partially translucent. Then add in the spinach to wilt. Should take another 3-5 minutes. Be sure to stir regularly so nothing sticks to the pan. By the time this is done, your quinoa should be ready.
      5. Add the quinoa and the veggies to the mixing bowl with the beans. Mix it all really well and add your spices. Adjust as necessary. 
      6. Use a large spoon to fill the peppers, gently packing it down as you go. Pack those buggers. Then set the peppers right side up in the baking dish. Pour about 1/2 cup water in the bottom of the dish, enough to cover the whole bottom of the dish. Spritz the tops with some cooking spray (keeps foil from sticking to the filling) then cover with foil. Bake about 30-35 minutes, until the peppers are slightly soft to the touch. You need to let them cool some before digging in, duh. I liked mine a little closer to room temperature, but whatever. Enjoy.


      22 May 2011

      Vegan Fried Pickles!

      If I were a world leader, I would declare Fridays to be fried pickle day. No one can resist their magical powers. I would use them to take over the world. Or whatever. Oh, wait. I made them on a Saturday. I guess I haven't really thought through my plan for world domination. Really, though, I first had these a few years ago when I was down south whitewater rafting with some family, and I couldn't get enough. Sadly, when I came back home, I couldn't find them anywhere, and people thought me insane when I asked. They had the insanity part right, but not because of the pickles...

      Speaking of pickles, I used the kind you find in the grocery store's refrigerated section. I chose the Kosher Dill Spears. These pickles are extra crunchy and I, literally, can't resist their extra garlicky flavor. I may have sipped some of the juice from the jar when no one was looking. Anyway, because they are so damn crunchy, they were perfect for the frying. They actually stayed crunchy after frying. Mmmmmm.....

      You'll definitely want to set up 2 shallow bowls for the dredging and use some tongs if you have them. It gets messy. I started out using my hands to dip and dredge the pickles, but my fingers very quickly resembled clubs. I had to abort that plan and dig out the tongs. Also, don't be me...I used a pan that was a little too shallow, so I got some splatter all over my stove. Icky. Maybe one day I will break down and get a fryer. For now, I will instead berate myself for not using a deep enough pot. Not really. Well, maybe.

      Makes a whole jar of dill spears. Don't be surprised when you abandon the rest of your dinner and eat only the pickles. I had made some delicious tempeh BLTs (aka TLT) made, but didn't even bother eating any until all the pickles were gone. OH, I almost forgot to tell you! The pickles are incredible dipped into your favorite vegan ranch. Here is the recipe I usually use---> Scroll down about halfway to find the Rodeo Ranch recipe. I sub almond milk for soy as I don't have much love for soymilk.

      Enough chatter, on to the recipe!

      Ingredients:
      • 1 jar kosher dill spears, or your chosen pickle
      • 1 1/2 cups all purpose flour
      • 2/3 cup almond milk
      • 1 1/2 tsp vegan worcestershire sauce
      • 1 tsp Braggs liquid aminos
      • about 2 tsp sriracha or your chosen hot sauce (Don't worry, the pickles aren't "hot" - it just adds flavor to the batter)
      • 1/2 tsp garlic powder
      • 1/2 tsp onion powder
      • dash cayenne
      • 2 tsp kosher salt
      • 1 1/2 tsp fresh cracked black pepper
      • 1 flax egg (1 TB ground flax mixed with 3 TB warm water and set aside until it resembles egg snot)
      • Oil for frying - you want at least 1-2 Inches deep in your chosen pot or deep fryer
      Method:
      1. First of all, you want to put your pickles out on paper towel and gently pat them with another paper towel to get all the excess liquid off of them.
      2. In a wide, shallow bowl, whisk together almond milk, worcestershire, Braggs, sriracha, garlic powder, onion powder, cayenne and flax egg.
      3. In another wide, shallow-ish bowl, whisk together the flour, salt and pepper. Your two bowls should look something like this:
      4. Heat your oil to 360 degrees F. I got mine to stabilize temperature while I was still dredging the pickles...but you should start heating the oil as it takes a little while on your stovetop. Moving on.
      5. Using your tongs, dip pickle into the wet bowl, then into the flour. Then back into the wet. Then back into the flour. The messier the better! Not even joking. The crazy excess dredge makes for delicious crunchy coating after they are fried. Repeat until they are all coated.
      6. Very carefully use your tongs to put a few into the hot oil. I only did 3 at a time because adding more lowered the oil temperature too much. You want it to stay around 350 degrees F while cooking. When they are a lightly browned all over, remove from oil and put on a paper towel-lined plate to soak the excess oil. When you first put them in the oil, do it one at a time, otherwise they try to stick together. Also, when first putting them in, use your tongs to make sure they don't stick to the bottom. It only takes a second. 
      7. Once they have cooled a bit, chow down. I highly recommend a dip in some ranch dressing. Enjoy!

      15 May 2011

      Vegan Lentil & Potato Curry

      If you visit my blog often, you'll know that lately I've had a complete obsession with making curries, and today is no different. I was looking around for some way to use up a cup of dried lentils I've had in my cupboard for a while and I thought that maybe, just maybe, they could work in a curry. BAM. I was so right. What's new, right? I'm beginning to think I have a knack for this whole "cooking" thing.

      If you haven't cooked lentils before, they're really easy to cook. But, they are disgusting if you overcook them. There's a fine line between perfect lentils and overcooked mushy ones. When you cook lentils, check them often. The cooking times can vary greatly depending on the type of lentil as well as how old the lentil is. I cooked mine in veggie broth for about 20 minutes today, checking them often so I wouldn't overcook them. For this recipe, you want to still have some chewiness to the lentils because they will cook a bit longer in the curry. I boiled the potatoes for about 7-8 minutes to make them "fork-soft" to cut down on curry cooking time.

      I'm all about brown rice, so I made some to go with the curry. It seriously went so well together that I can't imagine one without the other now. What I ended up doing is lightly toasting a garlic pita, then topping it with some brown rice, then the curry. Definitely the way to go. So, I highly recommend it. But, whatever. It's your dinner.

      This recipe make enough for 4-5 giant entree-sized servings.

      Ingredients:
      • 2 cups cooked lentils (1 cup dried, cooked in about 1 1/2 cups veggie broth, for about 20 minutes)
      • 2 smallish Idaho potatoes, peeled and diced into 1/3-inch dice, then boiled until fork tender
      • 1 cup frozen peas
      • 1/3 cup plus 1 TB veggie broth
      • 1 cup cooked chickpeas
      • 1 large carrot, peeled and chopped really small
      • 4 cloves garlic, minced
      • 3/4 of a white onion, roughly chopped
      • 1 TB olive oil
      • 1/2 tsp coriander
      • 2-3 tsp curry powder
      • 1 tsp chili powder
      • 1/8 tsp crushed red pepper flakes
      • 1/8 tsp cardamom
      • salt and pepper
      Method:
      1. Heat the oil in a large skillet (that has a lid) over medium heat for 3 minutes. Add the onion and carrot and cook until the onion is translucent, about 5 minutes. Add the garlic and cook another 2 minutes. 
      2. Add all the rest of the ingredients and stir well to cover everything in spices. Cook for about 4 minutes, then cover with lid and turn heat to medium-low and simmer for about 10 minutes. Adjust your seasonings and serve with cooked brown rice. I like to eat mine on either garlic naan or a garlic pita bread. Sooo tasty!!