Showing posts with label pasta. Show all posts

08 August 2012

Spaghetti and Balls


I've been so busy lately that the blog has been neglected. I do apologize for that. Things are calming down again and I should be able to start cooking more. As an act of good faith, I have decided to share my latest attempt at pasta sauce with you. It is quite yummy. And garlicky. And goes perfectly with The Sexy Vegan's Balls (pictured above). The balls are nutty and moist....all the things a ball should be. Haha. But, really, they are quite delicious. The recipe is not mine to share and can be found in his cookbook.

I had an abundance of tomatoes that were on the verge of going to veggie heaven, so I decided to attempt another marinara sauce. I never remember what all I put in it the last time I made it, so it always turns out differently. This one turned out even more different because my sweet basil died and the only fresh basil I had was Thai basil (it has a slight licorice flavor). It turned out much better than I had anticipated. In fact, we scarfed all the sauce up in one fell swoop. No leftovers made for a sad chickpea the next day.

Serves 2-3 people

  • 6-ish tomatoes (I had 3 large romas, 1 regular, and 2 medium-size orange ones)
  • 6 cloves garlic, minced
  • 2-3 TB olive oil (I started with 2 and kept adding it as needed)
  • 1/2 cup onion, diced
  • a palmful of fresh basil leaves, maybe about 1/4 cup, then minced
  •  2 TB fresh parsley, minced
  • Parmela vegan parmesan substitute, at least a couple TB
  •  1/4-1/2 tsp dried oregano, depending on your tastes. I used 1/4 as I don't particularly love it.
  • salt and pepper
  • 1 TB sugar
  • 1/4 cup almond milk (sounds weird, but helped in combatting the acidity of the tomatoes)
  1. Preheat oven to 400 degrees F. Add the tomatoes to an oven-safe dish and lightly coat with a little olive oil. Sprinkle with a little salt and pepper and roast for about an hour. Once they are soft and getting some browned spots, go ahead and remove from the oven. Let them cool down a bit before handling them. 
  2. In a skillet, heat 1-2 TB olive oil over medium heat. Once it is hot, add the onion and cook until softened. Then add in the garlic and cook until it becomes fragrant and is soft. Turn down the heat to low. 
  3. Take your tomatoes, a smidge of olive oil, the fresh herbs, sugar and milk and blend it up in your food processor until it is to your liking in terms of chunkiness. Now add this to the skillet and let cook together for at least 10 minutes. I added in the vegan parm and let it cook another 4-5 minutes. Adjust your seasonings and you're done.

27 May 2012

Baked Broccoli Mac and Cheese

Forgive the shoddy photo, I was too hungry to spend time caring.
I had a busy day today doing errands and generally just being awesome and completely forgot about dinner until late. I am low on groceries due to complete and utter laziness. Well, not really laziness. I worked the last 7 days in a row, and have been too tired and busy to get more food. What it all boiled down to is that I had broccoli in the fridge that was quickly approaching the end of its life and needed to use it up. As much as I love steamed broccoli on its own, I wanted something a little more hearty and comfy. What's more hearty and comfy than mac and cheese? Nothing, dammit. So, there you have it. Make this shit. You won't regret it.

Makes 4 servings as a side or 2-3 as a main dish.

What I used:
  • 1/2 pound small-medium shell pasta
  • 1 head broccoli, cut into small florets and steamed to your liking
  • 1 cup almond milk
  • 2 TB vegan butter
  • 1 more TB vegan butter 
  • 1 1/4 TB flour
  • 1/4 cup finely diced red onion
  • 1 tsp ground mustard seed/powder
  •  1/2 tsp garlic powder
  • 1/2 tsp onion powder
  • salt and pepper
  • 1/2 cup breadcrumbs
  • 1/4 cup Daiya mozza
  • 1 1/3 cup Daiya cheddar
What I did:
  1.  Preheat your oven to 430 degrees F. Then, put a pot of salted water on to boil. Add the pasta and stir. While it is cooking, start the next step.
  2. In a large-ish pot (over medium heat) melt the 2 TB butter and add the milk. Then, whisk in the flour, red onion, mustard powder, garlic powder, onion powder, salt and pepper. When it starts to thicken and boil gently, add in the Daiya and whisk until nice and smooth. 
  3. Drain your pasta and add it to the cheese sauce. Fold in the broccoli. taste for seasonings.
  4. In a small bowl, melt the other 1 TB of butter and mix in the breadcrumbs with a little salt or garlic salt. 
  5. Scoop your mac and cheese into an oven-safe dish (I used 2 smaller rectangle Le Creuset stoneware baking dishes). Sprinkle the breadcrumbs over the tops. 
  6. Bake for 12 minutes on the top rack, then turn on the broiler for a minute or two to brown up the breadcrumbs.

04 January 2012

Spicy Peanut Veggies & Noodles


I have been itching to make something spicy and peanutty for a while now. So, get this, I did it. Amazing, I know. Shower me with praise. Or not. I just know that this turned out awesomely and I will absolutely be making it again. For the noodles, I used a thinnish spaghetti noodle as that's what I had onhand. You can use whatever you want, but I like long, floppy noodles. Hahaha. I used to love lo mein noodles, but they have eggs in them, which is oh so sad. I haven't tried the rice noodles yet...they kind of freak me out for some reason. Perhaps I shall soon. Who knows. Crazier things have happened. In the meantime, I highly suggest you make this ridiculously yummy dish. I know you'll like it.

This makes 3 rather large servings or about 5 as a side.

What I used:
  • 1/2 head cauliflower, cut into florets
  • 1/2 bunch broccoli, cut into florets
  • 3 carrots, grated
  • 1/2 red onion, cut into thick strips
  • 1 cup pea pods, ends removed and cut in half
  • 5 button mushrooms, cut into chunks
  • noodles
  • 1/4 cup (or a bit more) smooth peanut butter
  • 1/2 cup soy sauce
  • 2 tsp sesame oil
  • 2-3 tsp rice vinegar
  • 1 TB (or more) sriracha sauce
  • a couple TB water
  • 2 tsp coconut oil 
  • dry roasted peanuts for a tasty garnish
What I did:
  1. I steamed the broccoli and cauli for about 5-6 minutes until they were just tender enough to spear with a fork (the broccoli will be a vibrant greeen). Then, I heated the coconut oil (you can use any oil) in a skillet over medium heat. I sauteed the onions until they started to lose their color. Then added in the carrot and mushroom along with the steamed broccoli and cauli. While the veg is cooking, start cooking your pasta.
  2. While the pasta and veg are still cooking, whisk together the peanut butter, soy sauce, sesame oil, rice vinegar, sriracha and water. It seems like it will never mix together, but keep on whisking. Taste it when it looks homogenous and add any more spices as necessary. Set aside. 
  3. By now, your veggies and pasta are ready. I added the pea pods in the last minute of cooking the veg because I love them nice and crispy. You can do whatever you want. Now, add the sauce to the pasta and then gently fold in your veggies. I let mine sit a few minutes to meld together and this is what it looked like:

10 December 2011

Lasagna - Finally!

Resistance is futile.
I've been waiting and waiting and waiting to attempt vegan lasagna. Why? Because I'm picky as hell and I was scared that I'd never make one half as good as the old dairy version I used to make. My biggest fears revolved all around the dairy aspects: 1) I used ricotta in the old recipe, so I was scared to try tofu ricotta. 2) As much as I love Daiya, I was scared it just wouldn't be as good as real mozzarella in this dish. I'm pleased to announce that I am really excited with how this lasagna turned out. And, while it wasn't 100% like the original, it was still awesome all the way around. We loved it.

For this one, I did take some shortcuts as I was absolutely starving! I typically take the time to make my own marinara sauce, but this time I used a garden veggie jarred sauce. I also used the no-boil lasagna noodles. I probably won't use them again, as they just weren't the same. But, they were quite convenient. I also made some simple tvp "meat" for texture that resembled the meaty version most of us grew up with - the recipe is below somewhere.

Anyway, I did use tofu, which is something kind of rare in my kitchen. I have a long history of not enjoying tofu as much as your typical veg-head seems to. It's okay on occasion, but not something I can really get behind. I'm coming around, though. I altered this recipe to make the ricotta, and I'm pretty pleased with it overall. Here is my version of the recipe:
  • 2/3 of a block of well-drained tofu (extra-firm)
  • 1 1/2 TB tahini
  • 1 1/2 TB lemon juice
  • 2 cloves garlic, roughly chopped
  • 3 TB minced red onion
  • 3 TB nooch (nutritional yeast)
  • 1 1/2 tsp white miso
  • 1 tsp olive oil
  • 1 TB dried parsley
  • some salt & pepper to your liking
 Throw everything into a food processor and pulse until well combined. Taste and adjust the seasonings as needed. How easy was that? Set aside until you start assembling the lasagna.

The lasagna was super quick to put together since I didn't have to boil the pasta. I did take a few minutes to make some tvp "meat." I used about a cup of tvp crumbles, put them in a small pot (with a lid), covered with some veggie broth and turned the heat up to medium-high. Add some all-purpose seasoning, a pinch of cumin and 1/4-1/2 tsp liquid smoke. Stir well and cover. Cook about 5 minutes, until the liquid is mostly absorbed. I mixed about 1/2 cup of the pasta sauce into the tvp and cooked a couple minutes over low heat to blend the flavors.

While the tvp was cooking, I sauteed up some diced bell pepper, diced onion and sliced mushrooms. Oh, and a little garlic, too. I meant to add some chopped zucchini, but in the rush, I totally forgot. Once that's done, you're ready to start making the lasagna.

I used a deep casserole to bake it. Since I used the no-bake noodles, I poured some sauce on the bottom of the pot, then added a layer of noodles. On top of that was a thin layer of sauce, then a little veggies and a smidge of the tvp meat. Top with noodles, then sauce, then little blobs of the ricotta I made. More sauce, then noodles, the rest of the meat and some more ricotta, a little more sauce. Noodles, sauce, veggies, topped with lots of Daiya. Something like that. I just made sure to use some sauce on all of the noodles to make them moist. Now, I should have told you that you should carefully press each layer to make sure everything is smooshed down and not airy between the layers. I added some garlic salt and a bit of pepper to the top of the cheese. Cover with foil and bake 35 minutes at 420 degrees. Then uncover and cook another 8-10 minutes so the cheese will melt and brown slightly.

Sorry I don't have an exact recipe, but I was in a rush and starving, so you'll just have to forgive me! This one made 4 MASSIVE servings of 6 normal ones.

Before...

And after :)

05 December 2011

Baked Daiya Mac and Cheese

Pardon the crap photo. I was too hungry to try for a better shot.
Mac and Cheese! Who doesn't love it? Clearly, you have no soul if you're in Mac and Cheese haters club. Well, anyway, I needed (yes, I NEEDED) some mac and cheese today. I always loved macaroni and cheese, especially when it's baked. So, I had a go at making a vegan version and it was a mega hit. We absolutely LOVED it! It made enough for 3-4 people, but two of us ate it all. Oink oink!!

I based this version on my previous stovetop version of my Daiya Mac and Cheese with a few little changes. I baked this up in an 8x8 inch baking dish, and it fit perfectly. I might add some sauteed onions into the cheesy goodness next time I make it. I think it'd be pretty rad.

What I used:
  • 1/2 pound medium shell pasta
  • 1 1/3 cups Daiya cheddar plus a little more to sprinkle on the top before baking
  • 1/3 cup Daiya mozzarella
  • 3/4 cup plus 2 TB almond milk
  • 3 1/2 TB  Earth Balance 
  • 1 tsp flour
  • 1 tsp mustard powder
  • 1/2 -2/3 tsp garlic powder
  • 3/4 tsp onion powder
  • 2 TB nooch (nutritional yeast)
  • 1/4 tsp cayenne pepper
  • 1/4 tsp garlic salt
  • 1/2 tsp black pepper
  • salt to your liking
  • about 1/2 cup plain bread crumbs
What I did:
  1. Preheat oven to 400 degrees F. Spray your baking dish with a light spritz of cooking spray. Set aside. 
  2. Bring a pot of salted water to a boil. Add the pasta and cook according to the directions on the box. While the pasta is cooking, get another pot and start on the next step.
  3. Heat the empty pot over medium heat. Add the milk and Earth Balance. Whisk in the spices and flour. Bring to a light boil, then add the cheese. Turn the heat to medium-low and keep whisking until the cheese is nice and melted and creamy as all hell. 
  4. By now, your pasta should be done. So, go ahead and gently mix the drained pasta into the cheese sauce. Remove from the heat. If it's too thick, mix in a little more milk to loosen the sauce up a smidge. 
  5. Pour the mac and cheese into the baking dish. Sprinkle a little Daiya cheddar over the top of the mac and cheese. Then sprinkle the bread crumbs on the top.
  6. Leave uncovered and bake for 15 minutes, or until the breadcrumbs are lightly browned.

14 November 2011

Hearty Minestrone Soup


After being on the road and traveling for the last week, I missed cooking. Not only that, I missed eating REAL food. You know, whole foods, not processed garbage. Well, today was the perfect day for cooking- it was cold, windy and rainy...prime soup-making weather. So, that's what I did. And it was super yummy. Why minestrone? Two reasons: first, it is my favorite soup. Second, I had to make up for a terrible soup I ate on vacation.

You see, after my best friend's beach wedding, we went out to eat at a nearby restaurant. I ordered minestrone soup and some salad. The soup was a terrible let-down. It lacked pasta, beans and flavor. What it did have was cabbage and a few pieces of carrot. Boring. And not at all what I'd ever call a minestrone soup. So, I have been obsessing about minestrone ever since. I needed to make my own and erase that terrible experience from my brain. Sure, I've made minestrone before, but this is my new favorite recipe. Here's my other minestrone recipe if you're interested.

This soup is soooo filling! I absolutely love it. It's hearty and flavorful and overall awesome. It makes enough for about 6-8 bowls, depending on your appetite.

What you need:
  • 3 medium to large carrots, cut into 1/4 inch slices
  • 2 large stalks of celery, sliced (I slice mine thinnish)
  • 1 small yellow squash, sliced
  • 1 medium red onion, diced
  • 4 cloves garlic, finely diced
  • 4 cups vegetable stock (I used Imagine brand)
  • 15-oz can fire-roasted tomatoes
  • 8-oz can tomato sauce
  • 16-oz can chickpeas, drained
  • 16-oz can light red kidney beans, drained
  • 2 cups water
  • 2 1/2 TB olive oil
  • 1/3 tsp celery seed
  • 1/4 tsp celery salt
  • 1 1/2 TB dried parsley
  • 1/3 tsp dried rosemary
  • 1/2 tsp rubbed sage
  • 1/2 tsp garlic powder
  • 3/4 tsp onion powder
  • 1/2 tsp oregano
  • 1/4 tsp tarragon
  • 1 TB dried basil
  • 1/4 tsp red pepper flakes (optional, but recommended)
  • 2 cups small dry pasta of your choice
  • 2-3 cups fresh baby spinach, stems removed
  • salt and pepper to your tastes (minestrone isn't minestrone without lots of pepper)
What you do:
  1. Heat oil over medium heat in a large pot that has a lid. Mine is an enameled cast iron dutch oven. Once hot, add the carrot, celery, and onion. Add your spices, minus the salt and pepper. Saute for about 4-5 minutes. Then add the garlic and squash. Cook another 4-5 minutes.
  2. Add the broth and water and scrape the bottom of the pot to make sure nothing has become stuck. Stir in the chickpeas, beans, tomatoes and tomato sauce. Salt and pepper the soup. Cover with lid and reduce heat to medium-low. Let simmer about 20 minutes. 
  3. Stir in the dry pasta and baby spinach. Cover with lid and cook another 20 minutes. By now, the liquid will have reduced somewhat and the pasta will be cooked through. Check for seasoning and serve up with some crusty french bread. Enjoy!!

11 October 2011

Tempeh Helper - Vegan MoFo #11


I have been really sick the last few days, so I haven't really felt much like making anything fancy. I was really hungry today, for the first time in a few days, and wanted something easy. After a little searching around, I settled on making the Tempeh Helper recipe from Isa Chandra's cookbook, Appetite for Reduction. The recipe is also posted here on the PPK website.  Because I'm still feeling so crummy, I'm not going to blab on and on or give you the recipe, but I will tell you the changes I made to the recipe to fit my tastes:
  • I used 1 cube of Not-Chik'n bouillon cube in the helper, and half a cube in the cheezy sauce instead of the broth powder in the original.
  • I used mustard powder instead of prepared yellow mustard.
  • Used slightly less thyme and oregano because I don't love them too much.
  • Used about 1 1/2 cup dry pasta (mini shells).
  • Added about 1/2 tsp cumin to the cheezy sauce.
  • Used about 3/4 cup of frozen peas instead of the 1/4 called for.

It really was quite tasty with some bread & butter. When I was a kid, mom always served hamburger helper with a slice of bread and butter. Not sure why, but I couldn't resist doing it with this version. Funny, though, even as a kid, I hated the beef. I would pick around and eat only the noodles and sauce. Anyway, give the tempeh helper a shot. It's not fancy (or pretty), but it does fill your hungry tummy.

17 June 2011

Meg's Fave Marinara Sauce

A few nights ago, I had a most tasty dinner...which you can spy above. The tempeh beanballs were an alteration of the recipe from Appetite for Reduction, which happens to be one of my top 3 favorite cookbooks ever. Totally not joking here. It's amazing.

So anyway, I decided to make the balls (heehee), when I suddenly realized I didn't have a jar of sauce for my spaghetti. Aargh. Silly me. But, I am nothing if not resourceful. Okay, that's an exaggeration. I'm also sarcastic and goofy and junk like that. But, back to the topic at hand: marinara. I made it myself because I was in a total crunch, and I had zero options. Fine, fine, I could have gone to the store, but I refuse to go for only 1 thing. Blah blah blah. I should really just shush and move on to the recipe. Head's up, this is pretty garlicky, just how I like it.

Ingredients:
  • 2- 14oz cans of diced or crushed tomatoes
  • 5 cloves garlic, minced
  • 1 tsp olive oil
  • 1/2 tsp garlic powder
  • 3/4 tsp onion powder
  • 1/4 tsp red pepper flakes
  • 1/4 tsp coriander (optional...I just LOVE coriander)
  • 1/4 to 1/2 tsp dried oregano (I use very little because I don't like it much)
  • dash dried thyme
  • 1/2 tsp dried parsley flakes
  • 1/2 tsp fresh black pepper
  • 1/2 tsp Braggs or soy sauce (optional)
  • about 12 basil leaves, shredded
  • salt to your tastes
Method:
  1. Drain most of the liquid from the cans of tomatoes, then put the tomatoes in a large sauce pan over a medium heat. Add everything else and cook for about 20 minutes, or until the liquid cooks down by at least half. 
  2. If you aren't in favor of chunkier sauce, use an immersion blender to break it down. That's what I did. Though, I have read that you can put it in a blender (be ultra careful as hot things have a tendency to explode in blenders). 
  3. Taste and adjust seasonings. How ridiculously easy was that?

17 April 2011

Spectacular Vegan Spaghetti with TVP

I have finally, and fully, accepted that I love TVP. I have seen the light. It can really take on some great flavors. And, it works excellently as a replacement for ground meats, especially ground beef or turkey. The texture is similar, and easily fools unsuspecting folks...not that I'd know... ahem.

So, I've really been wanting some spaghetti lately, and with my recent fascination with TVP, it seemed only natural to add it to my sauce and veggies and see how it worked out. Oh, baby. It was so so so terrific. My tastebuds were in love from the second it touched my tongue. Add a little garlic bread and you are in business. Holy hell, I can't wait for leftovers tomorrow.

Makes enough for 4 servings as main course...or if you are a glutton, maybe just 2 servings. I dunno. 

Ingredients:
  • 1/2 lb spaghetti or other noodles
  • 1 cup TVP/TSP
  • 3/4 cup plus 3 TB vegetable broth
  • 1 TB Braggs liquid aminos or soy sauce
  • 1/4 tsp liquid smoke
  • 1/2 tsp onion powder
  • 1/3 tsp garlic powder
  • 1/4 tsp fresh cracked black pepper
  • 1 jar of your favorite sauce (or homemade. I used Bertolli Tomato Basil sauce today to save time)
  • 1-2 TB olive oil
  • 1 small zucchini, cubed
  • 1 small yellow squash, cubed
  • 1/3 cup red onion, diced
  • 1/2 cup bell pepper, diced (I had orange as it was on sale)
  • 5 cremini mushrooms, sliced
  • 3 cloves garlic, minced
  • 1 pinch sugar (optional)
  • salt and pepper as needed
Method:
  1.  Bring a pot of salted water to a boil and cook spaghetti to the package's directions. While the pasta is cooking, get started on step 2 and 3.
  2. Combine vegetable broth, Braggs, liquid smoke, onion powder, garlic powder, and cracked black pepper in a small pot with a lid. Bring to a boil. Once boiling, remove from heat and stir in the TVP until no dry spots remain. Set pot aside while the TVP re-hydrates.
  3. In a large skillet, heat the oil over medium heat. Once hot, add the onion, bell pepper, zucchini, squash. Saute about 5 minutes, then add the mushroom, garlic, and rehydrated TVP. Cook about 5 minutes.
  4. Add in the sauce. Let it all simmer together over a medium-low heat for about 8 minutes, so the flavors meld. Adjust your seasonings and add the sugar (if you're so inclined). 
  5. Serve the sauce over your noodles, duh. I always make some garlic bread with pasta, and you should, too. Really. If you don't, you're wasting a perfectly good combo of sauce and bread.

14 March 2011

Chickpea Noodle Casserole (like tuna...only not)

My pal posted a recipe for a mock tuna casserole yesterday, and I was instantly intrigued. As I read the recipe, I thought, "Chickpeas. Pasta. Peas. How could it possibly be bad?" To tell the truth, it really is quite delicious. I didn't follow the original recipe exactly, but I used it as a starting point because I can never bring myself to exactly follow any recipe...ever. It's a weakness. Or a strength. I'm not really sure which yet! 

I really really liked this casserole! I'm typically not the biggest fan of casseroles as many tend to have no texture whatsoever, but this one did from the chickpeas and even from the peas. Really, it's great. You can add other veggies, but I stuck to peas as my add-in because I LOVE PEAS. And if you don't, well, that's just sad. I found some generic pasta that somewhat resembles the old egg-noodles most of us grew up on. You really could use any pasta you want. 


This makes about 5-6 big servings.


Ingredients:
  • 1/2 lb pasta of your choice
  • 2 cups cooked chickpeas, pulsed a few times in your food processor, DO NOT PUREE
  • 6oz fresh cremini mushrooms, sliced and chopped
  • 3 cloves garlic, minced
  • 1/2 cup diced onion 
  • 1 cup frozen peas
  • 3 TB olive oil
  • 3 1/2 TB flour
  • 2 cups unsweetened almond milk
  • 1/2 cup veggie broth
  • 1 1/2 tsp onion powder
  • 3-4 TB nutritional yeast
  • 1 TB garlic salt
  • 1/2 cup bread crumbs
  • salt and pepper to your tastes
  • 1/2 tsp coriander
Method:
  1. Preheat oven to 400 degrees F.
  2. Cook your pasta according to package directions. Then drain and set aside. While pasta is cooking, start on step 3 below.
  3. Heat 1 TB oil in a large skillet over medium heat. Once hot, add onions, and saute for 5 minutes, or until softened. Then add the fresh garlic. 
  4. Whisk some flour into the garlic onion mixture, and add 1 TB oil. It'll be really thick. Now, whisk in the milk and broth. Keep whisking until the sauce thickens somewhat. 
  5. Lower the burner to medium-low heat. Now add in the chickpeas, coriander, nutritional yeast, onion powder, mushrooms, and garlic salt. You will want to keep whisking so nothing burns to the bottom of the pan., but continues to thicken somewhat. Taste for salt and pepper and adjust accordingly.
  6. Fold in the peas and the pasta and cook another minute or three.
  7. Pour the mixture into a casserole dish. 
  8. In a small bowl, combine the last 1 TB of oil with the breadcrumbs. I added some salt and pepper to the bread crumbs because I pretty much always do. Now, mix well and spoon over the casserole, covering the entire surface if you can.

  9. Cook on the middle rack for 20-30 minutes, or until the breadcrumbs get toasted and the sauce is bubbling. Mine took exactly 25 minutes. This is what it should look like:

There you have it! Super tasty and really filling. And, the sauce is delicious. Tuck in, dude.

22 February 2011

Spicy Chickpea Pasta -what you make when you don't know what to make


You think I don't know that's a stupid name for a recipe? Really, I'm not dumb. I just sometimes can't think of creative titles. However, I can come up with some kickass recipes, so that makes up for my poor naming skills. I say it, thus it must be true. This is my blog. I make the rules.

Confession: I used to HATE (really fucking HATE) whole wheat pasta. I suddenly love it. Why? Because I'm a fickle chickpea and I do what I want. I frequently try new things that I used to dislike...maybe you should try it sometime; it's called being mature. Or whatever. I don't know. Just do it.

Now, this recipe is so easy, you'd have to be a complete fool to muck it up. And, really, add whatever you want. It'll be good. Maybe. Though, I bet mine is better because I created it.

This is enough for 4-5 large servings. Or, maybe if you are a giant, it's only 2 servings. I don't know you. I can't judge.

Ingredients:
  • 1/2 lb whole wheat penne or the pasta of your choosing
  • 15oz can of crushed tomatoes (I had a 28oz can, and used just over 1/2 of it)
  • 1 1/2 cups cooked chickpeas
  • 2 huge handfuls of baby spinach, roughly chopped (next time, I'd use more)
  • 8oz cremini mushrooms, stems removed, caps cut into quarters
  • 1/2 yellow onion, diced
  • 5 cloves garlic, minced
  • 1 medium carrot, garted very small (again, I'd use more next time)
  • 1 1/2 TB Braggs aminos
  • 2-3 TB nutritional yeast
  • lots of black pepper
  • 1/2 tsp red pepper flakes
  • 1/2 tsp oregano
  • 1/2 tsp basil
  • 1/2 tsp coriander
  • 1/2 tsp garlic powder
  • 1/4 tsp onion powder
  • a shake or two of thyme
  • 1/8 tsp rosemary
  • 1 TB olive oil
  • 2 TB vegetable broth
  • 1 TB sugar


Method:
  1. In a large skillet, heat oil over medium heat. Then add the onions and the spices (except the sugar). Stir around a bit. After about 5 minutes, add the garlic. You'll really smell it in about 2 minutes. Now, add in the broth and the mushrooms, carrot and chickpeas. You know the drill; stir well.
  2. After the mushrooms are cooked, which will be about 5-6 minutes, add the crushed tomatoes and the Braggs.Stir it up really well. Then leave uncovered to let the liquids cook down (reduce) some. This'll take about 15 minutes on medium heat. Stir every few minutes to make sure nothing is sticking to the bottom of your skillet. Meanwhile, get step 3 started.
  3. About 5 minutes into step 2, you'll want to put your pasta on to boil in salted water. Think ocean water. Cook according to the package. My penne took about 12-13 minutes. Drain and set aside.
  4. Gently fold the spinach into the sauce. It will take a few minutes to wilt down. Add the sugar and mix it in. Take a little taste and adjust your seasonings. I added more pepper and red pepper.
  5. Toss in the pasta.
 I only added this photo because I love the reflected placemat on the bowl. I'm that awesome.

30 January 2011

Chickpea Noodle Soup (AKA-My Best Soup Ever)

Remember back to your childhood (if you weren't a vegan), and recall that whenever you were freezing cold from playing in the snow all day, or feeling sick, someone made you chicken noodle soup. HAHA! I was the picky kid that only at the broth and the noodles, but still, that soup was comfort for my belly. Today, I needed the equivalent of a warm hug for my tummy, so, I set to work making what just so happened to be the "Best Soup Ever." And I am not using that term lightly. It fucking rocks my life.

This chickpea noodle soup has a bit of everything: carrots, onion, garlic, edamame, chickpeas, mushrooms, chopped snow peapods, noodles and lots of tasty spices. You can't go wrong. Or, well, I should say that I can't go wrong. Or didn't go wrong. Whatever. Leave me alone! Just add a bit of whatever you have, and it should be fine. I know, I know, it seems like a lot of spices, but it tastes excellent.

This recipe makes enough for 4 large bowls of vegan comfort. Even better is that it takes no time at all. 30 minutes or thereabouts!

Ingredients:
  • 1 TB olive oil
  • 4 cups vegetable broth
  • 1/2 large onion diced
  • 4-5 cloves garlic, minced
  • 1 large carrot, peeled and thinly sliced
  • 10-15 snow pea pods, ends removed, and shopped into bite-sized pieces
  • 4oz fresh mushrooms, sliced thinly (I used white buttons)
  • 2 cups cooked chickpeas (I used soaked/cooked, but you could use 1 can drained)
  • 1 cup frozen edamame
  • 3-4oz lo-mein noodles, broken into 1/3rds (about 1/3 of a 12oz package)
  • 2-4 tsp Braggs liquid aminos
  • 2-3 TB mellow white miso (optional, but recommended)
  • 1/2 tsp (or more) black pepper
  • 1 tsp garlic powder
  • 1/8 tsp crushed red pepper flakes
  • 1/4 tsp parsley flakes
  • 1/8 tsp rubbed sage
  • 1/2 tsp ground thyme
  • 1/4 tsp crushed rosemary (crushed between your fingers as you sprinkle it in)
  • 1/4 tsp coriander
  • 1/2 tsp celery seed
  • 1/4 tsp dried basil
  • 1/4 tsp sesame oil
 Method:
  1. Heat a large soup pot over medium heat. Add the olive oil. Let heat 3-4 minutes.
  2. Add the carrot, peapods and onion, and stir occasionally, until the onion is translucent, about 6-7 minutes. 
  3. Now add the garlic, mushroom, red pepper flakes and 1 TB of braggs along with 1 TB of the broth. Mix and let simmer about 2 minutes.
  4. Now add the rest of the ingredients EXCEPT the miso and noodles. Stir well and turn heat to medium-high for about 15 minutes to bring soup to a boil. Taste the broth and adjust seasonings, though I don't recommend adding any salt because the miso you add at the end is quite salty.
  5. Gently stir in the lo-mein noodles. Cover the pot and reduce heat to medium. Let gently boil for about 5 minutes. Now stir in your miso 1 TB at a time and taste as you go. You may want to add more or further adjust your other seasonings. Cook another 1 minute to absorb the miso and you're done.
How easy was that? Too easy. And if you think that was hard, then bugger off. 

27 January 2011

Chickpea Ballz!


Chickpeas. Ballz. Pasta. You literally cannot go wrong. Or, I should say, I couldn't go wrong since I'm the lovely lady who made it all. Okay, okay, I didn't make the pasta from scratch, but I did make the marinara. Yes, I was a marinara virgin. And, get this, I didn't use any recipe. I'm full of awesomeness!

I got the idea for the chickpea balls from Veganomicon, which has a recipe for beanballs and spaghetti (pg189) using kidney beans, which I don't really love. So, being the thinker that I am, I decided that chickpeas would be about 100 times better along with some extra spices. So, I set to work making a most tasty ball. But, what to serve with chickpea ballz? Pasta! What else? Haha. I had 2 jars of marinara in my cupboard, but I really wanted to test my kitchen skills and make my own. So I did. And, I could not believe how easy it was. And, get this: I actually used whole wheat penne...and liked it. I never used to like whole wheat pastas! Maybe I am growing up after all? NAH.

Chickpea Ballz Ingredients: (mine made 19 ballz)
  • 2 cups cooked chickpeas
  • 2 TB olive oil
  • 2 TB Braggs liquid aminos 
  • 1 1/3 TB steak sauce
  • 1 TB or more minced garlic (I ran out of fresh and so used jarred)
  • 1/2 tsp fresh lemon juice
  • 1 1/2 tsp garlic powder
  • 1/2 tsp oregano
  • 1/8 tsp thyme
  • 1/4 tsp dried basil
  • 10 leaves fresh basil, minced-ish
  • 1/2 cup plain bread crumbs
  • 1/4 slightly heaping cup vital wheat gluten
Chickpea Ballz Method:
  1. Preheat oven to 400 degrees F. Lightly oil a rimmed baking sheet and then set aside.
  2. I threw my chickpeas into a food processor and pulsed a few times until there were no whole chickpeas, but a they were also not pureed, either.
  3. Remove from the processor into a large bowl. Add in oil, Braggs, steak sauce, garlic, lemon juice, garlic powder, oregano, thyme, dried and fresh basil. Mix/mash together with a fork.
     
  4. Now use your hands to mash in the bread crumbs and gluten until well combined. Let set a minute or two for the gluten to start bonding a bit. I mashed mined down in the bowl. I don't know why, I'm just giving the facts!
  5. Now, use your paws to scoop out enough to make the size of a walnut in its shell. Maybe 1 1/2 TB? I don't know. Then squeeze the chickpea mix into a ball and set on the oiled baking sheet. Be sure to make them all roughly the same size so they cook about the same amount of time.
  6. Once all the ballz are made, you'll bake them for about 15 minutes. Then use tongs to flip them over and cook another 8-10 minutes. You want them lightly browned. 
The ballz are great solo, but they are also great either dipped in a little steak sauce or into some marinara, like so: 

    Marinara Ingredients:
    • 1 - 14oz can diced tomatoes, partially drained
    • 1- 8oz can plain tomato sauce
    • 1/2 of a 4-oz can tomato paste
    • 1 TB oregano
    • 1/2 TB basil
    • 1 tsp onion powder
    • 1/2 tsp thyme
    • lots of pepper
    • some garlic salt
    • 1 TB garlic powder
    • 2 TB Braggs liquid aminos
    • 1/2 tsp coriander
    • 1/4 tsp red pepper flakes
    • 2 TB sugar
    Marinara Method:
    1. Heat a medium saucepan over medium-high heat. Add the diced tomatoes. Cook for about 15 minutes, stirring occasionally. This cooks your tomatoes down a bit to make them more sauce-friendly.
    2. Reduce heat to medium, then stir in the tomato sauce.  I also added all of my spices except the salt and the Braggs. Stir again to make sure the spices are incorporated.
    3. After about 5 minutes, I whisked in the tomato paste and Braggs. Let simmer away for another 5 minutes. Then taste test! I needed to add sugar to mine as it seemed too acidic. So, I added 1 TB at a time and a bit of salt to the mix. You can add any other spices or herbs you'd like. See!!! It is so easy a child could do it. Well, not really that easy, but you get the picture.

    25 January 2011

    Mac & Cheese with Daiya - WOW


    Today was one "one of those days." You know the type. The kind of day where you just want to stay in your jammies and watch mindless teevee all day long because it's too damn cold to do anything else? This day was the impetus for making this mac and cheese. I had some Daiya calling my name from the fridge and I couldn't resist; I had to make mac and cheese.

    I didn't even bother attempting to find any recipes online. I had a pretty good idea of how I would make it based on my previous experiences as a vegetarian,who happened to have about 20 different mac and cheese recipes. This is why I was a pudge in my previous life.

    So, without further ado, here is my spectacular vegan Daiya Mac and Cheese recipe!
    Makes 2-3 large bowls of mac, at least if you use fusili, like I did. The best part of all, though, is that it takes only about 10-15 minutes from when you start boiling the pasta to when you're pigging out.

    Ingredients:
    • 1/2 pound of fusili (or your preferred pasta)
    • 1/2 cup plus 1 tsp almond milk
    • 2-3 TB Earth Balance
    • 1/2 tsp flour
    • 2/3 cup Daiya cheddar
    • 1/2 cup Daiya mozzarella
    • 1 tsp mustard powder
    • 1/2 to 1 tsp garlic powder
    • 1/4 to 1/2 tsp onion powder
    • 1 TB nutritional yeast (nooch)
    • 1/2 tsp fresh cracked black pepper (I like a lot of pepper, so you may want to taste as you go)
    • 1/4 tsp garlic salt
    • 1/8 tsp cayenne pepper
    Method:
    1. Boil salted water in a medium size pot. Add your pasta and cook according to package directions. Then drain and set aside. 
    2. While the pasta is cooking, get another pot. Heat over medium heat. Add 1/2 cup milk and Earth Balance. Whisk in the flour and spices. Bring to a gentle boil, until the sauce starts to thicken. Be sure to stir often, scraping the bottom or else it will burn to your pan.
    3. Turn heat to med-low and use a whisk to mix in the cheese. Keep whisking until cheese is almost entirely melted. I had to add that last TB of milk and whisk more to really make the cheese practically velvety smooth. It will get smoother when you add the pasta.
    4. Fold in your pasta. I let mine cook on low for another minute, just for good measure. 
    5. Adjust any seasonings and serve it up!
    Your tastebuds will thank you. Or not. Whatever.

    24 January 2011

    Pasta Fagioli: The pasta no one can pronounce

    I was ecstatic a few days ago when a trip to WholeFoods resulted in a bulk purchase of dried cannellini beans. I've been looking for these buggers for months, and no local stores ever had them. So, when I found them at WF, I squealed with delight. No, really, I did. I was just so excited to finally find what I started to think of as "The Holy Bean Grail." I began to think they didn't even actually exist, but were some mythical bean people spotted like the Loch Ness Monster or Bigfoot. Anywhoooo

    I soaked the beans over Saturday night and cooked them up last night to go into one of the easiest, most tasty pasta dishes I've had at home (or anywhere, for that matter) in a while. And it's mega cheap since most people who cook regularly have the ingredients on hand already. Except, I ran out of tomatoes and sauce a few days ago, so I had to buy those. So, whatever. You can really use any pasta you want, but I had penne rigate, which is my personal favorite. I should add now, before I forget, that this is partly someone else's recipe, but, of course, I added my own changes to fit my own tastes. I borrow recipes sometimes from LiberalPortions as we seem to have very similar tastes and his recipes are rockin. I was stumped about what I wanted to make with my beans, and he helpfully suggested this dish. So, thank you, or whatever.

    This is my version, which is plenty for 2-3 massive servings. Goes really well with a nice garlicky bread, too.

    Ingredients:
    • 1/2 lb of your fave pasta, mine is penne
    • 1- 14oz. can of diced tomatoes and the juices
    • 1 to 1 1/2 small can(s) of tomato sauce 
    • 5 cloves garlic, minced
    • 1/2 medium-sized onion, diced
    • 1 TB olive oil
    • 1 tsp dried oregano
    • 1 tsp dried basil
    • 1/2 tsp thyme
    • 1/2 tsp garlic powder
    • 1/2 tsp onion powder
    • 1/8 tsp red pepper flakes
    • 2 TB Braggs liquid aminos
    • 1 1/2 cups cooked cannellini beans
    • pepper and salt to your tastes, I like kind of a lot of pepper.
    • 7-8 large, fresh basil leaves, shredded or what have you
     Method:
    1. Put your pasta in some salted, boiling water. Cook according to the directions. Then drain and set aside.
    2. Meanwhile, you will heat the oil in a large skillet over medium heat. Add the onion, and cook until translucent, about 6 minutes. Then add in the pepper flakes and minced garlic. Cook 2 minutes.
    3. Add the tomatoes and the liquid to the skillet. Stir around to combine. Let this bubble/boil away for about 12-15 minutes.
    4. Stir in the spices, Braggs, and sauce. Test for flavor and adjust as needed. 
    5. Add in the beans and pasta. Stir well and turn heat to low and simmer for a few minutes. Stir in the fresh basil leaves. Cook 2 minutes, then it's done! 
    Easy peasy. And yummy, yummy, yummy! 

    14 January 2011

    Spicy Penne with Chickpeas (and other stuff, too)


    As you may or may not realize, I am, quite literally, obsessed with chickpeas lately (okay, all the time, not just lately).  I have been so hooked on cooking them myself instead of using canned, that I have considered buying them in bulk online to save some $$$.  Canned chickpeas are fine in a pinch, but soaking and cooking them is definitely my favorite now.  I'm thinking of starting to soak other beans now, too.  Anyway, I had about a cup of cooked chickpeas sitting in my fridge that I wanted to get used up, so I asked a friend for inspiration.  I was directed to this recipe, which I used as a guide, but also changed up a bit to fit my own tastes and on-hand ingredients.  Well, friends, it was excellent! 

    To be honest, I was kind of (by "kind of" I mean very) skeptical of the addition of either orange juice or balsamic vinegar at the end of the cooking.  Sounds bizarro and kind of gross, particularly the orange juice suggestion.  I only had white balsamic vinegar, which is a little calmer in acidity and taste than regular balsamic vinegar, so I decided to use that.  As soon as I poured it into the pan, I regretted it and got a little upset with myself for making such a foolish decision.  But, after I mixed it up really well, I realized that it was awesome!  The original recipe also called for kale, which I rarely buy as I don't really love it (except in stews).  Maybe it's an acquired taste, I don't know, but I do know that I like spinach a lot, so I typically use that when recipes call for kale as it is lighter and less bitter in taste. 

    My version makes at least 2-3 main course-sized servings.

    Ingredients:
    • 1/2 lb pasta (I used penne)
    • 1 heaping cup of cooked chickpeas
    • 1 cup baby spinach leaves
    • 1/2 of a medium red onion, thinly sliced
    • 4 cloves garlic, minced
    • 1/4 to 1/2 tsp red pepper flakes (use less if you're fearful of the spice)
    • 3-4 oz of fresh mushrooms (I had white mushrooms), sliced
    • 2 TB tomato paste
    • 1/2 tsp dried basil
    • a shake or two of oregano
    • 1 1/2 tsp white balsamic vinegar
    • 1/4 cup water
    • 1 tsp olive oil for sauteing the veg
    • salt and pepper to your tastes
     Method:
    1.  Put your pasta in a pot of salted pot of water. Cook per directions on the package.
    2. In a large skillet (preferably nonstick), heat your oil over medium heat. Add the onions and a few shakes of salt along with the red pepper flakes. A little red pepper goes a long way. So you may want to go easy on it if you don't like really spicy foods.  Stir occasionally every couple of minutes until the onions are soft. 5-6 minutes or so.
    3. Then add in your mushrooms, garlic and a TB or two of water to keep the veg moist and not stick to the pan. Add in your basil and oregano now, too. Stir around and cook until the mushrooms are mostly done. 3-5 minutes or so.
    4. Add your tomato paste and the rest of the water and mix until the paste is incorporated.  After a minute or two, your pasta should be mostly done.  So, drain it, duh!
    5. Add in the spinach, pasta, and chickpeas and stir to combine.  Cook about 4 minutes, until the spinach is wilted.  Add any more salt and pepper you may want. 
    6. Pour the vinegar in and toss well.  Serve it up and enjoy :)

    19 December 2010

    Veggie Pasta...Again


    If you've visited my blog in the past...distant past, you would have seen my veggie pasta recipe. But, I guess that it really isn't a recipe as I don't ever make it exactly the same way.  It's one of those dishes where I just use whatever I have in my fridge.  This last time it had broccoli, cremini mushrooms, carrots, yellow squash, zucchini, red onion, baby spinach and a ton of fresh basil and garlic.  Yes, I freaking LOVE garlic.  I even bought a stellar xmas tree ornament that is a bulb of garlic.  Don't believe me?  Check this out:


    Awesome, huh?

    Anyway, back to the veggie pasta.  It really is one of my most favorite things to make.  It's crazy easy, and it seems like everyone who tries it loves it.  Or, well, at least that's what they tell me.  Although, there's almost never any leftovers, so that has to mean something, right?

    As for the pasta itself, you can use any shape or kind you want, but I love me some penne.  In a pinch, I've used some rotini, but it just isn't the same.  I'm sure it's all in my head, but I'd like to think that maybe the penne is just more tasty.  The only thing I wouldn't do is use whole wheat pasta as it seems to get dried out too easily.  Plus, if I'm totally honest, I don't really like it.  Enough about my pasta OCD.

    Ingredients:
    • 1/2 lb pasta of your choice
    • 1 cup broccoli florets
    • 1 large carrot, peeled and thinly sliced
    • 3/4 of a small red onion, thick-sliced or diced large
    • 1 small zucchini, sliced
    • 1 yellow squash, sliced
    • 4-5 cloves garlic, minced
    • 4 cremini mushrooms, de-stemmed and cut into wedges
    • 1/2 cup fresh baby spinach
    • handful fresh basil, shredded
    • 3 TB olive oil
    • s&p to your tastes
    • a few shakes of garlic salt 


    Method:
    1. Put 2 TB of the oil into a skillet.  Heat over medium heat.
    2. Once hot, add the carrots and the broccoli.  Cook, stirring, for about 5 minutes.
    3. Now, add your pasta to some salted, boiling water.  Cook according to package directions.
    4. Add the zucchini, squash and onions to your skillet.  Saute, stirring occasionally for about 4 minutes. 
    5. Then add in the garlic and mushrooms.  Lower heat to medium-low and cook 3 minutes.  The veggies should be tender.
    6. Add the spinach to the pan and wilt a bit.  This should only take a couple of minutes at most.
    7. Drain your pasta and mix it in to your veggies.  I leave the heat on low and drizzle another TB of olive oil into the pan. Add in your salt and pepper, fresh basil and any other spices you want.  I sometimes add a bit of onion powder and garlic powder.  
    8. Serve up with some fresh garlic bread.  It'll blow your mind :)  Enjoy!

    19 November 2010

    Pierogies!! -- Vegan MOFO #19


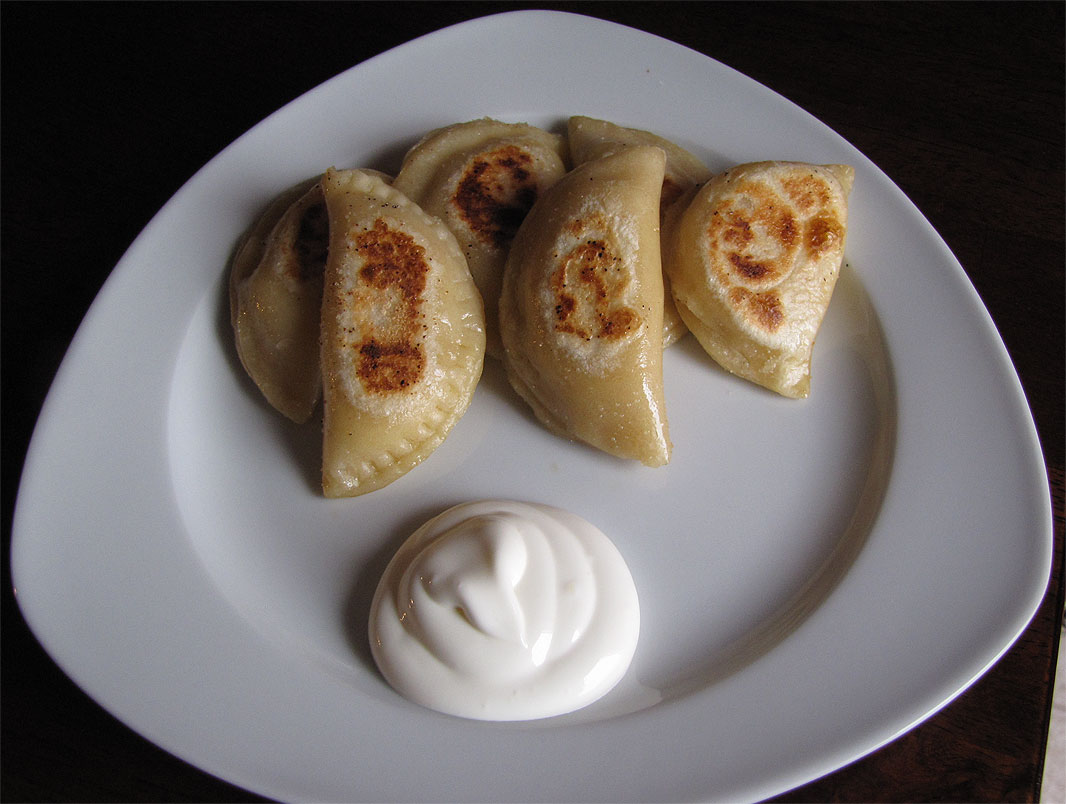
    Pierogies!!  What more can I say?  They're creamy, chewy and tasty as all get-out.  You can't eat just one.  They're versatile...add any ingredients you want into the filling.  These are just what my Polish granny would make (if I had a Polish granny, which I do not).

    You should know that this was my first time ever making pierogies, although I'm a life-long fan of them.  The thing is, I only ever ate the frozen ones and the ones at a little pub outside of Pittsburgh.  The frozen and pub varieties were tasty, but I really wanted a little more flavor out of them.  So, for this batch, I added some finely chopped caramelized onions to the mashed potatoes.  My mashed potatoes typically consist of lots of EB and salt and, occasionally, fresh garlic. OH, and another great thing to add to the mashed potatoes for these pierogi is some Daiya cheddar. Maybe 1/3 cup. Super yummy.

    I've gotta say: these pierogies turned out fabulously.  I made a big batch, but they're all gone -- there was some serious pigging out going on.  Depending on the size you make the pierogies, the dough will make enough for at least 20 (I used a 3.5 inch diameter glass to cut my dough into circles) and had dough left.  You can make your mashed potatoes any way that you want, so I'm not going to write up a recipe for that.  You will need a couple of cups of mashed potatoes.  I will share my friend's (@PaulEats from twitter) recipe for the pierogie dough.  I don't think he'd care if I shared with you all.  After filling the pierogies, you will need to boil them for about 3 minutes.  Then you can either serve them as-is, or take a little cooking spray and fry them up a bit.  I have to have them fried.  I just love how it makes some of the dough crispy, yet still chewy and delicious. 

    Ingredients:
    • 1/2cup + 2tbsp warm water 
    • 2c flour
    • 1/4c oil, 
    • 1tsp salt 
    • 2 cups mashed potatoes, give or take

    Method:
    1. In a large bowl, combine all ingredients until well combined with no dry spots.  I used my hands to combine the ingredients into well-mixed ball.
    2. Cover and let rest for 30 minutes.
    3. I separated the dough in half and rolled out the first half to be about 1/8th of an inch thick.  
    4. I took my glass and cut out circles.  Peel away the excess and set aside to be reused.
    5. Take about 1 TB of mashed potato and place in the center of the dough rounds.  Fold the dough and press the edges together, and seal.  I dipped my finger in water and rubbed around the bottom half-circle of dough before sealing the pierogies.  It seemed to make the sides stick together better.  You can press the edges firmly with your fingers to seal or use the tines of a fork and press firmly.  You want them to be sealed really well so potato doesn't come out during boiling. 
    6. Repeat steps 3-5 until you use up your dough.  
    7. Put a large pot of salty water on to boil.  When it is rolling steadily, carefully put about 5 pierogies into the pot.  I used a large slotted spoon to lower them in with no splashing.  You'll boil them for about 3 minutes, or until they rise to the top.  Repeat until all of your pierogies are cooked.
    8. You can set some aside to freeze and fry up later, but we were very hungry, so I started frying them up in a little cooking spray.  I like to fry until just lightly browned and crispy on the top and bottom.  I flip mine over several times throughout cooking to make sure they're cooked evenly.  I fry in a nonstick skillet over medium heat.  If these are freshly boiled, they take about 4-ish minutes to cook to perfection.
    9. Sprinkle with a little salt and pepper, or in my case, garlic salt and some pepper.  I like them with a little sour cream, but some people use anything from sauerkraut to applesauce.  Whatever floats your pierogie boat is cool by me.
    If you decide to freeze some, there is a little something extra you need to do. Once you boil the pierogi, place them on a wax paper-lined baking sheet, not touching one another. Let them dry so there are no wet spots left. Then, place the sheet in your freezer until the pierogie are frozen solid - at least 2 hours. Then put them in freezer bags. Doing it this way keeps the pierogie from sticking together when they are in the freezer bags because they can be a nightmare to get apart otherwise.

      15 November 2010

      Penne alla Vodka -- Vegan MOFO #15


       Skimming around the internet today, I came across a number of recipes for vodka sauce, none of which were vegan, so I jumped at the chance to give the sauce a tasty makeover.  I learned the basics of making the sauce and set out on my own to make a yummy recipe for the rest of us.  I think this recipe turned out spectacularly flavor-wise, but it didn't quite reach the creaminess level I was hoping for.  I ended up not "cooking down" the tomatoes far enough because I was very hungry and impatient as I always seem to be whenever I start cooking.  Well, enough talk. Let's get started.

      Here are a few tips for my version of Penne alla Vodka:
      • Chill out and don't "pull a Meg."  Give the tomatoes and vodka enough time and heat to cook down by about half, eventually they will. 
      • I used Muir Glen Fire Roasted diced tomatoes and I highly recommend them because they have a ton more flavor than plain diced tomatoes.
      • I used soy creamer instead of dairy heavy cream, so that its not quite as thick as heavy cream would have been.  If you're really craving a super creamy sauce, you could cook down the creamer in a saucepan and whisk in a tiny bit of flour.  I haven't tried it with this recipe, but I have done it in other creamy recipes. 
      • You can leave the sauce chunky if you want, it'll still be great, but I've always had vodka sauce that was almost totally pureed.  I used a hand-held immersion blender to smooth out the sauce, leaving a few small chunks.  You could put the completed sauce in your regular blender or food processor to reach the same result.
      • Serve with some garlic bread.  Man-oh-man.  The garlic bread dipped in the vodka sauce is quite literally a mouthgasm.
      This recipe makes 2 huge servings or 3-4 smaller ones.

      Ingredients:
      • 1/2 lb penne, uncooked
      • 1 TB extra virgin olive oil
      • 1 small onion, diced
      • 3-4 medium cloves garlic, minced (I used 4 because I LOVE garlic)
      • 1/3 cup soy creamer or you could also use your favorite milk, thickened on the stove
      • 1 14-oz can of diced tomatoes and their juices (I used the fire roasted diced tomatoes mentioned above)
      • 1/4 cup vodka
      • 1/4 to 1/2 tsp red pepper flakes
      • 1 1/2 tsp dried basil (I would have used fresh if I would have had it)
      • 1 tsp garlic powder
      • 1 tsp onion powder
      • sea salt and cracked pepper to taste
      Method:
      1. In a large saucepan, heat the oil and red pepper flakes over medium heat.  Heat about 3 minutes.
      2. Once the oil is nice and hot, add your onions and stir around.  Cook about 5 minutes, until the onions are translucent and softened.
      3. Then add in the garlic and cook another 2 minutes.
      4. Add in the vodka and tomatoes with their juice.  Be careful here.  If your pan is too hot, your vodka may catch fire.  I added the vodka slowly to avoid that.  Add the basil, onion powder and garlic powder and mix well.  Then bring to a boil until the liquid cooks down by half.  I probably cooked mine about 10 minutes on medium heat, which wasn't long enough.  You could also turn up the heat to speed this up a bit.
      5. Bring a separate pot of salted water to a boil.  Add your pasta and cook according to the package directions.
      6. After your tomato sauce thickens, stir in your creamer.  Cook about 5-10 minutes, stirring occasionally.  I brought mine back to a boil for a bit while I cooked my pasta.
      7. Drain pasta and put into a large bowl.  I dropped a TB of Earth Balance onto the pasta and tossed it gently. 
      8. Pour your sauce onto the pasta and gently toss to coat all of the noodles.  Serve up with some garlic bread and enjoy :)

      21 October 2010

      Spicy Mac and Cheez


      Creamy, tasty, hint of spice. You just can't lose with this killer pasta. I really never ever thought that nutritional yeast could make such a creamy, tasty pasta sauce! I was kind of scared to try making a lot of the recipes I found online because they had soy milk (which I really am not too fond of taste-wise). So, I combined a few different recipes and took a risk by using water instead a milk-replacement. And, it paid off...big time. I can't get over how delicious this is. I will warn you that it doesn't taste like the classic old blue box mac and cheese that we all grew up on. It has a more complex taste and the sauce is very thick and creamy. How yeast becomes so creamy, I have no idea. I used farfalle pasta (bowties), but I'm sure this would be good with pretty much any pasta. I'm thinking that next time I'll saute some onions for some extra yummy-ness.

      This pasta is actually really good for you. The nutritional yeast is packed with, well, nutrition! Check these sites for more info about the yeast:
      Buzzle- Nutritional Yeast Benefits
      Bragg-- Nutritional Yeast Information  (this is my preferred brand)

      Now, on to the Recipe!!

      Here's My Recipe: Serves 2 as Main Dish, 3-4 as a Side

      Ingredients:

      • 1/4 to 1/3 lb pasta of your choice
      • 1/4 cup nutritional yeast
      • 1/4 cup unbleached flour
      • 1 1/4 TB vegan margarine (I use Earth Balance)
      • 1 cup water
      • 1 tsp garlic salt
      • 1/4 tsp garlic powder
      • 1/4 tsp onion powder
      • 1/4 tsp mustard powder
      • 1/8 tsp turmeric (primarily to give it a more yellow color)
      • 1/8 tsp cayenne pepper (optional, but it adds a tasty kick that I think makes this dish)
      • dash cumin
      • 1/8 tsp fresh cracked black pepper (I probably added a bit more)

      Method:

      1. Before you start the cheez sauce, start boiling some water for your pasta. Add some salt and put the pasta in. Follow the directions on the pasta package. Mine took 11 minutes. Start your sauce when your pasta has 6-7 minutes left to cook.
      2. Mix your dry ingredients in a bowl until it well combined.
      3. Slowly whisk the water into the dry ingredients trying to eliminate most chunks.
      4. Melt the margarine in a small saucepan over medium heat.
      5. Pour your cheez mixture into the saucepan and whisk well. Continue whisking the sauce almost constantly until it becomes thick and creamy to your liking. I had to add about a tsp more water to mine to loosen the sauce a smidge. Adjust your spices as necessary. Then remove pan from the heat. To be honest, I did think the sauce smelled a little weird at first, but when combined with the pasta, it tastes AWESOME!!
      6. Drain your pasta gently fold into the cheez sauce and serve up immediately. It would probably be extra good with a little homemade garlic bread :)