17 February 2011

BBQ Tempeh & Homemade Baked Beans


A couple weeks back, I decided to stock up on some plain tempeh from Trader Joe's, which I recently discovered I am in love with (the tempeh). I used up the smoked tempeh last week, which left me with 2 packages of the plain stuff. I've literally been trying to think of how I want to use it up for the last week. I am not old and senile, but I am indecisive. So, last night I started talking with some twitter pals about soaking some navy beans. I didn't know what to make with them, and several pals said to make baked beans. Ick.

"But," they exclaimed, "they are a million times better when you make them from scratch! The canned baked beans are a sad representation of what real baked beans are all about."

"Fine! I'll give it a shot, but I better not be wasting my fucking beans. Do you understand how hard it is to find good dried beans around here?" I complained. I'm clearly a 70-year old in a 30-year old's body. Get off my damn lawn!

Well, I started wondering about what goes well with baked beans. And I remembered cookouts always seem to have baked beans with some sort of BBQ. And coleslaw. That is the fascinating story of how I ended up making not only BBQ sauce from scratch, but some baked beans and coleslaw. You will be quizzed. And it won't be multiple-choice, you whippersnappers.

Today's recipe for BBQ sauce makes A LOT of sauce. I have no idea what to do with the rest of mine. The tempeh (depending on how you cut it) can make 3-4 sandwiches on normal-sized burger buns. The BBQ sauce recipe is adapted from this one. The baked beans made enough for 3-4 as a side dish. Who would eat baked beans as a main dish? Sheesh. The bean recipe is adapted somewhat from Veganomicon, but I did change several things, such as using soaked, cooked navy beans instead of canned, and changing up the spices somewhat. If you do decide to make both recipes at the same time, I suggest starting the BBQ sauce once you get the beans in the oven. This will get them both done at the same-ish time. See? I'm helpful. Sometimes.

You can figure out your own coleslaw for now because mine wasn't perfect, but it made the cut for this dinner. I REALLY liked adding the creamy coleslaw onto the tempeh sandy, like a condiment. Clever, no? Yes, it is! This is my blog. I can say what I want!


Ingredients for BBQ sauce:
  • 1- 8oz package of plain tempeh, cut into finger-sized pieces or whatever size you prefer
  • 1- 15oz can of tomato sauce (or use 2 of the small cans)
  • 1 small-medium yellow onion, diced small
  • 1 TB olive oil
  • 1/2 heaped tsp red pepper flakes
  • 1 tsp cumin
  • 1/2 tsp cayenne pepper
  • 4-5 cloves garlic, minced
  • 1/2 cup ketchup
  • 1/2 cup plus 2 TB brown sugar
  • just under 1/2 cup molasses (not blackstrap)
  • 2 TB spicy brown mustard
  • 3 TB regular yellow mustard
  • 1/2 tsp or so of black pepper
  • 1/2 tsp coriander
  • 1/2 tsp garlic powder just because
  • 1 1/2 TB Braggs liquid aminos (or soy sauce)
  • 1/2 tsp liquid smoke
  • A pinch of kosher or sea salt to your tastes
Method for the BBQ sauce and Tempeh cooking:
  1. Heat a large sauce pan or deep skillet over a medium heat. Add the oil, cumin and red pepper flakes. Let the oil heat through...maybe 3-5 minutes. Add in the onions and let cook about 6-8 minutes. You want them transparent and soft. I even let mine caramelize a tiny bit. 
  2. While the onions were cooking, I got a bowl and whisked together the rest of the ingredients (except the minced garlic). Always be prepared or something. 
  3. Okay, onions are cooked. Add the garlic and cook 2 minutes. It'll be nice and fragrant. 
  4. Add the bowl of ingredients I made you prepare. Haha. You're welcome. Stir well and scrape any bits from the bottom of the pan. I just used a whisk because it was easiest and I didn't want to get another utensil. 
  5. Let cook over medium heat, stirring occasionally for about 30 minutes, so it thickens a bit. I do suggest that once it starts bubbling, you turn the heat down to just under medium heat. Otherwise the bubbling could make a mess. I got sauce in my hair, if that is any indication. And, while I'm quite short, that sauce got some serious air. So, you've made sauce. Congrats.
  6. Preheat your oven to 375 degrees F (I should have maybe told you that already). Lightly oil a baking dish of some sort. I used an enameled stoneware baking dish. Pour about half of the BBQ sauce into the dish. Then drop your tempeh fingers in. I used my fingers to flip the tempeh around in the sauce to cover all sides in said sauce. But, if you are a germophobe or whatever, you may use tongs. I also used a spoon to scoop lots of sauce onto the tops of the tempeh. Cover dish with foil. Bake about 30 minutes. Or until the fingers are somewhat tender and have absorbed a bit of the BBQ sauce.
  7. When I put the tempeh slices on my bun, I slathered on a bit more of the leftover sauce that had cooked in the dish. Holy yum. Then, topped it with some coleslaw and a bit of yellow mustard. It was ridiculously messy, but SO worth it. 
Now, on to the beans. I assume you have already soaked them overnight. Mine tend to soak close to 18 hours before I cook them. Then, put them in the pot with fresh water and about a TB of salt. Stir it all up. Put the lid on, askew, to let the steam out. Cook the navy beans for about an hour over medium heat. But, test for doneness. yours may take longer or less. I dunno! SO, your beans are cooked. Lets get started with the rest of the recipe.


Ingredients for the baked beans:
  • 1 1/2 cups cooked and drained navy beans (or 1 can, drained and rinsed)
  • 1 small white onion, minced
  • 3 cloves garlic, minced
  • 1 - 8oz can of tomato sauce
  • 1/4 cup molasses (not blackstrap)
  • 1 1/2 tsp mustard powder
  • 1/2 tsp coriander
  • 1/4 tsp salt
  • 1/8 tsp allspice
  • 1/8 tsp red pepper flakes
  • dash cayenne
  • 1/2 tsp garlic powder
  • 1 bay leaf (don't forget to remove it before serving the beans!)
  • 1 tsp Braggs (because I'm a junky for the stuff)
  • some black pepper to your tastes
Method for the baked beans:
  1. Find yourself an oven-proof pot with lid. I used a small enameled cast-iron dutch oven. Heat the pot over a medium burner and add the oil and red pepper flakes. Then add the onion and cook until the onions are translucent. 5-7 minutes. Now add the garlic. Cook another couple of minutes until some of the onions are just starting to turn golden. 
  2. While the onions are cooking, add all the other ingredients (except the beans) to a small bowl and whisk to combine. 
  3. Once the onions are browned a smidge, add the sauce you just mixed up. Stir well and dislodge any bits from the bottom of the pan. Cook about 5 minutes this way. Then turn the burner off.
  4. Add the beans and mix well. Pop the lid on the pot and cook on the center rack of oven 60 minutes total. BUT, halfway through, pull them out and give them a good stir. Take a moment to taste them and adjust your spices. Then put the cover back on and cook another 30 minutes. Fish out the bay leaf and toss it in the trash. Done!

15 February 2011

My Veggie Potpie (can kick your potpie's ass)


There are few things I love better than a good potpie (or is that pot pie?). Actually, that was a lie, as I love many more things than potpie. But I refuse to apologize! Why? Because this is my fucking blog and I am a malevolent dictator of said blog. So, potpie, it is magnificent and tasty and probably one of my most favorite comfort foods of all time. And, that, is not a lie.

I like my potpie with flavor, which all frozen potpies lack. Why waste my time eating something that tastes like shit? I absolutely refuse to have a bland dinner. So, I add some curry powder to my filling, which gives it a mildly-spiced, amazing-scented, kick-assedness. Or whatever. It rocks. I suggest using a homemade crust because it turned out SO much better than the pre-made, frozen crusts and puff pastries I used in the past. My friend, Meagan, sent me this recipe for the crust, which I halved because I didn't have enough Earth Balance to make a double crust and I didn't feel like going to the store. I ran 3.2 miles on my dreadmill (ha) today and got lazy afterward. So, cut a chickpea some slack, dude!

If you decide to make your own crust, make it before starting the filling and put it in the fridge until it's time to use it. For a flakier crust, you'll want a cold dough where the butter and shortening haven't melted. I used a pastry cutter to blend the ingredients in a large bowl until pretty well combined. Then I quickly mushed it all together by hand and wrapped it tightly in some plastic wrap. When I was done cooking the potpie filling, I rolled out the crust and put it on top of the pie plate. Don't fuck it up and forget to use lots of flour on the countertop otherwise you will have a hell of a time getting the crust off the counter. Learn from my mistake. Or not. Whatever.

This recipe is for one 9-inch potpie. I used an enameled stoneware pie plate for the potpie. You can use whatever you want. Maybe an 8x8-inch casserole or something? Speaking of using whatever you want, you can use whatever veggies you want in this potpie. I used what I had on-hand. Get creative or something!

On to the recipe. And, yes, it does include chickpeas!


Ingredients:
  • At least 1 crust, in the fridge until later
  • 2 TB olive oil
  • 1/2-2/3 cup diced onion
  • 3 large cloves garlic, minced
  • 5 button mushrooms, sliced thinly
  • 1 large & 1 small potato, peeled, diced into 1/4 inch pieces
  • 2 carrots, peeled and diced into 1/4 inch pieces
  • 1 cup cooked chickpeas (use canned if you must)
  • 1/2 cup frozen peas
  • 1/2 cup-slightly heaping- frozen lima beans
  • 1 cup frozen corn
  • 1 1/2 TB flour
  • 1/3 cup almond milk
  • 3/4 cup vegetable broth
  • 3/4 tsp curry powder, though I added a few shakes more to taste before baking the pie
  • 1/2 tsp black pepper
  • 1/4 tsp coriander
  • salt
 Method: 
  1. Preheat oven to 400 degrees F.
  2. Boil a medium-sized pot of salted water. Add the carrots and potatoes and cook about 10 minutes. Check for them to be softened and then drain. 
  3. While the potatoes and carrots are boiling, get a large skillet. I use one with straight sides so I don't spill anything to my glass cooktop, which can be a complete bitch to clean. Anywhoooo...put the skillet on a medium heat. Add half the oil.
  4. Now add the onions and saute for 4-5 minutes. Then add in your garlic and mushrooms. Saute for about 3 minutes, until the mushroom is cooked and the garlic very fragrant. 
  5. Add the frozen veg. Stir well and cook a minute or three. 
  6. While they are cooking, combine the almond milk and veg broth and heat for 1 minute in your microwave. Basically, you want them warm to hot in temp. Use a microwave-safe bowl, of course. I really shouldn't have to tell you that part, but I am anyway.
  7. Add the potatoes and carrots, along with the oil, flour and spices. I used a whisk to mix together. Don't worry. It will be very dry for a minute. Chill.
  8. Whisk in the milk/broth mixture and keep whisking until the sauce is thickened. It should take about 4 minutes. I like mine kind of thick (ha), so I cook it a minute or two longer. Taste your filling and adjust your spices as needed. Pour the filling into your pie plate.
  9. Cover pie plate with the crust. Slice a few gashes into the crust to help with possible overflow/venting. I put foil around the edges of the crust for the first 20 minutes of cooking.
  10. Remove foil after 20 minutes and cook another 25-30 minutes. Your crust will be lightly browned and you'll hear your filling boiling.
There you go. Slice into that pie and pig out. You know you want to. And if you don't, well, get lost sucka!

12 February 2011

Spicy Black Bean Burgers (aka-I'm a master beaner)


I was a black bean virgin. I had never cooked black beans. Don't judge me! So, anyway, last night I decided to soak a heaping cup of them and just see what I could come up with today. I puttered around with a few ideas, but I wanted to challenge myself to make a non-sucky black bean burger. If you've tried many bbb's, you'll likely agree that they are typically either dry and crumbly or mush. So, the challenge was on. And guess what?!? Well, you probably actually guessed it since I'm blogging it. But here it is anyway: I fucking rocked it.

I'm not sure what other toppings you might want to use, but I really enjoyed some salsa and guacamole with a little red onion. I suppose you could try other toppings, but, really, why would you? Take my word for it and use the guac/salsa combo. As a side, I made some nachos. Just spread some refried beans on tortilla chips (be sure to get the ones that say vegetarian otherwise you're going to be eating lard...for real). Then, sprinkle a bit of Daiya cheddar, onions, whole black beans and any other toppings you want. Bake at 375 degrees F for about 8 minutes. Then, add on any guac, salsa, or sour creme you might want.

Makes 4 regular-size patties.

Ingredients:
  • 1 1/2 cups cooked black beans
  • 2/3 - 1  cup bread crumbs
  • 3-4 TB vital wheat gluten
  • 3 cloves garlic
  • 4 button mushrooms, chopped
  • 1/4 cup (slightly heaping) onion, diced
  • 3 TB orange bell pepper, diced
  • 2 TB Braggs liquid aminos (or soy sauce)
  • 3-4 TB liquid taco sauce, medium
  • 3/4 tsp cumin
  • 1/4 tsp red pepper flakes
  • 1/4 tsp onion powder
  • 1/2 tsp garlic powder
  • 1/4 tsp cayenne pepper
  • 1/2 tsp liquid smoke (optional) or some smoked paprika would work
  • pepper, though I would not add salt as the Braggs and taco sauce are both salty already
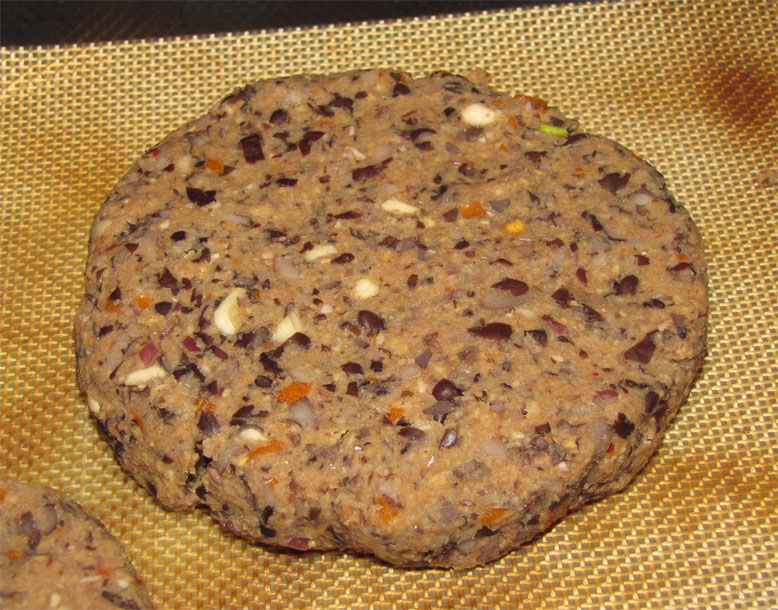
 Patty before it was cooked
Method:
  1. Preheat your oven to 375 degrees F. Line a baking sheet with whatever you typically use...silicone mat, foil, parchment. Then spray it with a smidge of cooking oil.
  2. Put your beans, onion, mushroom, red pepper, garlic, Braggs, taco sauce, liquid smoke and dry seasonings into a food processor. Pulse about 10-15 times, or until your beans are no longer whole. It will be kind of juicy, but don't worry, we'll get to that.
  3. Scoop out of the processor and into a large-ish bowl. 
  4. Add the gluten and the breadcrumbs and combine with your hands. You'll want to add 3 TB of the gluten and 1/2 cup of the breadcrumbs right off the bat. Then add more until the the bean mix all sticks together firmly and can easily be shaped into patties that don't fall apart when handled. I probably used about 3 1/2 TB gluten and 3/4 cup of the breadcrumbs total. But, depending on how juicy your mix is, you may need more or less. 
  5. Now, shape into patties that are no more than 3/4 inch thick and set on your prepped baking sheet. I sprayed a tiny bit of oil on the tops of the patties to help them crisp a bit.
  6. Cook on the middle rack for about 15 minutes. Then, carefully flip your burgers (I spritzed a bit more oil on the top) and return to oven another 12-15 minutes. You want the burgers browned somewhat. They will be crispy around the edges and firm in the middle.
So, there you go. Make it. Or not. I can't make all your decisions for you! Sheesh. But, I can say that you'd be a fool if you didn't like my burgerz.

11 February 2011

Crazy Tasty Chickpea Gravy

It sure isn't pretty, is it? But, you know what? I don't give a shit and you shouldn't either because it tastes stellar. And I think that says a lot because I'm not much of a gravy sort of girl on the best of days. I usually just eat my mashed taters with some Earth Balance and salt and pepper. This gravy was even tasty with some roasted veg. Weird, I know. Or, well, maybe it isn't. Some of you folks may think I'm the weird one for not being a gravy addict. Who knows! Who cares?! I sure as hell don't. I was just making conversation.

Anyway, I was bored today, so I started flipping through my cookbooks to find inspiration. The inspiration started from a recipe called Punkrock Chickpea Gravy (pg 111) in Vegan With A Vengeance by Ms. Moskowitz. Well, you know me; I can never resist chickpeas as they are the most kick-ass legume around, but gravy? Meh. I was skeptical, but I've been in a serious cooking rut this last week and needed to step out of my comfort zone and try something entirely different. I'm ashamed to admit that in this rut, I had forgotten to soak and cook some chickpeas. *forehead smack* I rummaged through my cupboards and found the one (and only) can of chickpeas that managed to survive my dried bean love fest. Canned beans just don't hold the appeal they once did. I've been converted. It's like some weird dried bean cult or something. Whatever.

This recipe makes a LOT of gravy. Far more than I would have thought. Probably 2-3 cups. I dunno. A lot. So, make a lot of potatoes, or whatever it is you gravy-loving folk put it on.

Ingredients:
  • 1 1/2- 2 cups cooked chickpeas (or 1 can, drained and rinsed)
  • 1/4 cup plus 1 TB all-purpose flour
  • 2 cups water (you may need a little more at the end of cooking if your gravy gets too thick for you)
  • 1 1/2  TB olive oil
  • 1/2 to 3/4 of a medium onion, diced small
  • 5 large cloves garlic, minced
  • 1/2 tsp mustard powder (ground mustard seed)
  • 1/2 tsp fresh cracked black pepper
  • 1 dash celery seed
  • 1/2 tsp onion powder
  • 1/4 to 1/2 tsp oregano
  • 1/2 tsp ground coriander
  • 1/2 tsp cumin
  • 3 shakes red pepper flakes
  • 1/8 tsp crushed rosemary
  • 2 dashes ground thyme
  • 3 TB Braggs liquid aminos (or soy sauce)
  • 1 TB lemon juice
  • 2 TB nutritional yeast
Method:
  1. Use either a potato masher or your food processor to get your chickpeas semi-mashed. I could have maybe processed mine a bit further, but I don't think you'd really want them pureed. Let's just say that you should keep them slightly chunky.
  2. Whisk together the flour and water in a bowl and set aside for now.
  3. Get a skillet out...a large nonstick one if possible. Heat oil in skillet over medium heat. Then add in the onions. After cooking for about 6-7 minutes, add in the garlic. Cook 2 more minutes, until the onion is transparent and the garlic very fragrant. 
  4. Add in the chickpeas and heat about 4 minutes. 
  5. Now, stir in all of your spices, the Braggs, and lemon juice. Stir very well and cook another minute or three.
  6. Add in the flour/water mixture and mix very well. Keep scraping the bottom of the pan so no gravy sticks. As soon as the gravy starts to thicken, I added the nooch and turned my burner down to low and just kept stirring and folding the gravy for about 4-6 minutes. I like it kind of thick, but you can add more water if it is too thick for you. 
  7. I added a bit more pepper and a few sprinkles of salt to mine here. So, taste test your seasonings and serve it up on whatever it is you weirdos put gravy on.

    02 February 2011

    Veg Chowda or The Ugly Soup That Tastes Rad

    Yeah, this is some ugly-ass soup. I know this. So keep the vomit/babypoo comments to yourself. Or whatever. Now, what you don't know is that it tastes excellent...especially with my genius addition of the garlic croutons*** I made from some ciabatta I bought at the bakery yesterday. And, aside from the sodium content, it is crazy healthy.

    This soup started with a desperate desire to use up about 4 cups of cooked white beans (I had a mix of cannellini and great northern). My Twitter pal @vegdancer offered up this recipe. I thought it sounded good, but, as you know, I tend to add other foodstuffs, particularly spices, and change any recipe I get my paws on. I used that recipe as a very rough guide to get started and then let my brain go wild adding anything that sounded remotely tasty. Then, I thought it looked silly as a regular soup, so I started up the immersion blender (I rarely have occasion to use it as I typically HATE pureed foods), and went to town. I was a bit disappointed when I realized there were no chunks of bean or veg. So, I just added the last 1 cup of beans I had on hand and about another 1/2 cup of frozen corn. No biggie.

    HAHA!! If only you'd known me about 18 months ago, you'd laugh your ass off because that one simple thing would have put me into meltdown mode. When I was just learning to cook, I always followed recipes to the letter, sad, I know. Anything that deviated from a printed recipe was cause for immediate alarm. No joke. No more, my friends! I have learned so much and continue to learn more every single time I cook. And, little things like that don't scare the hell out of me like they used to. I'm a big girl now or whatever.

    ***For the croutons, I just buttered 4 slices of a tasty ciabatta loaf. By buttered, I mean lightly covered with Earth Balance vegan butter. Slice into crouton sized bits. Place on a baking sheet buttered sides up and sprinkle lightly with garlic salt, not powder. Bake at 400 degrees F for about 10-15 minutes, or until they are browned to your liking. Then remove and set aside to cool while the soup is cooking. Don't cover or they will not be crunchy.

    This following recipe is mine and it makes far more than I would have liked to end up with. I think it could easily make 4-6 large-ish bowls.

    Ingredients:
    • 1 TB olive oil
    • 1 medium onion, diced
    • 2 carrots, peeled and thinly sliced
    • 1 Idaho potato, peeled and diced quite small
    • 5 large cloves garlic, minced
    • 4 oz fresh mushrooms, sliced
    • 3 cups veg broth (you could use water, but that seems a bit boring to me)
    • 3 TB Braggs liquid aminos (shut up, I love it)
    • 1 tsp coriander
    • 1/4 tsp red pepper flakes
    • 1/8 tsp oregano
    • 1/8 tsp thyme
    • 1/4 tsp rubbed sage
    • 1/8 tsp rosemary
    • 1 tsp garlic powder
    • 1 tsp parsley flakes
    • lots of fresh cracked black pepper
    • 1 TB cornstarch
    • 1 1/2 cups frozen corn
    • 1/2 cup frozen peas
    • 1/4 cup frozen lima beans
    • 3-4 cups cooked white beans (You could use 2 cans of white beans, drained, rinsed)
    • 1-2 TB mellow white miso
    Method:
    1. In a large soup pot, heat your oil over medium heat for about 4 minutes. Then add in the carrot and onion. Saute about 6 minutes, stirring 2-3 times until the onion is translucent. 
    2. Add the garlic and mushroom and cook about 2 minutes, until the garlic is super fragrant. There is nothing better than the smell of sauteeing garlic in my house.
    3. Now add in the red pepper flakes, potato, broth and Braggs aminos. Turn heat up to medium-high and bring to a boil for a few minutes.
    4. Once boiling, add in all the spices, not the cornstarch. Put the lid on and turn down to medium heat. Cook at a rolling boil for about 20 minutes. Taste for seasonings, except salt since the miso you add later is very salty.
    5. Remove the lid and let the liquid reduce slightly. Maybe 3-4 minutes? I don't remember. Now, add in the frozen veg and the beans. If you want a soup with texture, reserve about 1 cup of the beans and 1/2 cup of the corn to add at the end. I let this cook about 5 minutes, stirring occasionally. 
    6. Whisk in the cornstarch. Turn the burner down to low and whisk occasionally to keep anything from burning to the bottom of the pot. 
    7. I whipped out my immersion blender and went crazy with it. I pretty much pureed everything in the pot. So, then I added in the reserved beans and corn and let cook about 5 more minutes to heat them through. Carefully whisk in the miso. Now taste your seasoning and add more as necessary, duh!
    Serve with the garlic croutons. I swear, you will not regret it. And, if you do, well, get lost. I don't want to hear about it!