29 June 2011

Sweet and Spicy Tempeh

While this isn't the most beautiful dish, it is fantastically delicious. I have a serious addiction to tempeh, and yesterday I had the biggest craving for it, but couldn't think of anything fun to do with it. So, I hit FoodGawker and found this recipe from Jeroxie. While I definitely altered it, I thought you may want to give the original a shot if you are craving a slightly less spicy version. If, however, you are all about the spicy, then you may want to give my version a shot. It's wickedly tasty and goes excellently with some brown rice. Also quite tasty is eating it solo or from a leaf of romaine. I actually liked it so much, I ate some raw. But, that's just me. I'm hardcore that way.

Oh! And I got to use my mortar and pestle, which just doesn't happen often enough, really. It ground everything into a nice thick paste to put on the tempeh, which was lovely. I rub/marinated mine for a few hours before cooking, which helps flavor the tempeh a little better, but you could try cooking it right off the bat, just don't blame me if it doesn't work out. The rub/marinade tasted so good, I ate some of the tempeh raw. I'm so hardcore.

Makes 3 large servings if you serve it with rice or some sides.
Ingredients:
  • 1 package tempeh, cut into small cubes
  • 1 small can tomato sauce (8oz)
  • 2 cloves garlic
  • 1/3 cup finely chopped red onion
  • 1/2 tsp ground ginger
  • 1 tsp brown sugar
  • 1/3 tsp cinnamon (it's 1/4 plus 1/8th tsp)
  • 1/2 tsp paprika
  • 1/3 tsp smoked paprika
  • 1/3 tsp allspice
  • 1/2 tsp coriander
  • 1/4 tsp red pepper flakes
  • salt and pepper
  • 1 1/8 tsp curry powder
  • 1 tsp sriracha or other hot sauce.
  • 2 tsp (approx) Braggs aminos or soy sauce
Method:
  1.  Cut the tempeh into small cubes and place in a largish bowl. 
  2. Now, if you have a mortar and pestle, you'll need to use it. If you don't, am guessing you could use a little food processor to destroy your garlic then use a spoon or fork to make a thick paste. Okay, put the onions, garlic, ginger, brown sugar, cinnamon, paprikas, allspice, coriander, red pepper flakes and some salt and pepper into your mortar and bash it into a really thick paste, like this:
  3. Now mix the Braggs and the paste together. Then add it to the tempeh and mix very well to coat the tempeh on all sides. Cover and put in the fridge for at least an hour. I think mine ended up marinating for about 5 hours. 
  4. Once it's done sitting in your fridge for however long you want, add the tempeh to a non-stick skillet over medium heat. Cook, stirring every minute or so for about 6 minutes. Now turn the heat down to medium-low and add the tomato sauce, sriracha and curry powder. Let cook about 8 minutes, until the tomato sauce thickens and somewhat evaporates. 
  5. Serve up over rice or on some lettuce. Or just by itself. It's that good.

27 June 2011

Chili Cheese Tots - OMFG

Chili, cheese, tots. What the hell else could all go better together? Nothing, that's what.

I don't know about you all, but in my pre-veg days, I used to love going to Sonic to get their chili cheese tots. For weeks now, I've been craving those little morsels of heaven. But, they have meat and dairy in them. Icky poo, dudes. So, I decided to take matters into my own little hands and create a simple masterpiece. Fine, it's not like I even made the chili myself, but I do take pride in making it better. I bought a can of Hormel Vegetarian Chili with Beans (it has tvp in it!), and went to town with all 3 Daiya cheeses. And I can't imagine it tasting any better because it was mind-blowing. Seriously. Fucking amazing. And easy. And vegan. Dig it.

Makes 3 big servings.

Ingredients:
  • 1/2 bag frozen tater tots
  • 1 can vegan/vegetarian chili
  • 1/4 cup finely chopped red onion
  • 1/2 tsp garlic powder
  • 1/2 tsp chili powder
  • 1/4 heaping tsp onion powder
  • salt and pepper to your tastes
  • 1/4 tsp red pepper flakes
  • 1/2 cup vegan cheese (I used all 3 flavors of Daiya, but mostly the cheddar and pepperjack)
  • cooking spray
Method:
  1. Preheat oven to 450, or whatever temp your tots say. Mine was 450. Line a baking sheet with foil and lightly spritz the foil with cooking spray. This keeps the tots from sticking to the foil. Arrange tots in a single layer, not touching, if possible. Spritz the tops lightly and sprinkle with some salt.
  2. Cook about 18-20 minutes, turning them halfway so they cook evenly. 
  3. In the last 2 minutes of baking the tots, pour the can of chili into a microwave-safe bowl. Mix in the onions and spices. Heat (covered) until very hot, about 2:30. By now, your tots are ready.
  4. Carefully place the tots in a baking dish in a single layer if you can. Pour the chili on the tots and spread until it covers all the tots. Now, sprinkle your cheese on the top.
  5. Turn on your broiler and put the baking dish on the top shelf of the oven. I cooked mine about 3 minutes, until the cheese melted and started bubbling. Then, carefully remove the dish and serve. 

See, it's insanely easy, but incredibly delicious. You need to make these...NOW. Get moving!

24 June 2011

Introducing Mrs. Lidia & Her First Post

Hello loveliest of lovely readers...and you less than lovely schmucks, too, I suppose. I have an announcement to make, so pay attention:

I've decided to invite two other bloggers to post once a month as some of you have asked about gluten-free vegan food and how to make some of my recipes GF. I will freely admit that I know next to nothing about gluten-free living aside from the fact that you don't eat wheat. So, in trying to cater to youse guise, I have invited two lovely bloggers that I respect to post stuff like that for you. The first post will be an intro to being GF by the lovely @LidiaLF. Lidia writes the blog AirEater.com - aptly named because people think being gluten-free and vegan means you eat just that...air. But, as you will learn, being GF isn't a death sentence, but an opportunity to not only educate yourself but to also try a whole new plethora of tasty goods. 

Here's a little bit about Lidia:

Scarborough born, 32 year old, written for Generation Go and Four Green Steps specifically about being a gluten free vegan by choice. Currently, working in the marketing/packaging industry at a food company. Wife to @MathieuLF and cat mom to two lovely beasts residing in Toronto. 

And because someone is shy...here she is:

So, anyway, that was my big news. I will still be posting my normal type recipes and rants and stuff like that, but I'll be trying to pay more attention to the GF issue as I would like to learn more about it myself. So, I hope you appreciate how hard it was to secure Lidia as a guest blogger. I had to pay her WAAAY too much and give her all sorts of perks. You all better be thankful. 
I kid. Kind of.  So, let's please welcome Mrs. Lidia!!


Here's her first post!


An Intro to Gluten-Free Living!

I was recently asked, on Twitter, about tips to being gluten free for beginners.

The best piece of advice I can give is to always read the labels and use common sense. My day job involves food packaging. I am always amazed at the different words for gluten and how some companies try to cover it up.

There should be clear labels on all products denoting common allergens avoiding any misconception, however, until that day comes it's best to be uber aware of what ingredient statements mean.

Here are the many words for ingredients that often contain gluten:
- wheat
- durum,
- bulgur
- dinkel
- kamut
- spelt
- semolina
- couscous
- starch
- bran
- hydrolyzed vegetable protein
- dextrimaltose
- stoneground flour
- wheatgerm flour
- malted wheatgrain flour
- wholemeal four
- malt
- caramel
- butter flavour
- Chocolate, pudding, candy, and frosting
- Creamer substitute
- Dextrin, dextrose
- Food dyes
- Herbs, spices
- Hydrolysates or hydrolyzed anything
- Miso and other soy products, such as soy sauce and teriyaki sauce
- Modified Food Starch (can be from other sources)
- MSG
- Mustard Powder
- Nitrates, nitrites, sulfates or sulfites
- Oat Flour or oats
- Vitamins
- Edible Starch
- Einkorn
- Enriched Flour
- Farina
- Graham Flour
- Granary Flour
- Hard triticum
- High Gluten Flour
- High protein Flour
- Hordeum
- Triticale
- Udon
- Vital Gluten

There are more, but this gives you an idea.

Let's start at the beginning. You wake up to shower - is your soap/shampoo/conditioner gluten free? Is your toothpaste/mouthwash gluten free? What about your creams/make up/perfume?

Amazing how wheat can be in your everyday items. Being gluten free includes all these things.

What about breakfast? There are many options when it comes to gluten free bread and cereal, if you're a traditionalist, but a protein smoothy is a great way to sneak in protein without really noticing.

I'm a big fan of Vega, it's gluten free, vegan and free of most common allergens. Invented by a Canadian Iron Man, Brendan Brazier, Vega is easy to make and quick. I know I don't have much time in the morning, due to my own fault, but at least I know I'll get my fill of vitamins/minerals no matter what else I eat during the day. See Vega's health claims here.
Here are the Nutritionals for the Chocolate flavour, my particular favourite, I suggest checking out the site for a non fuzzy version.
In between breakfast and lunch, I'm a big fan of snacking, I usually have a Larabar and or fruit/nuts at my desk.

Lunch can consist of anything, if you're willing to put in effort or find a restaurant you know that can promise a non contaminated meal. It doesn't have to be all salads and bird seed. You can have a sandwich on gluten free bread, or gluten free pasta, gluten free pizza - anything really. It's just a mental thing interms of breaking free from the, "What the heck am I going to do now?!" thinking. Being gluten free just requires a bit more thought in terms of your meals. The difference being to walk into any restaurant and feel comfortable with the handling and preparation of food.

Eating at restaurants is a bit harder in terms of finding people who really understand what gluten can do to you if ingested. I find the closer you are to a city the easier it is.

Say goodbye to drinking: beer, whiskey, malt based drinks, gin and some vodkas. All of these drinks are made with some form of gluten. I find I've come to appreciate wine more. I was also pleasantly surprised that my favourite vodka, Iceberg Vodka, was gluten free.

There's gluten in the candy coating shell in Smarties, Blue Cheese, Rice Krispies and a number of surprising places just to name a few. It takes a while to adjust passing by rows and rows in the grocery store that contain gluten. It's a shame really, but that just opens the doors to more natural fruits and vegetables that are gluten free and much better than anything processed could be. On the bright side, it gets you cooking and more aware of your health than ever before - not really a bad thing?

If you're interested there is a "Dummies" series for living gluten free:


Hopefully this post has helped.

Check out great links like:
http://www.celiac.ca/
http://www.torontoceliac.org/contact/index.shtml
http://www.celiacguide.org/diagnosis.html

Happy eating!

22 June 2011

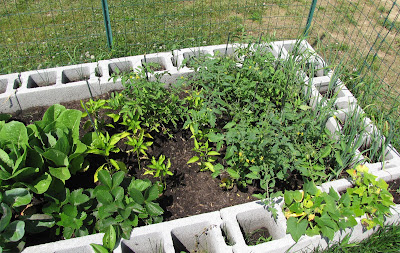
Garden Update #3!

I've been waiting a while for this update because growth in the garden has been slow the last few weeks. But, over the last 6 days, things have gone wild! It's like my garden hit its puberty growth spurt all of a sudden and it seems to have grown every time I blink my damn eyes. So, I decided it was definitely time for an update. I just realized last night that I have tomatoes. Like, for real. They're green, but they're there. And, drumroll please, jalapenos! Rock on. I'm ready to make some salsas...now if the tomatoes would just turn red...
I am bummed that my watermelon plants died. And all but 1 of my okra plants died. The onions and garlic are going really well. You can only see their tall greens, so I didn't bother to photograph them. The green zucchini are full of flowers, but no actual zukes yet, so that's another I didn't get a photo of. Well, lovelies (and not so lovelies), That is all for now. Enjoy the garden....or not. Whatever.

Whole garden shot. Looks wild.


L to R: Romaine, peppers, toms, onions, garlic.

L to R: Peas, garlic, brussels, romaine, strawberries (that are not producing...grrr).

Pea plant and some garlic.

Pea plant with lots of flowers.

Pea plant starting to bud more.

Hard to see, but in the little brown spot in the center, is a bell pepper starting to grow.

Cherry tomatoes. Back right are some romas.

More cherry tomatoes!

Tiny jalapeno :)

Another jalapeno hiding under the tomato leaves.

One sad little okra barely surviving out of the 4 plants I started with.

Roma tomatoes. 

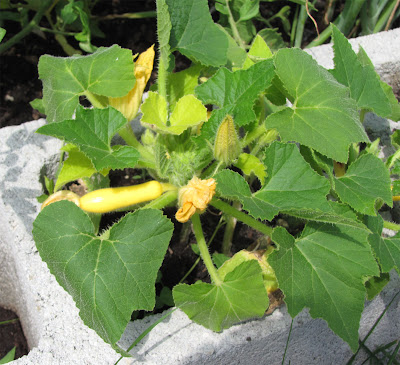
Tiny summer squash. It's less than 1 inch long right now. 

Another summer squash. It's about 2 inches long. I'm so stoked!!

20 June 2011

Sometimes You Make Other People's Food


I was in the mood for some chickpeas today. What's new, right?! What to make, what to make? So many options. Chickpea sammies, chickpea masala, curried chickpeas, stew, chickpea noodle soup, chickpea patties. The options are endless. I settled on some baked falafel from one of my favorite cookbooks, Appetite for Reduction. Of course, I altered the falafel somewhat, adding more garlic, sriracha, and some curry powder. This is totally one of my go-to recipes when I'm not sure what I want. And, it always gets eaten. All of it. The falafels are extra tasty with a little lemony tahini sauce.


My lemony tahini sauce recipe:
  • 1/4 cup tahini
  • 1 TB lemon juice
  • 1/4 tsp garlic powder or a tiny bit of minced fresh garlic
  • 1-2 TB water
  1. Whisk all the ingredients together in a small bowl. Don't worry, it starts runny, but will get thicker as it sets. If runny, add a little more tahini and whisk again. If it's too dry, add a bit more water. Easy. Let set for 5 minutes so the flavors meld and the sauce thickens.


Settled on the falafel, I had to think of something to make to go with it. DOH! Of course!
I recently stumbled upon a recipe for Salt & Vinegar Potato Wedges on The Tolerant Vegan's website. Ever since I saw it, I have been obsessed with making the potatoes. I honestly can't believe it's taken me this long to make them. The wait was worth it, I promise. HOLY HELL. These buggers are fucking awesome! The only thing I changed was to use a smidge less oil. Otherwise, I made them exactly as the recipe calls for. They'll be getting a regular rotation in my recipe repertoire. For reals. You absolutely HAVE to make them. I even ended up dipping mine in the rest of the vinegar cuz I liked it so much. Why didn't I think of this brilliant recipe? I absolutely love salt and vinegar potato chips, and these wedges are a low-fat, healthier version of them.

I'm not posting The Tolerant Vegan's recipe, because I think you should definitely visit her site. Read her "About" page. You'll be a better person for it. And, oh my god, her photos are mouth-watering.

Dudes and dudettes, that was my exciting post. And a big thank you to The Tolerant Vegan for the awesome recipe. I'm seriously smitten.