25 October 2010

Garlicky Hummus


Sometimes I really crave chickpeas, like, BAD.  This is definitely one of those days.  And, my favorite way to eat chickpeas, aside from straight out of the can, is to make them into hummus; creamy, garlicky hummus.  Back in ye olden days, I used to buy hummus pre-made in tiny, plastic name-brand containers for $4.00 (which I could often devour in one sitting).  But one day, a Jordanian friend of mine showed me just how easy (and cheap) it is to make it at home.  Now, I'd like to pass that along to you.  As always, add any ingredients you'd like, this recipe is simply how I normally make it. 

I use canned chickpeas because they're inexpensive and you don't have to soak/cook them for ages, which you'd need to do if you were using dried chickpeas.  I should warn you, however, that some tahini (ground sesame paste) can be pricey if you only plan on using it once.  I use tahini regularly, so I buy the 16 ounce jar of Ziyad Brand Imported Tahini, which costs about $6.50 and has the taste and consistency I love.  I have seen small cans of other brands at the grocery store for pretty cheap, though, so use whatever works for you. I definitely recommend stirring or shaking your tahini well before adding it to your food processor because it has a tendency to separate with the top layer being all oil.  I just make sure my lid is on tight and give it a vigorous shake for a few seconds.

This recipe makes enough for several servings, depending on your serving size.  I eat a fair bit, and it makes about 2.5 - 3 servings for me.  I prefer to serve up my hummus with some fresh veg (cherry tomatoes, seedless cucumbers, button mushrooms, carrot sticks and even cauliflower florets) and whole wheat pitas.  Sometimes I stuff the pitas with the hummus and veggies, but usually I just dip them in the hummus.

Ingredients:
  • 1 can chickpeas, liquid drained, but reserved in a separate bowl.
  • 3-4 TB tahini
  • 3 average-size cloves garlic, peeled and stem trimmed off
  • 1 1/2 TB extra virgin olive oil
  • 1/4 tsp cumin powder
  • dash or two cayenne powder
  • a bit of lemon juice (optional--which I usually forget to add, and the hummus tastes wonderful anyway)
  • pinch of salt or garlic salt
Method:
  1. Get out your food processor (a blender might work okay too, although I've never tried it). Update 10/22/11: I make it in my Vita-Mix blender all the time now. Ultra creamy and smooth with no added oil. Just a little water in its place.
  2. Put your drained chickpeas, tahini, garlic cloves, cumin, cayenne and salt to the food processor.  Blend for a moment, so there are no large chunks of chickpea left.  Then, add in about 2 TB of the bean liquid and pulse several times.
  3. Open the top chute of the processor.  Turn processor back on and drizzle the olive oil into the mix.  Blend until very smooth.  Some people add a lot more oil or bean liquid to make it runnier, but I like it creamy and somewhat thick.  So, do whatever feels (and tastes) right to you.  Enjoy!!

22 October 2010

Tu-Not Sammies


YUMMM!! I never, ever thought a chickpea sandwich could taste like an old meaty comfort food from my distajnt past (tuna fish)...only better.  I was shocked to find a simple, delicious vegan recipe to take its place.  This is my very favorite sandwich of all time, and I make it at least once a week.

I got the basis for this recipe here (HappyHerbivore-- one of my new favorite vegan blogs), but changed a few things to fit my own personal tastes. I definitely recommend using the nutritional yeast if you have some. If you're new to nutritional yeast, it is not the same stuff you use to bake bread with. This yeast has a cheesy-ish flavor and (to be frank) looks like fish food flakes. I buy the Braggs brand at my health food store, which has added B-vitamins. Do some research about B-12 if you're unsure of the nutritional needs of vegans and vegetarians. On to the recipe!!

Here's My Version: Makes 2 Sandwiches

Ingredients:

  • 2/3 cup soaked/cooked chickpeas, or use half of a can after you rinse and drain them
  • 2-3 TB diced onion
  • 1 tsp spicy brown mustard
  • 1-2 TB dill relish
  • 1 heaping TB nutritional yeast
  • 1 TB Vegenaise Mayo --You could use other brands, but Vegenaise is my favorite
  • 1-2 TB unsalted sunflower seeds
  • 1/2 tsp Braggs 
  • pepper to taste

Method:

  1. Put everything in a food processor and pulse a few times to chop and combine the ingredients. I left mine kind of chunky, which was delicious! You can also use a fork and mash the chickpea by hand should the mood strike you. It never strikes me, so good luck with that.
  2. Taste and adjust. Feel free to add any other ingredients or seasonings. You're the one eating it, after all. I serve mine on toasted bread because it's awesome. Sometimes, though, I eat it straight out of a bowl with some crackers instead of on bread. Too much tastiness.

21 October 2010

Spicy Mac and Cheez


Creamy, tasty, hint of spice. You just can't lose with this killer pasta. I really never ever thought that nutritional yeast could make such a creamy, tasty pasta sauce! I was kind of scared to try making a lot of the recipes I found online because they had soy milk (which I really am not too fond of taste-wise). So, I combined a few different recipes and took a risk by using water instead a milk-replacement. And, it paid off...big time. I can't get over how delicious this is. I will warn you that it doesn't taste like the classic old blue box mac and cheese that we all grew up on. It has a more complex taste and the sauce is very thick and creamy. How yeast becomes so creamy, I have no idea. I used farfalle pasta (bowties), but I'm sure this would be good with pretty much any pasta. I'm thinking that next time I'll saute some onions for some extra yummy-ness.

This pasta is actually really good for you. The nutritional yeast is packed with, well, nutrition! Check these sites for more info about the yeast:
Buzzle- Nutritional Yeast Benefits
Bragg-- Nutritional Yeast Information  (this is my preferred brand)

Now, on to the Recipe!!

Here's My Recipe: Serves 2 as Main Dish, 3-4 as a Side

Ingredients:

  • 1/4 to 1/3 lb pasta of your choice
  • 1/4 cup nutritional yeast
  • 1/4 cup unbleached flour
  • 1 1/4 TB vegan margarine (I use Earth Balance)
  • 1 cup water
  • 1 tsp garlic salt
  • 1/4 tsp garlic powder
  • 1/4 tsp onion powder
  • 1/4 tsp mustard powder
  • 1/8 tsp turmeric (primarily to give it a more yellow color)
  • 1/8 tsp cayenne pepper (optional, but it adds a tasty kick that I think makes this dish)
  • dash cumin
  • 1/8 tsp fresh cracked black pepper (I probably added a bit more)

Method:

  1. Before you start the cheez sauce, start boiling some water for your pasta. Add some salt and put the pasta in. Follow the directions on the pasta package. Mine took 11 minutes. Start your sauce when your pasta has 6-7 minutes left to cook.
  2. Mix your dry ingredients in a bowl until it well combined.
  3. Slowly whisk the water into the dry ingredients trying to eliminate most chunks.
  4. Melt the margarine in a small saucepan over medium heat.
  5. Pour your cheez mixture into the saucepan and whisk well. Continue whisking the sauce almost constantly until it becomes thick and creamy to your liking. I had to add about a tsp more water to mine to loosen the sauce a smidge. Adjust your spices as necessary. Then remove pan from the heat. To be honest, I did think the sauce smelled a little weird at first, but when combined with the pasta, it tastes AWESOME!!
  6. Drain your pasta gently fold into the cheez sauce and serve up immediately. It would probably be extra good with a little homemade garlic bread :)

Roasted Brussels Sprouts


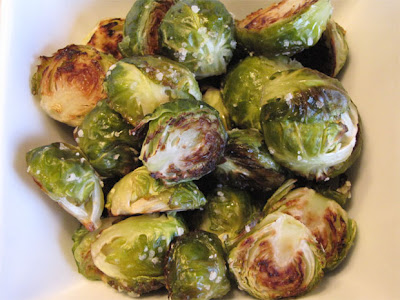
I know, I know-- Brussels sprouts! Yuck!  Only not at all!!!  So easy. So tasty. Brussels sprouts are surprisingly yummy. I didn't eat them when I was a kid because my mom never liked them (until about 2 weeks ago). I was at my local Farmer's Market recently and I saw some little buckets of brussels sprouts for $2.00. They seemed like a bargain, so I snagged one. I really had no idea what they tasted like or how I should cook them, so I figured that I couldn't really go wrong by roasting them in my oven. I guess I don't really even need to give you a specific recipe, since there's no much to it, but I'll try anyway...because you're worth it!!

Ingredients:

  • brussels sprouts (use as many as you want)
  • extra virgin olive oil - I used just enough to lightly drizzle on the sprouts
  • salt - I like to use kosher or another larger-grain salt

Method:

  1. Pre-heat oven to 425 degrees F.
  2. Chop the little stems off of your sprouts. Then slice your sprouts in half lengthwise.
  3. Remove the top little leaves of the sprout.
  4. Place sprouts in a large bowl and lightly drizzle with oil. Toss to coat the sprouts.
  5. Place sprouts on baking sheet cut sides down. Sprinkle the salt on top of the sprouts.
  6. Bake on middle rack of oven for about 18-20 minutes. I like mine with some crispy edges, so mine took about 20 minutes, but if you want them out sooner, take them out. The edges and tops of the sprouts will lightly browned if you cook them the full 20 minutes.

Minestrone Soup


Minestrone soup is the PERFECT soup for chilly, windy days. Today was that day. Ever since the weather started to cool off this last week, I have been craving soup. I just didn't know what to make. When I woke up this morning, I knew that I absolutely HAD to make some minestrone soup. What to do when you have no recipe? Just make it up as you go! As I always say, add whatever sounds good to you or whatever you have on hand.  I know that the ingredient list is long, but the directions are insanely easy. Just use this recipe as a rough guide. I do very, very much recommend getting these fire roasted tomatoes to put into the soup. FABULOUS!


This recipe easily serves 6-8 adults.

Ingredients:

  • 5 cups vegetable broth
  • 1-2 cups water
  • 1/3 pound pasta of your choice (I used ditalini)
  • 28 oz. can of diced fire-roasted tomatoes & their juice (I got mine at WholeFoods)
  • 15 oz. can of light red kidney beans, drained
  • 15 oz. can of cannelini beans, drained
  • 2 large stalks celery, chopped small (I also added some of the leaves from the celery plant)
  • 1/2 large red onion, chopped
  • 2 carrots, peeled and thinly sliced into rounds
  • 1 small zucchini, sliced thinly into rounds
  • 1 medium/large red potato, peeled and diced small
  • 1 very large handful baby spinach, roughly chopped/torn
  • 1 medium leek, sliced-- white and light green parts only (Be sure to clean the leek really well after slicing. I use my salad spinner)
  • 3-4 cloves garlic, minced
  • 1 TB dried parsley
  • 1 1/2 tsp dried basil
  • 2 TB extra virgin olive oil
  • 1/2 tsp fresh cracked black pepper
  • 1 1/2 bay leaves
  • 1 tsp garlic powder
  • 1/2 tsp onion powder
  • 1/2 tsp garlic salt
  • sea salt to your tastes
  • 1/8 tsp ground coriander
  • dash ground thyme
  • 1/8 tsp crushed rosemary


Method:

  1. Heat half of your oil in a stock pot, and half in a non-stick frying pan (both over medium heat).
  2. Place the celery and onion in the stock pot to start them cooking. In the frying pan, place the potatoes, carrot, zucchini. Stir frequently so nothing sticks to the pans. When the onion is translucent, add the garlic, leek, and spinach and stir. Let cook about 2 minutes, then add the veggies from the frying pan. Mix well.
  3. Add the tomatoes and their juice to the stock pot. Then, mix in the vegetable broth.
  4. Add the rest of the ingredients and stir well. If you're adding the parmigiana-reggiano, do so now.
  5. Cook about 20 minutes, boiling gently, covered. Be sure to stir every few minutes so nothing sticks to the bottom of the pot.
  6. Mix in your pasta and cover again (or cook separately and add in a few minutes). Follow the cooking time on the pasta you choose. Mine took 9 minutes, but yours may take longer. Once the pasta is cooked, you will likely need to add the water. I added about 1 1/4 cups hot water to mine and cooked it another 5 minutes.
  7. Keep tasting and adjust your spices as necessary, and be sure to remove the bay leaves before serving. This soup goes very well with some delicious, fresh-baked crusty bread or some homemade garlic bread.