29 June 2011

Sweet and Spicy Tempeh

While this isn't the most beautiful dish, it is fantastically delicious. I have a serious addiction to tempeh, and yesterday I had the biggest craving for it, but couldn't think of anything fun to do with it. So, I hit FoodGawker and found this recipe from Jeroxie. While I definitely altered it, I thought you may want to give the original a shot if you are craving a slightly less spicy version. If, however, you are all about the spicy, then you may want to give my version a shot. It's wickedly tasty and goes excellently with some brown rice. Also quite tasty is eating it solo or from a leaf of romaine. I actually liked it so much, I ate some raw. But, that's just me. I'm hardcore that way.

Oh! And I got to use my mortar and pestle, which just doesn't happen often enough, really. It ground everything into a nice thick paste to put on the tempeh, which was lovely. I rub/marinated mine for a few hours before cooking, which helps flavor the tempeh a little better, but you could try cooking it right off the bat, just don't blame me if it doesn't work out. The rub/marinade tasted so good, I ate some of the tempeh raw. I'm so hardcore.

Makes 3 large servings if you serve it with rice or some sides.
Ingredients:
  • 1 package tempeh, cut into small cubes
  • 1 small can tomato sauce (8oz)
  • 2 cloves garlic
  • 1/3 cup finely chopped red onion
  • 1/2 tsp ground ginger
  • 1 tsp brown sugar
  • 1/3 tsp cinnamon (it's 1/4 plus 1/8th tsp)
  • 1/2 tsp paprika
  • 1/3 tsp smoked paprika
  • 1/3 tsp allspice
  • 1/2 tsp coriander
  • 1/4 tsp red pepper flakes
  • salt and pepper
  • 1 1/8 tsp curry powder
  • 1 tsp sriracha or other hot sauce.
  • 2 tsp (approx) Braggs aminos or soy sauce
Method:
  1.  Cut the tempeh into small cubes and place in a largish bowl. 
  2. Now, if you have a mortar and pestle, you'll need to use it. If you don't, am guessing you could use a little food processor to destroy your garlic then use a spoon or fork to make a thick paste. Okay, put the onions, garlic, ginger, brown sugar, cinnamon, paprikas, allspice, coriander, red pepper flakes and some salt and pepper into your mortar and bash it into a really thick paste, like this:
  3. Now mix the Braggs and the paste together. Then add it to the tempeh and mix very well to coat the tempeh on all sides. Cover and put in the fridge for at least an hour. I think mine ended up marinating for about 5 hours. 
  4. Once it's done sitting in your fridge for however long you want, add the tempeh to a non-stick skillet over medium heat. Cook, stirring every minute or so for about 6 minutes. Now turn the heat down to medium-low and add the tomato sauce, sriracha and curry powder. Let cook about 8 minutes, until the tomato sauce thickens and somewhat evaporates. 
  5. Serve up over rice or on some lettuce. Or just by itself. It's that good.

27 June 2011

Chili Cheese Tots - OMFG

Chili, cheese, tots. What the hell else could all go better together? Nothing, that's what.

I don't know about you all, but in my pre-veg days, I used to love going to Sonic to get their chili cheese tots. For weeks now, I've been craving those little morsels of heaven. But, they have meat and dairy in them. Icky poo, dudes. So, I decided to take matters into my own little hands and create a simple masterpiece. Fine, it's not like I even made the chili myself, but I do take pride in making it better. I bought a can of Hormel Vegetarian Chili with Beans (it has tvp in it!), and went to town with all 3 Daiya cheeses. And I can't imagine it tasting any better because it was mind-blowing. Seriously. Fucking amazing. And easy. And vegan. Dig it.

Makes 3 big servings.

Ingredients:
  • 1/2 bag frozen tater tots
  • 1 can vegan/vegetarian chili
  • 1/4 cup finely chopped red onion
  • 1/2 tsp garlic powder
  • 1/2 tsp chili powder
  • 1/4 heaping tsp onion powder
  • salt and pepper to your tastes
  • 1/4 tsp red pepper flakes
  • 1/2 cup vegan cheese (I used all 3 flavors of Daiya, but mostly the cheddar and pepperjack)
  • cooking spray
Method:
  1. Preheat oven to 450, or whatever temp your tots say. Mine was 450. Line a baking sheet with foil and lightly spritz the foil with cooking spray. This keeps the tots from sticking to the foil. Arrange tots in a single layer, not touching, if possible. Spritz the tops lightly and sprinkle with some salt.
  2. Cook about 18-20 minutes, turning them halfway so they cook evenly. 
  3. In the last 2 minutes of baking the tots, pour the can of chili into a microwave-safe bowl. Mix in the onions and spices. Heat (covered) until very hot, about 2:30. By now, your tots are ready.
  4. Carefully place the tots in a baking dish in a single layer if you can. Pour the chili on the tots and spread until it covers all the tots. Now, sprinkle your cheese on the top.
  5. Turn on your broiler and put the baking dish on the top shelf of the oven. I cooked mine about 3 minutes, until the cheese melted and started bubbling. Then, carefully remove the dish and serve. 

See, it's insanely easy, but incredibly delicious. You need to make these...NOW. Get moving!

24 June 2011

Introducing Mrs. Lidia & Her First Post

Hello loveliest of lovely readers...and you less than lovely schmucks, too, I suppose. I have an announcement to make, so pay attention:

I've decided to invite two other bloggers to post once a month as some of you have asked about gluten-free vegan food and how to make some of my recipes GF. I will freely admit that I know next to nothing about gluten-free living aside from the fact that you don't eat wheat. So, in trying to cater to youse guise, I have invited two lovely bloggers that I respect to post stuff like that for you. The first post will be an intro to being GF by the lovely @LidiaLF. Lidia writes the blog AirEater.com - aptly named because people think being gluten-free and vegan means you eat just that...air. But, as you will learn, being GF isn't a death sentence, but an opportunity to not only educate yourself but to also try a whole new plethora of tasty goods. 

Here's a little bit about Lidia:

Scarborough born, 32 year old, written for Generation Go and Four Green Steps specifically about being a gluten free vegan by choice. Currently, working in the marketing/packaging industry at a food company. Wife to @MathieuLF and cat mom to two lovely beasts residing in Toronto. 

And because someone is shy...here she is:

So, anyway, that was my big news. I will still be posting my normal type recipes and rants and stuff like that, but I'll be trying to pay more attention to the GF issue as I would like to learn more about it myself. So, I hope you appreciate how hard it was to secure Lidia as a guest blogger. I had to pay her WAAAY too much and give her all sorts of perks. You all better be thankful. 
I kid. Kind of.  So, let's please welcome Mrs. Lidia!!


Here's her first post!


An Intro to Gluten-Free Living!

I was recently asked, on Twitter, about tips to being gluten free for beginners.

The best piece of advice I can give is to always read the labels and use common sense. My day job involves food packaging. I am always amazed at the different words for gluten and how some companies try to cover it up.

There should be clear labels on all products denoting common allergens avoiding any misconception, however, until that day comes it's best to be uber aware of what ingredient statements mean.

Here are the many words for ingredients that often contain gluten:
- wheat
- durum,
- bulgur
- dinkel
- kamut
- spelt
- semolina
- couscous
- starch
- bran
- hydrolyzed vegetable protein
- dextrimaltose
- stoneground flour
- wheatgerm flour
- malted wheatgrain flour
- wholemeal four
- malt
- caramel
- butter flavour
- Chocolate, pudding, candy, and frosting
- Creamer substitute
- Dextrin, dextrose
- Food dyes
- Herbs, spices
- Hydrolysates or hydrolyzed anything
- Miso and other soy products, such as soy sauce and teriyaki sauce
- Modified Food Starch (can be from other sources)
- MSG
- Mustard Powder
- Nitrates, nitrites, sulfates or sulfites
- Oat Flour or oats
- Vitamins
- Edible Starch
- Einkorn
- Enriched Flour
- Farina
- Graham Flour
- Granary Flour
- Hard triticum
- High Gluten Flour
- High protein Flour
- Hordeum
- Triticale
- Udon
- Vital Gluten

There are more, but this gives you an idea.

Let's start at the beginning. You wake up to shower - is your soap/shampoo/conditioner gluten free? Is your toothpaste/mouthwash gluten free? What about your creams/make up/perfume?

Amazing how wheat can be in your everyday items. Being gluten free includes all these things.

What about breakfast? There are many options when it comes to gluten free bread and cereal, if you're a traditionalist, but a protein smoothy is a great way to sneak in protein without really noticing.

I'm a big fan of Vega, it's gluten free, vegan and free of most common allergens. Invented by a Canadian Iron Man, Brendan Brazier, Vega is easy to make and quick. I know I don't have much time in the morning, due to my own fault, but at least I know I'll get my fill of vitamins/minerals no matter what else I eat during the day. See Vega's health claims here.
Here are the Nutritionals for the Chocolate flavour, my particular favourite, I suggest checking out the site for a non fuzzy version.
In between breakfast and lunch, I'm a big fan of snacking, I usually have a Larabar and or fruit/nuts at my desk.

Lunch can consist of anything, if you're willing to put in effort or find a restaurant you know that can promise a non contaminated meal. It doesn't have to be all salads and bird seed. You can have a sandwich on gluten free bread, or gluten free pasta, gluten free pizza - anything really. It's just a mental thing interms of breaking free from the, "What the heck am I going to do now?!" thinking. Being gluten free just requires a bit more thought in terms of your meals. The difference being to walk into any restaurant and feel comfortable with the handling and preparation of food.

Eating at restaurants is a bit harder in terms of finding people who really understand what gluten can do to you if ingested. I find the closer you are to a city the easier it is.

Say goodbye to drinking: beer, whiskey, malt based drinks, gin and some vodkas. All of these drinks are made with some form of gluten. I find I've come to appreciate wine more. I was also pleasantly surprised that my favourite vodka, Iceberg Vodka, was gluten free.

There's gluten in the candy coating shell in Smarties, Blue Cheese, Rice Krispies and a number of surprising places just to name a few. It takes a while to adjust passing by rows and rows in the grocery store that contain gluten. It's a shame really, but that just opens the doors to more natural fruits and vegetables that are gluten free and much better than anything processed could be. On the bright side, it gets you cooking and more aware of your health than ever before - not really a bad thing?

If you're interested there is a "Dummies" series for living gluten free:


Hopefully this post has helped.

Check out great links like:
http://www.celiac.ca/
http://www.torontoceliac.org/contact/index.shtml
http://www.celiacguide.org/diagnosis.html

Happy eating!

22 June 2011

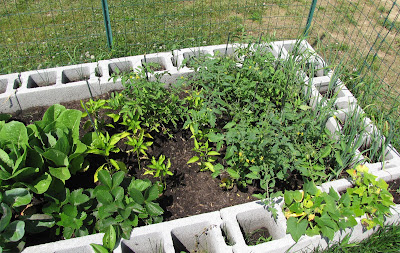
Garden Update #3!

I've been waiting a while for this update because growth in the garden has been slow the last few weeks. But, over the last 6 days, things have gone wild! It's like my garden hit its puberty growth spurt all of a sudden and it seems to have grown every time I blink my damn eyes. So, I decided it was definitely time for an update. I just realized last night that I have tomatoes. Like, for real. They're green, but they're there. And, drumroll please, jalapenos! Rock on. I'm ready to make some salsas...now if the tomatoes would just turn red...
I am bummed that my watermelon plants died. And all but 1 of my okra plants died. The onions and garlic are going really well. You can only see their tall greens, so I didn't bother to photograph them. The green zucchini are full of flowers, but no actual zukes yet, so that's another I didn't get a photo of. Well, lovelies (and not so lovelies), That is all for now. Enjoy the garden....or not. Whatever.

Whole garden shot. Looks wild.


L to R: Romaine, peppers, toms, onions, garlic.

L to R: Peas, garlic, brussels, romaine, strawberries (that are not producing...grrr).

Pea plant and some garlic.

Pea plant with lots of flowers.

Pea plant starting to bud more.

Hard to see, but in the little brown spot in the center, is a bell pepper starting to grow.

Cherry tomatoes. Back right are some romas.

More cherry tomatoes!

Tiny jalapeno :)

Another jalapeno hiding under the tomato leaves.

One sad little okra barely surviving out of the 4 plants I started with.

Roma tomatoes. 

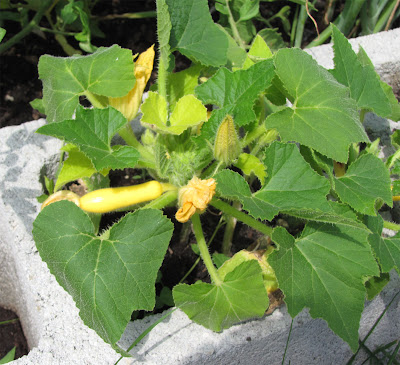
Tiny summer squash. It's less than 1 inch long right now. 

Another summer squash. It's about 2 inches long. I'm so stoked!!

20 June 2011

Sometimes You Make Other People's Food


I was in the mood for some chickpeas today. What's new, right?! What to make, what to make? So many options. Chickpea sammies, chickpea masala, curried chickpeas, stew, chickpea noodle soup, chickpea patties. The options are endless. I settled on some baked falafel from one of my favorite cookbooks, Appetite for Reduction. Of course, I altered the falafel somewhat, adding more garlic, sriracha, and some curry powder. This is totally one of my go-to recipes when I'm not sure what I want. And, it always gets eaten. All of it. The falafels are extra tasty with a little lemony tahini sauce.


My lemony tahini sauce recipe:
  • 1/4 cup tahini
  • 1 TB lemon juice
  • 1/4 tsp garlic powder or a tiny bit of minced fresh garlic
  • 1-2 TB water
  1. Whisk all the ingredients together in a small bowl. Don't worry, it starts runny, but will get thicker as it sets. If runny, add a little more tahini and whisk again. If it's too dry, add a bit more water. Easy. Let set for 5 minutes so the flavors meld and the sauce thickens.


Settled on the falafel, I had to think of something to make to go with it. DOH! Of course!
I recently stumbled upon a recipe for Salt & Vinegar Potato Wedges on The Tolerant Vegan's website. Ever since I saw it, I have been obsessed with making the potatoes. I honestly can't believe it's taken me this long to make them. The wait was worth it, I promise. HOLY HELL. These buggers are fucking awesome! The only thing I changed was to use a smidge less oil. Otherwise, I made them exactly as the recipe calls for. They'll be getting a regular rotation in my recipe repertoire. For reals. You absolutely HAVE to make them. I even ended up dipping mine in the rest of the vinegar cuz I liked it so much. Why didn't I think of this brilliant recipe? I absolutely love salt and vinegar potato chips, and these wedges are a low-fat, healthier version of them.

I'm not posting The Tolerant Vegan's recipe, because I think you should definitely visit her site. Read her "About" page. You'll be a better person for it. And, oh my god, her photos are mouth-watering.

Dudes and dudettes, that was my exciting post. And a big thank you to The Tolerant Vegan for the awesome recipe. I'm seriously smitten.

19 June 2011

The ABCs of Food

Apparently, there have been some of these silly little things going around the internet,and it looked fun. I found this one on my friend's blog, Czech Vegan (In America), and I had to do it. Let the ABCs commence!

A is for Avocado: How do you like yours prepared?
  • I love it pretty much any way I have ever had it: in salsas, as sandwich spread, as guacamole, you name it, I love it.

B is for Bread: Regardless of nutrition, what is your favorite type?
  • Such a hard question! I love naan, pita, whole wheat, multigrain, sourdough, French, Italian. It's literally impossible for me to choose just one. I am what you might call a carb-a-holic. My favorite recently is the simple, generic store brand multigrain sandwich bread; tasty and cheap.
C is for Chocolate: What is your favorite kind currently? 
  •  I like the Chocolate Dream bars, which are one of the very few dairy-free chocolates I can find locally. I love them.
D is for Donuts: You might not currently eat them, but what kind do you fancy?
  • I haven't had a donut in ages. But, I have recently been looking at buying a donut pan so I can make my own. My old favorites were nutty donuts, cinnamon-sugar, and the cinnamon twist. Mmm. Yum. I think I need to hurry and get that pan....
E is for Eggs: How would you like yours prepared?
  • I don't eat eggs. Ever. When I used to many years ago, I would get horrific stomach pains and feel sick for hours. I did like omelets back then, despite the pain. I make a mean tofu scramble that tastes like, feels like, and even looks like eggs. It goes ridiculously well with salsa, veggies and served on tortillas, like a breakfast burrito. 
F is for Falafel: Yay or nay?
  • YES!!! I simply CANNOT get enough falafel. Baked, fried, whatever. It's only made with my most favorite legume, the chickpea. There is nothing I don't love about it. I'm pretty sure I could eat it 5 times a week and never tire of it. Here's my recipe for fried falafels.
G is for Groceries: Where do you purchase yours?
  • I primarily get my groceries from a regional store called Meijer, but also hit Kroger when I have coupons. Did you know they double coupons up to $1.00? Wild. So, I do my coupon shopping there. The few health food stores are pretty much cost-prohibitive, so I make do with non-specialty stores.
H: is for Hot Beverages: What is your favorite hot drink?
  • I love Yogi Teas, especially their Immune Support tea. It's herbal and tastes like heaven. I've never been a coffee sort.
I is for Ice Cream: Pick a favorite flavor and add a fun topping.
  • I love the So Delicious ice creams and the Purely Decadent flavors. I especially any sort of minty or cookies and cream ice creams. My fun topping of choice is some Oreos.
J is for Jams or Jellies: Do you eat them? If so, what kind and flavor?
  • I love strawberry basil jam the best. But, it's quite expensive here, so I tend to only buy it on occasion. Instead, I usually stick with a strawberry jam of some sort. I never could stand the orange marmalade or the grape jellies. Icky.
K is for Kashi: Name your favorite Kashi product?
  • I've never found a Kashi product that I liked. Bad vegan, I know. 
L is for Lunch: What was yours today?
  • I made a super yummy sandwich with LightLife turkey deli slices. It involved some soy-free Vegenaise, spicy brown mustard, onions, romaine lettuce and a bit of Daiya cheddar. I scarfed it in about 2 minutes flat. Oink, oink.
M is for microwave: What is your favorite microwave meal/snack?
  • I enjoy an Amy's brand frozen meal occasionally. Otherwise, I don't really use it all that much except to reheat certain leftovers.
N is for nutrients: Do you like carbs, fats, or proteins best?
  • I'm a complete carb lover. But, since legumes are packed full of proteins, I'm learning to love protein a lot more. I can honestly say, though, that I have drastically cut back on my simple carb intake...less bread and a LOT less pasta. Go me!
O is for oil: What kind do you like to use?
  • This is another one of those things that I have greatly reduced lately. When I do use oil, I tend to use olive oil or sesame oil. 
P is for protein: How do you get yours?
  • From pretty much everything I eat. Even veggies have protein...hard to believe, I know. My primary sources are legumes, nuts, veggies, grains, quinao and the occasional bit of soy (tempeh primarily). 
Q is for Quaker: How do you like your oats?
  •  In the occasional granola bar or cookie. I seriously struggle to eat cooked oatmeal. It kind of gags me.
R is for roasting: What is your favorite thing to roast?
  • VEGGIES!! I love roasted cauliflower, potatoes and asparagus the best. 
S is for sandwich: What’s your favorite kind?
  • My favorite is my delicious chickpea sandwich, kind of like a tuna salad sammie, but a million times better (and no mercury!). Second favorite would have to be a tempeh BLT, or TLT, if you will. I have this awesome TLT recipe.
T is for travel: How do you handle eating while traveling?
  •  I can find veg options pretty much anywhere, so I still eat well. A lot of my travel involves family vacations that include a chef uncle...so I have little to worry about there. I find that many fast food places have numerous options, from salads to sandwiches. So, I am never at a loss for food. For roadtripping, I often pack snacks like fruit, nuts, sandwiches and chips. Easy peasy.
U is for unique: What are some of the unique foods that you like?
  • For the non-veg folks, my love of tempeh seems odd and unique, as does my love of Daiya cheese.
  • Brussels sprouts, baby! I love them immensely while many hate them.
  • Ultra-spinachy green smoothies.
  • Popcorn spritzed with Braggs Aminos and sprinkled with nooch (nutritional yeast).
V is for vitamins: What kind do you take?
  • I take a multivitamin and B-12 supplements.
W is for Wiener Schnitzel: Do you ever recreate this traditional Czech food?
  • I can honestly say that I've never eaten wiener schnitzel. I don't even know what it is. Maybe I'll have to look into it.
X is X-RAY: If we xrayed your belly right now, what food would we see?
  • Raspberries. A lot of raspberries. And water.
Y is for Youth: What foods remind you of your childhood?
  • Mashed potatoes
  • Mac and Cheez
  • Spaghetti and lasagna
  • Raspberries (we had a massive raspberry bush in our back yard when I was little)
  • Corn on the cob
Z is for Zucchini: How do you prepare it?
  • Lightly sauteed with some vegan butter, onions, and mushrooms
  • Grilled
  • Raw in salad
  • Roasted in the oven

So, there you have it. That's my ABCs of food!

18 June 2011

The Snarkiest Stuffed Peppers


Until a few days ago, I had never ever eaten a stuffed pepper. So, what, you ask, inspired me to make them? A sale on the colored bell peppers. They were a buck apiece instead of the ridiculous $2.00-3.00 each that they typically are here. I snagged 4 in the desperate hope that I'd find something to do with them. If all else failed, I'd be doing a lot of dipping in hummus. Alas, I got creative and made a very kickass stuffed pepper. I amaze myself sometimes. No, really, I do.

You eat quinoa, right? You better, because it is ridiculously healthy AND tastes really good, especially when paired with toasted almonds as it has a nutty flavor on its own. It has complete protein, fiber and nutrients. Dig it. It has other perks, too, like that fact that you can cook it up faster than brown rice, it's healthier than rice, and you can use it to replace rice in just about any dish. Oh, and did I mention it's really tasty? Don't believe me about quinoa's awesomeness? Read all about it here: Quinoa: An In-Depth Guide, WHFoods: Quinoa, and Livestrong. Or do your own search. You'll find that quinoa has a cult following for good reason: it's awesome. Moving on...

For this dish, I chose not to use green peppers because, although I do like green pepper, I can only handle them in small quantities. Gotta problem? I thought not. I used one red, one orange, and one yellow pepper, all quite large. They were heaping with delicious goodness. And, they helped me get rid of about a cup of cooked beans I had in my fridge. I've been trying extra hard to not waste any foods at all because I paid for it. And I hate wasting money. You should too, because in the US, the largest portion of materials heading to landfills is, get this, FOOD WASTE. Read all about it here: US EPA. Plus, you paid for that food, fucking use it. End rant. It's recipe time.

My recipe makes enough for 3 rather large peppers or 4 smaller ones, all packed to the brim.

Ingredients:
  • 3 large bell peppers, or 4 smaller ones, tops sliced off, and ribs/seeds removed. Lightly slice the very bottoms so they will stand upright without falling, but be careful, otherwise you'll cut too far up and lose your bottom entirely. You want it to still be able to hold the filling!
  • 1/2 cup (slightly heaped) dry quinoa
  • 1 1/2 cups warm water
  • 1 cup raw almonds, chopped to your liking
  • heaping 1/2 cup red onion, chopped
  • 1 cup cooked beans (mine was 2/3 black-eyed peas, 1/3 chickpeas)
  • 4 oz, about half a package of fresh mushrooms
  • 4 cloves garlic, minced
  • 1 tsp olive oil
  • 1 large carrot, grated
  • 1 big handful baby spinach, shredded
  • a few shakes of coriander
  • 1/2 tsp onion powder
  • salt and pepper
Method:
  1. Preheat oven to 375 degrees F. Get a baking dish and lightly spray the bottom with cooking oil. Set aside.
  2. Bring the water to boil in a small pot with a sprinkle of salt. Once boiling, mix in the quinoa, turn the heat to medium-low and cover with a lid. Cook until the water is pretty much all absorbed. This will take about 15-20 minutes depending on how old your quinoa is. It'll probably take longer if its older. You will see the little tails from the seed and the texture will be a little chewy, like brown rice. Meanwhile, get started on the rest of the steps.
  3. Throw your beans and mushrooms into a the food processor and whir until you don't see any whole beans or large mushroom chunks. Put into a large mixing bowl and set aside.
  4. In a small skillet, heat the oil over medium heat. Once hot, add the onion, almonds, garlic and carrot. Cook until the onion is partially translucent. Then add in the spinach to wilt. Should take another 3-5 minutes. Be sure to stir regularly so nothing sticks to the pan. By the time this is done, your quinoa should be ready.
  5. Add the quinoa and the veggies to the mixing bowl with the beans. Mix it all really well and add your spices. Adjust as necessary. 
  6. Use a large spoon to fill the peppers, gently packing it down as you go. Pack those buggers. Then set the peppers right side up in the baking dish. Pour about 1/2 cup water in the bottom of the dish, enough to cover the whole bottom of the dish. Spritz the tops with some cooking spray (keeps foil from sticking to the filling) then cover with foil. Bake about 30-35 minutes, until the peppers are slightly soft to the touch. You need to let them cool some before digging in, duh. I liked mine a little closer to room temperature, but whatever. Enjoy.


17 June 2011

Meg's Fave Marinara Sauce

A few nights ago, I had a most tasty dinner...which you can spy above. The tempeh beanballs were an alteration of the recipe from Appetite for Reduction, which happens to be one of my top 3 favorite cookbooks ever. Totally not joking here. It's amazing.

So anyway, I decided to make the balls (heehee), when I suddenly realized I didn't have a jar of sauce for my spaghetti. Aargh. Silly me. But, I am nothing if not resourceful. Okay, that's an exaggeration. I'm also sarcastic and goofy and junk like that. But, back to the topic at hand: marinara. I made it myself because I was in a total crunch, and I had zero options. Fine, fine, I could have gone to the store, but I refuse to go for only 1 thing. Blah blah blah. I should really just shush and move on to the recipe. Head's up, this is pretty garlicky, just how I like it.

Ingredients:
  • 2- 14oz cans of diced or crushed tomatoes
  • 5 cloves garlic, minced
  • 1 tsp olive oil
  • 1/2 tsp garlic powder
  • 3/4 tsp onion powder
  • 1/4 tsp red pepper flakes
  • 1/4 tsp coriander (optional...I just LOVE coriander)
  • 1/4 to 1/2 tsp dried oregano (I use very little because I don't like it much)
  • dash dried thyme
  • 1/2 tsp dried parsley flakes
  • 1/2 tsp fresh black pepper
  • 1/2 tsp Braggs or soy sauce (optional)
  • about 12 basil leaves, shredded
  • salt to your tastes
Method:
  1. Drain most of the liquid from the cans of tomatoes, then put the tomatoes in a large sauce pan over a medium heat. Add everything else and cook for about 20 minutes, or until the liquid cooks down by at least half. 
  2. If you aren't in favor of chunkier sauce, use an immersion blender to break it down. That's what I did. Though, I have read that you can put it in a blender (be ultra careful as hot things have a tendency to explode in blenders). 
  3. Taste and adjust seasonings. How ridiculously easy was that?

14 June 2011

CLOSED! Winner announced!! - Happy Herbivore Cookbook Giveaway!

This contest is now closed!!!
Thank you to everyone that entered.
The winner is Crys (@Crys_AW) ~ watch your email! You are the lucky entrant chosen by Random.org.

Don't worry, this beat-up copy is mine. You'll get one free of crumbs and stuck-together pages.
I've been toying with the idea of doing a cookbook giveaway for a while now. And I'm truly smitten with 3 cookbooks right now, so it was hell trying to decide which one to do the giveaway for. I decided on The Happy Herbivore cookbook for a couple of reasons.
  • I love that the recipes are all so easy and taste great.
  • Most take less than an hour start to finish.
  • They use everyday ingredients that I can find in my regular grocery store and don't cost me a fortune to buy. I think this one is my most important reason because I hate driving an hour down to WholeFoods for specialty ingredients that end up costing a ton. 
So, here we have it. That's why I love this book so much. And, if you read this blog semi-regularly, you know that I always alter recipes from cookbooks to fit my tastes, and with this book, I alter very little. Mostly, I add more garlic and salt because that's just how I am. Deal with it.

Here are some of my favorite recipes I've made so far in no particular order:
I won't lie. I was skeptical of the French Toast, but it's awesome!
Okay, I can't find red lentils, so I make it was regular ones, and it's still very tasty.
The Mushroom Burgers are my favorite. Best burgers yet.
I do alter the tuna, adding sunflower seeds, but it is a lunch staple for me.
The Baked Shells and Cheese is pretty tasty, I added spicy mustard and more garlic.
I can't resist the Cinnamon-Sugar Tortilla Chips. Too much tastiness.
Oh, wait, maybe this Cheater pad Thai is my most favorite. Eek, I can't decide!

Up for grabs is 1 brand spanking new copy of The Happy Herbivore Cookbook, provided by yours truly. I guarantee it will be free of crumbs and miscellanous splatters. I can only do shipping to US and Canada at this time because it is just too damn expensive to send anywhere else. I'm sure you understand. And if you don't, well, that's just too bad, my friends. Please click on this link to
ENTER THE GIVEAWAY

Leaving a comment here is appreciated, just to let me know why you want this book and to let me know that you entered. A winner will be drawn sometime on June 17th, 2011. Please, NO ENTRIES on that day. Good luck!!

09 June 2011

Cookbook Giveaway Heads-Up!

 Don't worry, this is my copy, you'll get a fresh one.

I just wanted to let you lovely readers know that I am giving away a brand new copy of The Happy Herbivore Cookbook on this blog. It's hosted and provided by me, The Snarky Chickpea, herself. I can only ship to US and Canada because I am not rich. No, really, I'm not. The giveaway starts tonight at midnight and goes through Thursday, June 16th at midnight Eastern time. I'll draw the winner randomly at some point during the 17th. If you're the winner, you have 48 hours to respond to my email. If you don't, I will draw another winner. It's that easy. Just watch the blog and follow the link to enter.

I have been using the shit outta my copy lately and I wanted to share the Herbie love with all of you. You don't have to be a follower of my blog to win, though I'd love to have you. Feel free to pass along a link to my blog to your friends...or not. Whatever floats your boat. So, come on back tonight at midnight or anytime over the next week and enter. Please only enter once. Greed is not a virtue. Let everyone have a chance, please.

Good luck and I hope you win!


04 June 2011

Meg's Garden Update #2

I am so proud of my little garden! I never thought I'd love it so much. And, today, it showed me how much it loves me, too. It let me harvest a large handful of fat and tasty peapods which I added right into Happy Herbivore's Cheater Pad Thai I was cooking for dinner, which was an instant hit! LOVE IT!!! Check it out:


And now on to the gardening updates!

My first harvest! They were magnificent. You can't beat home-grown produce.

More peas. To the left are some onions.

Tomato plant- staked and blooming :)

Staked tomato plants!

Jalapenos

L to R: romaine lettuce, bell peppers, tomato. Bottom- strawberries

Top: Allium 
L to R: Broccoli, Brussels sprouts, romaine lettuce, bell peppers and strawberries

Garlic and Peas

Peapods pre-harvest

Brussels sprouts

My first broccoli!!!

So, there it is. Dig it. Gardening rocks. (And so does the Happy Herbivore Cookbook.) I'm thinking of doing a giveaway of her book because I am absolutely smitten with it. What do you guys think?


01 June 2011

Review: Happy Herbivore's Mushroom Burgers

I have a confession...
I've fallen in love with two cookbooks. I have barely been making my own dishes lately as I'm completely smitten with these recipes. My most recent cookbook love is The Happy Herbivore Cookbook by Lindsay Nixon (aka- The Happy Herbivore, herself). Today's dinner was the clincher: HH's Mushroom Burgers (page 89 of the cookbook). WOW. They are absolutely, hands-down my favorite veggie burger EVER. You think I'm kidding? Well, my friends, you are sadly mistaken. I can't describe their glory. I never, ever eat 2 burgers in one sitting, but I did tonight. I couldn't resist; I'm weak against their power.

As always, I never follow recipes 100%, but I came pretty close with this one. The changes I made to the original recipe:
  • I used white button mushrooms instead of creminis.
  • Used 2 cloves minced garlic instead of garlic powder.
  • I added about 1/3 tsp liquid smoke.
  • Used freshly soaked & cooked kidney beans instead of canned.
The burgers held their shape really well, which doesn't always happen with homemade veggie burgers. I baked mine, per HH's instructions, and they got a nice crispness around the outer edges yet still stayed moist inside. Another magical feat that most veggie burgers can't accomplish. The addition of the BBQ sauce and steak sauce really gave the burgers a lovely depth of flavor. I was actually a little wary of using mushrooms in a burger, thinking it would just make it mushy and taste too much like mushrooms. Don't get me wrong, I LOVE mushrooms a lot, but I don't want a burger to taste like a giant mushroom. I wouldn't have ever guessed there were mushrooms in the burgers if I hadn't made them myself. And, to top it all off, they were SO easy to make. I can't recommend them enough.

I could really go on and on about the burgers, but I'd rather you just made them yourself! I made some baked sweet potato fries to go with mine. And they make a magnificent combo, if I do say so myself. So, the moral of the story: Make the burgers. You won't be disappointed. Or, maybe you will be...but that's only because you're insane.